Python Asynchronous model
- Asynchronous Programming 异步编程简介
- Mastering Concurrency in Python
Asynchronous Programming 异步编程简介
Python Asynchronous model
Asncyhronous or concurrency 解決了什麼問題呢?
- 追根究底就是消除等待。
- concurrency 主要拿來跟 parallellism 比較,
- 拿做菜為例子,
- concurrency 談的其實就是能夠在同一時間完成很多事情, 就算只有一個廚師,他還是可以在同時間完成切菜,準備醬料,煮菜等等工作,他會在中間切換來切換去,而不會等到一盤菜好了,再去準備接下來的事情,
- 而 Parallellism 比較像是同時有很多 worker 做差不多事情。
一般寫的程式,其實大部分都在處理這種問題
- 像是 GUI 程式,使用者按了一個 button 後,你不可能完全卡在那邊等待其他的程式跑完,又像是你的 API server 經由網路呼叫一個 3rd party 的外部程式,如果你在那邊傻傻的等,是不是浪費了很多 CPU resource。
- 可以直接用 thread 去操作,避免掉 main process 被卡住的情況,而其實 thread 也算是一種 aysnchronous programming 的 model,而且現今的程式語言也有更好語法去使用它們,像是用 Future or Promise。
在瞭解完要解決什麼問題後,需要知道的是不同解法之間的差異
- 寫 javascript 或是 python,所以在 asynchronous flow 上面比較多著墨 callback, eventloop, coroutine 還有最後衍生出來的 async/await,
- 而 javascript 天生就使用一個 thread 去達成 concurrency
- 補充一些 linux IO 的知識,像是 blocking IO/non-blocking IO 的差別,最後導出 IO multiplexing 才能講得下去 event loop 怎麼實作的,
- nginx 之類的 service 就是利用了 IO multiplexing 才有效的解決 C10K 的問題,
使用一個 thread 處理 network IO 請求,其實就減少了增減 thread 的開銷,memory 的使用量也大減,但取而代之的就是,程式會有點難寫難讀,所以就有了 libev, libevent, libuv 這類 library 幫忙處理 asynchronous IO 這部分,使用這類的 lib,上層 program 很簡單就可以使用 callback function 與之互動,等到 socket 的 file descriptor 被 trigger 時再去呼叫 callback 繼續處理下去。
在有了 callback 後,世界並不是就太平了,很快就有人發現可以寫出 callback hell 這種程式,asynchronous progrmamming (主要談 callback) 到這邊就變成語法的改進了,希望能夠把程式寫得更漂亮更易讀一點,所以就有了 promise 或是 coroutine 的方法與其結合,在 coroutine 中會把控制權從 function 中切換回 main task 中,某種程度跟 eventloop 就很相似,所以可以利用 coroutine 的特性加上 non-blocking I/O 成為更好的框架,而程式也會變得像是 synchronous 的樣子,不過要注意一但有程式是 blocking IO 或是 cpu intensive 的任務,就會把這個 thread 卡住,最後提到的 async/await 只不過是語法的變形,其實跟 coroutine 的概念是很相似的,可以讓整個程式更好寫易讀,然後背後又能高效率的處理 IO bound 問題。
- 其實這些方法都是為了解決一些任務太慢而產生的,在我們當使用者的時候(caller),實際上也許不知道背後這些 async module 是如何運作的,除非是自己要一手從下到上包辦,但還是有些點需要注意,如果這類程式只是處理 networking IO 的話,應該是不會有太大的問題,但如果中間有個 cpu intensive 的任務最好還是要能 fork 出 process/thread 去處理,或是利用 queue 丟給其他的 worker 去處理,所以一旦我們清楚這些架構後,才能知道採取哪種方式處理問題是比較好的。
Mastering Concurrency in Python
“Who this book is for” If you’re a developer familiar who’s and you Python who want to learn to build high-performance applications that scale by leveraging single-core, multi-core, or distributed concurrency, then this book is for you.”
- 此文首先介绍了线程的基本概念及其和进程的关系
- 再介绍了如何使用Python的threading模块,包括启动线程、同步线程、线程锁、线程优先级&队列等案例。
01. 并发 Concurrency
《Fluent Python》关于Class/Object的读书笔记:
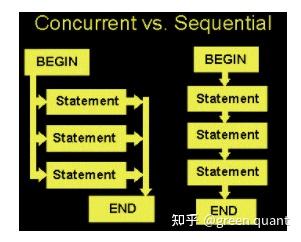
并发与顺序 Concurrent vs Sequential
并发编程的相对优势: 节约执行的时间 。
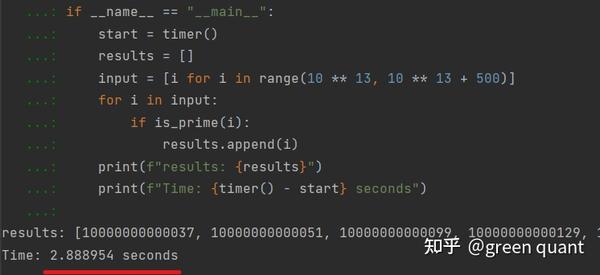
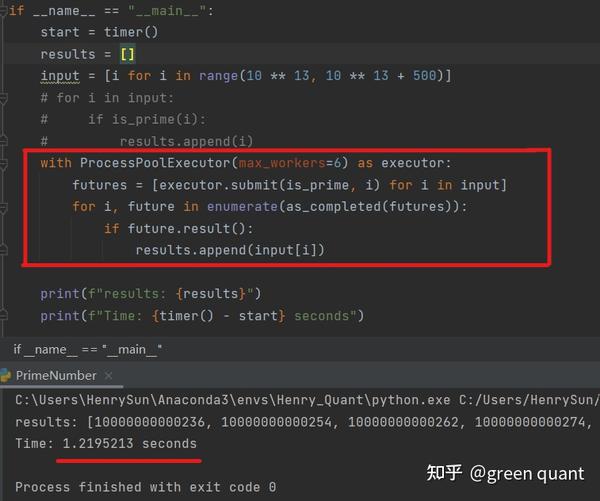
测试并发编程带来的速度提升
一个简单的判断 质数 的程序:
1
2
3
4
5
6
7
8
9
10
def is_prime(x):
    if x < 2 or x % 2 == 0:
        return False
    if x == 2:
        return True
    limit = int(sqrt(x)) + 1
    for i in range(3, limit, 2):
        if x % i == 0:
            return False
    return True
Sequential Programming
Concurrent Programming
并发与并行 Concurrency vs Parallelism
区别:是否共享了一定的资源( shared resource )?
- 上面的图:并行
- 下面的图:并发
- 并行是各个路毫无影响,并发则因为共享资源的存在,会出现一条路等待另一条路的情况,比如 等红绿灯 。
并发的问题
无序
再来看一眼刚刚执行的两个结果。可以发现,通过并发实现的结果List, 并不是按照大小顺序排列的 。这也使得一些 inherit sequential 问题难以使用并发解决,比如经典的 牛顿迭代法 。
I/O Bound
简单来讲,I/O Bound是指, 喂到系统中的数据的速度<系统处理/消耗数据的速度 。那么,在这种情况下,整个程序耗费时间主要由输入/输出(Input/Output)决定,并发编程就没法起到提速的效果。
02. Amdahl’s Law
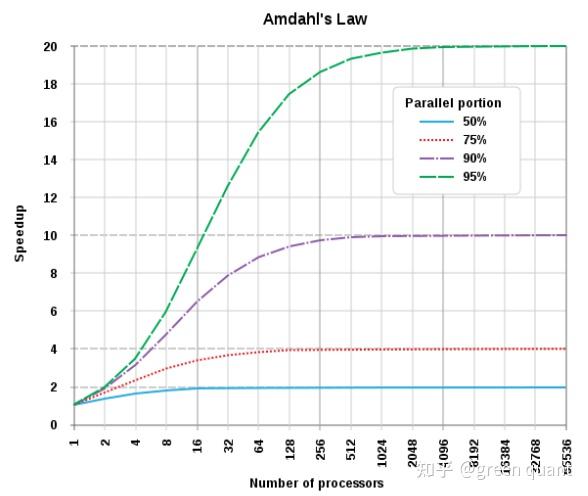
Amdahl’s Law:作用
分析了提升背后的简单原理,以及速度提升的极限,重点分析了内在顺序性的影响。
从数学角度分析, 增加processor的数量 ,能提升多少的 执行速度 。
说明 :此法则用于并行编程 parallel,对于并发Concurrency起到估计、启发的作用。
对于同一个程序,使用N个processors的执行时间是仅使用1个的1/N。但是, 绝大多数的程序是没法100%并行的 ,因为程序中的部分代码之间有内在的顺序性。
Amdahl’s Law:公式
- 定义:
- $B$ :程序中存在顺序性的比例。
- $T(j)$ :使用 j 个processors所需要用的时间
对于程序中存在 内在顺序性 的部分所需要的时间为: $B * T(1)$
对于 内在顺序性(inherently sequential) ,使用多个processors和1个processor的时间是一样的。
所以,对于程序中 可以并行 的部分,再使用1个processor的情况下,需要的时间为: $(1-B) * T(1)$
那么,如果使用了N个processors,这部分的时间就可以变为其的1/N。
最后,定义并行所带来的速度提升( speedup ):
- $S_{j}=\frac{T( 1)}{T( j)} =\frac{T( 1)} { B * T( 1) + \frac{( 1-B) * T( 1)}{j} } = \frac{1}{B+\frac{1-B}{j}}$
Amdahl’s Law:提升极限
- 对此法则的最后结果做简单的极限分析,可以得到:
$\lim_{j \rightarrow +\infty}{S_{j}}=\frac{1}{B}$
- 所以,在一个程序中,内在顺序性的部分占比越大,增加processors的数量所带来的速度提升的效果越差。
多线程 - Python thrading 模块
03. 线程 - Python thrading
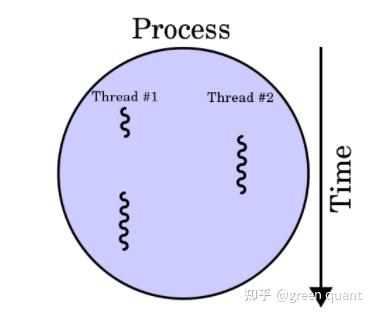
thread, 操作系统能够进行运算调度的 最小 单位
线程(thread) 是 进程(process) 的组成部分:
一个进程可以包含多个线程
这些线程可以同时执行,也允许共享资源,比如内存和数据
Multithreading/多线程
- 在一个进程中,运行多个线程 -> Python -> import threading
1
2
3
4
5
6
7
8
9
10
11
12
13
14
15
16
17
18
19
20
21
22
23
24
25
26
27
28
29
import threading
import time

def func(name, delay):
    counter = 5
    while counter:
        time.sleep(delay)
        print(f "Thread{name} counting dowm:{counter} ...")
        counter -= 1

class MyThread(threading.Thread):
    def __init__(self, name, delay):
        threading.Thread.__init__(self)
        self.name = name
        self.delay = delay

    def run(self) -> None:
        print(f "Start thread:{self.name} ")
        func(self.name, self.delay)
        print(f "End thread:{self.name} ")

if __name__ == "__main__":
    thread1 = MyThread("AAA", 0.5)
    thread2 = MyThread("BBB", 1)
    thread1.start()
    thread2.start()
    thread1.join()
    thread2.join()
    print("Finished.")
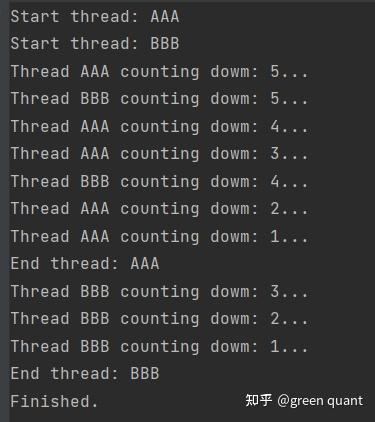
运行结果:
- 其中,MyThread继承了threading包中的Thread这个类,
- 一是增加了name和delay2个初始化参数,
- 二是overirde了run方法(也就是print了一些东西,加上使用了func这个倒数计数的函数)。
可以看到,2个thread同时在运行着。
threading模块
3.1 一些基本功能
threading的方法
| import | function | 功能 |
|---|---|---|
| import threading | threading.active_count() | 当前程序中活跃的线程数量 |
| - | threading.current_thread() | 返回当前的Thread这个Object |
| - | threading.enumerate() | 返回当前活跃的所有线程组成的list |
3.2 启动线程
对于threading包中的线程的使用,一般来说有3个步骤:
- Step1: 继承threading.Thread
1
class MyThread(threading.Thread)
- Step2: Override
___init__(self, xxx, xxx)
1
2
def __init__(self, name, delay):
    threading.Thread.__init__(self)
- Step3: Override
run(self, xxx, xxx) -> None- 这里的
-> None是Python的Type Hint,仅仅在IDE等里面进行类型提示,并不在runtime中产生作用】
- 这里的
1
def run(self) -> None:
- 定义好 MyThread 这个类之后,将使用 start() 和 join() 2个方法,启动线程。
1
2
3
4
5
6
7
8
9
my_input = [1, 2, 3, 4, ....]  # list
threads = []  # list

for x in my_input:
    temp_thread = MyThread(x)
    temp_thread.start()  # 启动线程,调用run()方法
    threads.append(temp_thread)
for thread in threads:
    thread.join()  # 优先让该线程的调用者使用 CPU 资源
3.3 同步线程(Synchronizing threads)
主要目的:
- 防止共享数据产生错误, avoid data conflicts & discrepancies
- 因为不同线程在并发中是共享数据的, 所以,可以通过同步线程,来设定不同线程访问 某部分资源(critical section) 的先后顺序。
方法:
- 使用“锁”,即 threading.Lock 这个类,主要的功能有:
- threading.Lock():初始化这个类
- acquire(blocking):
- blocking=False -> 不需要先后
- blocking=True -> 需要先后
- release():释放这个锁
例子: 改变上述的倒数程序
1
2
3
4
5
6
7
8
9
10
11
12
13
14
15
16
17
18
19
20
21
22
23
24
25
26
27
28
29
30
31
32
33
34
35
36
37
38
# Synchronizing
import threading
import time

def func(name, delay):
    counter = 5
    while counter:
        time.sleep(delay)
        print(f "Thread{name} counting dowm:{counter} ...")
        counter -= 1

class MyThread(threading.Thread):
    def __init__(self, name, delay):
        threading.Thread.__init__(self)
        self.name = name
        self.delay = delay

    def run(self) -> None:
        print(f "Start thread:{self.name} ")
        thread_lock.acquire(blocking = True)
        func(self.name, self.delay)
        thread_lock.release()
        print(f "End thread:{self.name} ")

if __name__ == "__main__":
    thread_lock = threading.Lock()

    thread1 = MyThread("AAA", 0.5)
    thread2 = MyThread("BBB", 1)
    thread1.start()
    thread2.start()
    thread1.join()
    thread2.join()

    print(f "threading.active_count() -> {threading.active_count()}")
    print(f "threading.currentThread() -> {threading.current_thread()}")
    print(f "threading.enumerate() -> {threading.enumerate()}")
    print("Finished.")
运行结果,就编程了线程AAA执行完毕后,线程BBB才开始执行,因为我们使用了 thread_lock.acquire(blocking=True)
3.4 线程优先级队列 Multithreaded Priority Queue
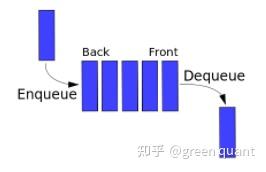
数据结构-队列:
- FIFO,firt-in-first-out
Python的queue模块 -> queue.Queue class
get(): 返回队列最前面的元素,并从队列中移除这个元素
put(): 把一个新元素加到队列末尾
qsize(): 返回队列的长度
empty(): 返回bool,判断队列是否为空
full(): 返回bool,判断队列是否满了
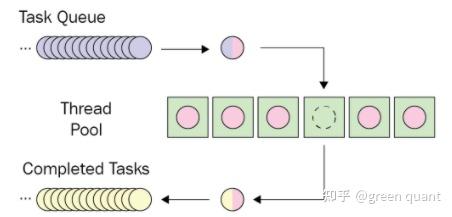
队列与并发编程:希望使用固定数量的线程 -> thread pool
例子:
1
2
3
4
5
6
7
8
9
10
11
12
13
14
15
16
17
18
19
20
21
22
23
24
25
26
27
28
29
30
31
32
33
34
35
36
37
38
39
40
41
42
43
44
45
46
47
48
49
50
51
import queue
import threading
import time

def print_factors(x):
    result_string = 'Positive factors of %i are: ' % x
    for i in range(1, x + 1):
        if x % i == 0:
            result_string += str(i) + ' '
            result_string += '\n' + '_' * 20
            print(result_string)

def process_queue():
    while True:
        try:
            x = my_queue.get(block=False)
        except queue.Empty:
            return
        else:
            print_factors(x)
        time.sleep(1)

class MyThread(threading.Thread):
    def __init__(self, name):
        threading.Thread.__init__(self)
        self.name = name

    def run(self):
        print('Starting thread %s.' % self.name)
        process_queue()
        print('Exiting thread %s.' % self.name)

if __name__ == "__main__":
    input_ = [1, 10, 4, 3]
    # 初始化queue,并将input放入queue
    my_queue = queue.Queue(maxsize=len(input_))
    for x in input_:
        my_queue.put(x)

    # 初始化线程
    thread1 = MyThread('A')
    thread2 = MyThread('B')
    thread3 = MyThread('C')
    # 启动线程
    thread1.start()
    thread2.start()
    thread3.start()
    thread1.join()
    thread2.join()
    thread3.join()
    print('Done.')
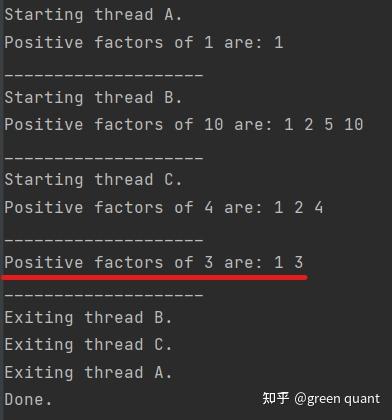
运行结果:
- input的处理顺序按照FIFO规则
- 线程池/thread pool的大小是3
- 在处理最后一个input的时候,没有新的线程启动,可以很好猜测到,是线程A的第一个任务执行完了,便把最后一个input纳入进行处理。所以,最后线程结束的顺序编程了 B -> C -> A
最后需要说明,当前queue的处理优先级为FIFO,当然,也可以对queue中的每一个input添加一个其本身的 优先级(score) ,那么处理优先级则基于这个score的大小,从而变成了 priority queue .
04. 线程 - with语句
- 关于Python的 with 语句的内在逻辑
- 以及如何和 threading 中的 Lock 类进行搭配使用,以防止 deadlock 的出现。
with语句作为上下文管理器(Context Manager)
- with可以对程序中的某些变量进行清除(cleanup)
- with定义了变量的作用域(scope)
- with的用法:
1
2
3
4
5
6
7
8
9
10
11
12
# 一
> with [expression] (as [target]):
>   [code]

# 二
> with [expression1] as [target1], [expression2] as [target2]:
>   [code]

# 等价于:
> with [expression1] as [target1]:
> with [expression2] as [target2]:
>   [code]
例子:
1
2
3
4
5
6
7
8
9
10
11
12
13
class Sample:
    def __init__(self):
        print("__init__")
    def __enter__(self):
        print("__enter__")
    def __exit__(self,exc_type,exc_val,exc_tb):
        print("__exit__")

if __name__ == "__main__":
    with Sample() as sample:
        print("--------------------Inside--------------------")
    print("--------------------Outside--------------------")
    print(f"f={sample}")
运行结果:
- 可以看到:
- -> with首先会去initialize后面的
[expression],即 Sample()- 调用 __init__ ,所以是 print(“__init__“)
- 其次会去调用 __enter__ 方法,即 print(“enter”)
- -> 接下来,进入
,后面的[code],即print("--------------------Inside--------------------") - ->
[code]运行结束后,调用 __exit__ 方法,即print("__exit__")
with语句与threading.Lock
这个点主要是讲如果出现deadlock的情况,比如:
1
2
3
4
5
6
7
from threading import Lock
my_lock = Lock()
def get_data_from_file_v1(filename):
    my_lock.acquire()
    with open(filename, 'r') as f:
        data.append(f.read())
    my_lock.release()
如果,filename是一个不存在的路径,那么,my_lock将永远不被释放,形成deadlock,程序不能继续进行。
解决办法就是采用with语句:
1
2
3
def get_data_from_file_v2(filename):
    with my_lock, open(filename, 'r') as f:
        data.append(f.read())
综上所述,with语句一方面可以帮助程序cleanup,一方面可以去处理一些错误(如threading.Lock),甚至还可以提高程序的可读性,比如最后这个代码块。
05. 案例:线程 - 网络爬虫
如何将多线程应用到网络爬虫当中
1 网络爬虫基础
1.1 HTML
- HTML, Hypertext Markup Language , 是开发网页和网页应用的标准语言之一。
- HTML中, 文本由tags包围和分割, 如
<p>, <img>, <i>等
1.2 HTTP请求/ HTTP Requests
- 客户/浏览器 是HTTP请求的发出者, 被访问的网站 是HTTP请求的接收者, 并在一定条件下, 对客户发出HTTP的相应信息。
- 请求的主要模式包括:
GET, POST, PUT, HEAD, DELET等- 其中, GET和POST是最主要的方式。
- GET就是 单纯 从服务器中 拿 一个数据,
- POST则是把一个数据 添加至 服务器的 数据库 中。
- 简单例子就是, 在金融的程序化交易中 , 如果我们想从交易所 取得行情信息 , 那么需要发出 GET 类型的请求, 如果我们希望向交易所 下单 , 那么需要发出 POST 类型的请求。
1.3 HTTP的状态码/ Status Code
主要分为5大类:
| HTTP Status Code | 含义 |
|---|---|
| 1xx(100, 102, …) | 服务器已经接受了HTTP请求, 并正在处理 |
| 2xx(200, 202, …) | 服务器成功收到并处理了HTTP请求 |
| 3xx(300, 301, …) | 用户需要额外的请求, 才能正确处理该HTTP请求 |
| 4xx(400, 404, …) | 报错:用户的问题 |
| 5xx(500, 504, …) | 报错:服务器的问题 |
2 Python的request模块
用request模块向Bing发出HTTP请求。
1
2
3
4
5
import requests
url = "https://www.bing.com/?mkt=zh-CN"
res = requests.get(url)
print(res.status_code)
print(res.headers)
request模块:
- requests.get(url) 代表用户向Bing发送了一个 GET 请求
- 返回的HTTP状态码是200, 说明HTTP请求成功
- 返回的header里面有更加详细的信息, 将此Dict转换为Pandas的DataFrame可以更好的阅读:
3 使用多线程进行HTTP请求
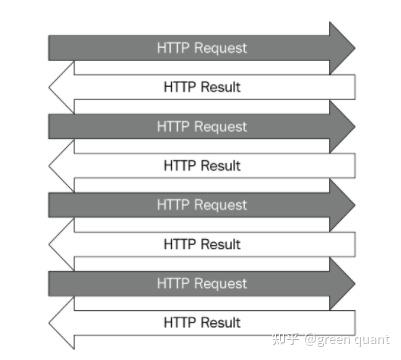
- 每一个HTTP请求, 一般来讲, 是相互独立的。
- 尝试用多线程来加快多个HTTP请求的速度。
通过继承之前提及的threading模块中的Thread类, 来编写符合需求的Class。
1
2
3
4
5
6
7
8
9
10
11
12
13
import threading
import requests
import time

class MyThread(threading.Thread):
    def __init__(self, url):
        super().__init__()
        self.url = url
        self.result = None

    def run(self):
        res = requests.get(url=self.url)
        self.result = f"{self.url}:{res.text}"
- 其中, run 这个方法是进行override。
使用线程的基本操作模式
- 先基于所有的input来instantiate这个MyThread类
- 接着依次对每一个实例进行 start 和 join 。
1
2
3
4
5
6
7
8
9
10
11
12
13
14
15
16
17
18
19
20
21
if __name__ == "__main__":
    urls = [
        'http://httpstat.us/200',
        'http://httpstat.us/400',
        'http://httpstat.us/404',
        'http://httpstat.us/408',
        'http://httpstat.us/500',
        'http://httpstat.us/524'
    ]
    start = time.time()
    threads = [MyThread(url) for url in urls]

    for thread in threads:
        thread.start()
    for thread in threads:
        thread.join()
    for thread in threads:
        print(thread.result)

    print(f'Took {time.time() - start : .2f} seconds')
    print('Done.')
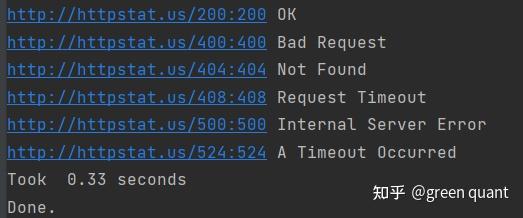
- 其实将多线程用在网络爬虫中, 主要的操作模式是和其他方面的应用没有区别的, 依旧是先自定义一个Thread的类型, 再把需要process的函数(如果爬虫)应用到该class的run方法中来。
多进程 - Python multiprocessing模块
06. 进程 - multiprocessing模块
07. 进程 - Reduction Operator
Mastering Concurrency in Python
此文首先介绍了线程的基本概念及其和进程的关系,再介绍了如何使用Python的threading模块,包括启动线程、同步线程、线程锁、线程优先级&队列等案例。
两种常见的编程模式:多线程 Multithreading 和多进程 Multiprocessing 的介绍均告一段落:
- 多线程 & Python thrading模块
- 多进程 & Python multiprocessing模块
接下来的几节开始介绍一种新的编程模式:异步编程 / Asynchronous Programming。
这也是并发编程的重要组成部分之一,对于 量化交易系统 而言也是非常重要的。
基本介绍可以参照Wiki: Asynchrony (computer programming)
异步编程:概念
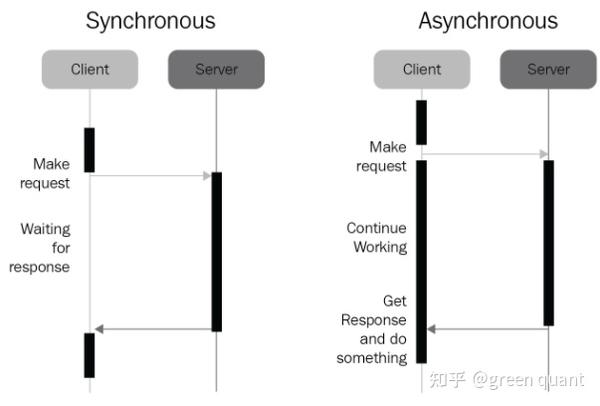
(1)目的: 协调 一个应用中的不同任务的执行顺序,决定在什么时间应该从一个任务 切换 到另一个任务,以及如何在同一段时间内完成 更多 的任务。
(2)异步编程的最大特点之一:任务之间的来回切换 / Task-Swithing Nature
ref: 《Mastering Concurrency in Python》
(3)异步编程的最大使用场景之一就是基于HTTP的网络编程,可以在等待HTTP response的期间去完成其他的任务。当然,凡是涉及到 大数据量处理 的场景,异步编程均可以有效提升程序的效率,这可能也是在 量化多模型训练 计算中可以尝试使用的。
(4)异步编程与多线程、多进程的最主要区别:异步编程只会用到 1个进程、1个线程 ,关键在于基于这1个线程和1个进程来进行 任务之间的来回切换 。所以,异步编程与系统CPU的核的数量 无关 。这也是一个能够结合multiprocessing和asynchronous的角度。
(5)异步编程和小学“奥数”里面的“如何让N头牛更快地过河”、“如何安排家务花的总时间最少”的思想是非常类似的。
异步编程:Python asyncio模块基本用法
1
`import asyncio from math import sqrt async def is_prime ( x ): print ( 'Processing %i ...' % x ) if x < 2 : print ( ' %i is not a prime number.' % x ) elif x == 2 : print ( ' %i is a prime number.' % x ) elif x % 2 == 0 : print ( ' %i is not a prime number.' % x ) else : limit = int ( sqrt ( x )) + 1 for i in range ( 3 , limit , 2 ): if x % i == 0 : print ( ' %i is not a prime number.' % x ) return elif i % 100000 == 1 : # print('Here!') await asyncio . sleep ( 0 ) print ( ' %i is a prime number.' % x ) async def main (): task1 = loop . create_task ( is_prime ( 9637529763296797 )) task2 = loop . create_task ( is_prime ( 427920331 )) task3 = loop . create_task ( is_prime ( 157 )) await asyncio . wait ([ task1 , task2 , task3 ]) if __name__ == "__main__" : try : loop = asyncio . get_event_loop () loop . run_until_complete ( main ()) except Exception as e : print ( str ( e )) finally : loop . close ()`
运行结果
asyncio模块
可以看到:
(1)在定义函数的时候,需要在 def 前面加上 async
(2)需要定义一个 main 函数,里面添加上条用 async def 函数的任务,并且完成 await 语句
(3)在具体执行的时候,先创建 asyncio.get_event_loop() 对象,再调用 run_until_complete 方法去运行 main 函数,最后 close 掉该对象
(3)从运行结果可以看到,第一个任务的计算量非常大,程序在等待其执行期间,去完成成了第二个与第三个任务
编辑于 2022-02-26 16:23
.css-ch8ocw { position: relative; display: inline-block; height: 30px; padding: 0 12px; font-size: 14px; line-height: 30px; color: #1772F6; vertical-align: top; border-radius: 100px; background: rgba(23, 114, 246, 0.1); } .css-ch8ocw:hover { background-color: rgba(23, 114, 246, 0.15); }
赞同 1 添加评论
分享
喜欢 收藏 申请转载
.






Comments powered by Disqus.