Virtulization - Google Kubernetes
- Virtulization - Kubernetes
- 快速上手
Virtulization - Kubernetes

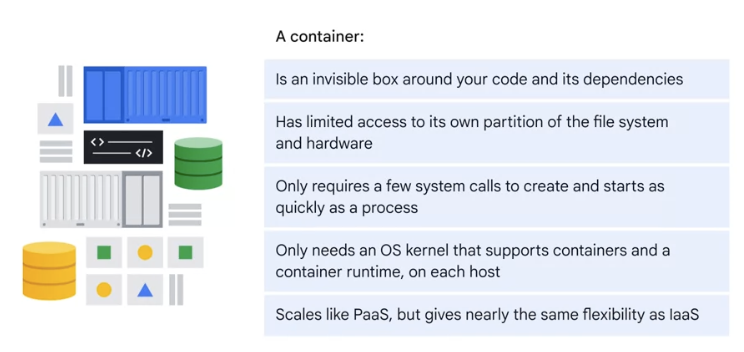
container:

Basic
open source container orchestration tool
- help to manage containerized application in different deployment environment (physical, virtual, cloud)
Google 团队发起并维护的基于 Docker 的开源容器集群管理系统,
目标是管理跨多个主机的容器, 提供基本的部署, 维护以及运用伸缩, 主要实现语言为 Go 语言
它不仅支持常见的云平台, 而且支持内部数据中心。
- 易学:轻量级, 简单, 容易理解
- 便携:支持公有云, 私有云, 混合云, 以及多种云平台
- 可拓展:模块化, 可插拔, 支持钩子, 可任意组合
- 自修复:自动重调度, 自动重启, 自动复制
- 建于 Docker 之上的 Kubernetes 可以构建一个容器的调度服务, 其目的是让用户透过 Kubernetes 集群来进行云端容器集群的管理, 而无需用户进行复杂的设置工作。
- 系统会自动选取合适的工作 Node 来执行具体的容器集群调度处理工作。
- 其核心概念是 Container Pod。
- 一个 Pod 由一组工作于同一物理工作 Node 的容器构成。
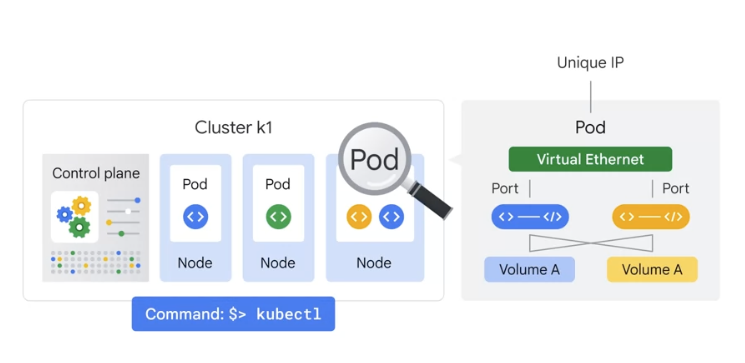
- 这些组容器拥有相同的网络命名空间、IP 以及存储配额, 也可以根据实际情况对每一个 Pod 进行端口映射。
- 此外, Kubernetes 工作 Node 会由主系统进行管理, Node 包含了能够运行 Docker 容器所用到的服务。
need of container orchestration tool
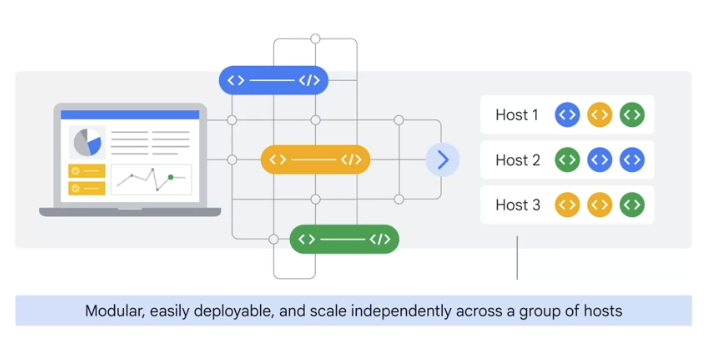
trend from Monolith to Microservices
increased usage of microservices
- proper way to manage it
- High Availability - no down time
- scalability or high performance - high response rate
- Disaster recovery - backup and restore
It makes it easy to orchestrate many containers on many hosts, scale them as microservices, and easily deploy, rollouts, and rollbacks.
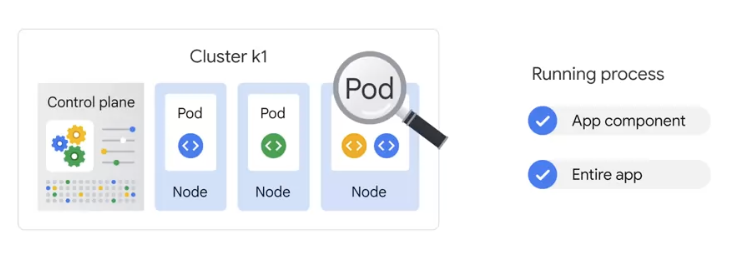
Kubernetes is a set of APIs that you can use to deploy containers on a set of nodes called a cluster.
- The system is divided into a set of primary components that run as the control plane, and a set of nodes that run containers.
快速上手
Kubernetes 支持在多种环境下的安装, 包括本地主机(Fedora)、云服务(Google GAE、AWS 等)。
- 然而最快速体验 Kubernetes 的方式显然是本地通过 Docker 的方式来启动相关进程。
在单 Node 使用 Docker 快速部署一套 Kubernetes 的拓扑。

Kubernetes 依赖 Etcd 服务来维护所有主 Node 的状态。
1
2
3
4
5
6
7
8
9
10
11
12
13
14
15
16
17
18
19
20
21
22
23
24
25
26
27
28
29
30
31
32
33
34
35
36
37
38
39
40
41
42
43
44
45
46
47
48
49
50
51
52
53
54
55
56
57
58
59
60
61
62
63
64
65
66
67
68
69
70
71
72
73
74
# 启动 Etcd 服务。
$ docker run --net=host -d \
         gcr.io/google_containers/etcd:2.0.9 /usr/local/bin/etcd \
         --addr=127.0.0.1:4001 \
         --bind-addr=0.0.0.0:4001 \
         --data-dir=/var/etcd/data


# 启动主Node
# 启动 kubelet。
$ docker run --net=host -d -v /var/run/docker.sock:/var/run/docker.sock \
         gcr.io/google_containers/hyperkube:v0.17.0 /hyperkube kubelet --api_servers=https://localhost:8080 --v=2 --address=0.0.0.0 \
         --enable_server \
         --hostname_override=127.0.0.1 \
         --config=/etc/kubernetes/manifests


# 启动服务代理
$ docker run -d --net=host --privileged
         gcr.io/google_containers/hyperkube:v0.17.0 /hyperkube proxy --master=https://127.0.0.1:8080 --v=2


# 测试状态
# 在本地访问 8080 端口, 可以获取到如下的结果:

$ curl 127.0.0.1:8080
{
  "paths": [
    "/api",
    "/api/v1beta1",
    "/api/v1beta2",
    "/api/v1beta3",
    "/healthz",
    "/healthz/ping",
    "/logs/",
    "/metrics",
    "/static/",
    "/swagger-ui/",
    "/swaggerapi/",
    "/validate",
    "/version"
  ]
}


# 查看服务
# 所有服务启动后, 查看本地实际运行的 Docker 容器, 有如下几个。
CONTAINER ID        IMAGE                                        COMMAND                CREATED             STATUS              PORTS               NAMES
ee054db2516c        gcr.io/google_containers/hyperkube:v0.17.0   "/hyperkube schedule   2 days ago          Up 1 days                               k8s_scheduler.509f29c9_k8s-master-127.0.0.1_default_9941e5170b4365bd4aa91f122ba0c061_e97037f5
3b0f28de07a2        gcr.io/google_containers/hyperkube:v0.17.0   "/hyperkube apiserve   2 days ago          Up 1 days                               k8s_apiserver.245e44fa_k8s-master-127.0.0.1_default_9941e5170b4365bd4aa91f122ba0c061_6ab5c23d
2eaa44ecdd8e        gcr.io/google_containers/hyperkube:v0.17.0   "/hyperkube control   2 days ago          Up 1 days                               k8s_controller-manager.33f83d43_k8s-master-127.0.0.1_default_9941e5170b4365bd4aa91f122ba0c061_1a60106f
30aa7163cbef        gcr.io/google_containers/hyperkube:v0.17.0   "/hyperkube proxy --   2 days ago          Up 1 days                               jolly_davinci
a2f282976d91        gcr.io/google_containers/pause:0.8.0         "/pause"               2 days ago          Up 2 days                               k8s_POD.e4cc795_k8s-master-127.0.0.1_default_9941e5170b4365bd4aa91f122ba0c061_e8085b1f
c060c52acc36        gcr.io/google_containers/hyperkube:v0.17.0   "/hyperkube kubelet    2 days ago          Up 1 days                               serene_nobel
cc3cd263c581        gcr.io/google_containers/etcd:2.0.9          "/usr/local/bin/etcd   2 days ago          Up 1 days                               happy_turing

# 这些服务大概分为三类:主Node 服务、工作Node 服务和其它服务。

# 主Node 服务
# apiserver 是整个系统的对外接口, 提供 RESTful 方式供客户端和其它组件调用;

# scheduler 负责对资源进行调度, 分配某个 pod 到某个Node 上;

# controller-manager 负责管理控制器, 包括 endpoint-controller(刷新服务和 pod 的关联信息)和 replication-controller(维护某个 pod 的复制为配置的数值)。

# 工作Node 服务
# kubelet 是工作Node 执行操作的 agent, 负责具体的容器生命周期管理, 根据从数据库中获取的信息来管理容器, 并上报 pod 运行状态等;

# proxy 为 pod 上的服务提供访问的代理。

# 其它服务
# Etcd 是所有状态的存储数据库;

# gcr.io/google_containers/pause:0.8.0 是 Kubernetes 启动后自动 pull 下来的测试镜像。
这些服务大概分为三类:主Node 服务、工作Node 服务和其它服务
主 Node 服务
- apiserver 是整个系统的对外接口, 提供 RESTful 方式供客户端和其它组件调用;
- scheduler 负责对资源进行调度, 分配某个 pod 到某个 Node 上;
- controller-manager 负责管理控制器, 包括 endpoint-controller(刷新服务和 pod 的关联信息)和 replication-controller(维护某个 pod 的复制为配置的数值)。
工作 Node 服务
- kubelet 是工作 Node 执行操作的 agent, 负责具体的容器生命周期管理, 根据从数据库中获取的信息来管理容器, 并上报 pod 运行状态等;
- proxy 为 pod 上的服务提供访问的代理。
其它服务
- Etcd 是所有状态的存储数据库;
gcr.io/google_containers/pause:0.8.0是 Kubernetes 启动后自动 pull 下来的测试镜像。
基本概念
- 节点(
Node)- 一个 Node 是一个运行 Kubernetes 中的主机。
- A node represents a computing instance like a machine.
- 容器组 (
Pod)- 一个 Pod 对应于由若干 Pod 成的一个 Pod
- 同个 Pod 内的容器共享一个存储卷(volume)。
- the smallest unit in Kubernetes that you can create or deploy, representing a running process on your cluster.
- Generally, there is one container per pod, but multiple containers with a hard dependency can be packaged into a single pod.
- A pod provides a unique network IP and set of ports for your containers,
and configurable options that govern how your containers should run.
- You can run a container in a pod using the kubectl run command, which starts a deployment with a container running inside a pod.
- 容器组生命周期(
pos-states)- 包含所有容器状态集合, 包括 Pod 状态类型, Pod 生命周期, 事件, 重启策略, 以及 replication controllers。
- Kubernetes can be used in an imperative or declarative way, with the latter providing a configuration file that describes the desired state.
Replication Controllers- 主要负责指定数量的 pod 在同一时间一起运行。
- 服务(
services)- 一个 Kubernetes 服务是 Pod 逻辑的高级抽象, 同时也对外提供访问 Pod 的策略。
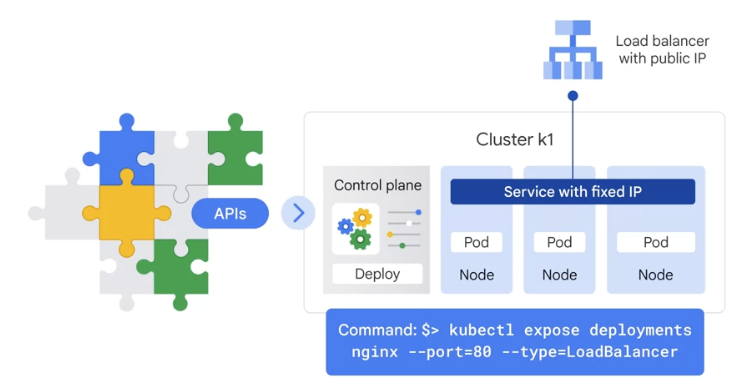
- Kubernetes creates a service with a fixed IP address for your pods, and a controller attaches an external load balancer with a public IP address to that service .
- A service is an abstraction that defines a logical set of pods and a policy by which to access them.
- Pods will be assigned their own IP addresses, but those addresses don’t remain stable over time.
- A service group provides a stable endpoint or fixed IP address for a set of pods.
- 卷(
volumes)- 一个卷就是一个目录, 容器对其有访问权限。
- 标签(
labels)- 标签是用来连接一组对象的, 比如 Pod 。标签可以被用来组织和选择子对象。
- 接口权限(
accessing_the_api)- 端口, IP 地址和代理的防火墙规则。
- web 界面(
ux)- 用户可以通过 web 界面操作 Kubernetes。
- 命令行操作(
cli)kubecfg命令。- To update a new version of your app, you can use kubectl rollout or change your deployment configuration file and apply the change.
- deployment
- A deployment represents a group of replicas of the same pod and keeps your pods running even when the nodes they run on fail.
- You can scale a deployment using the kubectl scale command, specifying the number of pods or using autoscaling based on parameters like CPU utilization.
容器组 Pod

在 Kubernetes 中, 使用的最小单位是 Pod
- Pod 是创建, 调度, 管理的最小单位。
- 一个 Pod 使用相同的 Docker 容器并共享卷(挂载点)。
- 一个 Pod 是一个特定应用的打包集合, 包含一个或多个容器。
smallest unit
abstraction over container
create a layer of container
- Pod : one application
- Pod > container + container + container
each Pod has one IP
- pod communicate by using IP
- new IP on re-creatyion
- Pod 被认为只有很短的运行周期。
- Pod 被调度到一组 Node 运行, 直到容器的生命周期结束或者其被删除。
- 如果 Node 死掉, 运行在其上的 Pod 将会被删除而不是重新调度。(也许在将来的版本中会添加 Pod 的移动)。
Pod 设计的初衷:资源共享和通信
- Pod 主要是为了数据共享和它们之间的通信。
- 在一个 Pod 中, 容器都使用相同的网络地址和端口, 可以通过本地网络来相互通信。
- 每个 Pod 都有独立的 IP, 可用通过网络来和其他物理主机或者容器通信。
- Pod 有一组存储卷(挂载点), 主要是为了让容器在重启之后可以不丢失数据。
Pod 管理
Pod 是一个运用管理和部署的高层次抽象, 同时也是一组容器的接口。Pod 是部署、水平放缩的最小单位。
Pod 的使用
Pod 可以通过组合来构建复杂的运用, 其本来的意义包含:
- 内容管理, 文件和数据加载以及本地缓存管理等。
- 日志和检查点备份, 压缩, 快照等。
- 监听数据变化, 跟踪日志, 日志和监控代理, 消息发布等。
- 代理, 网桥
- 控制器, 管理, 配置以及更新
替代方案
为什么不在一个单一的容器里运行多个程序?
- 透明化。为了使 Pod 中的容器保持一致的基础设施和服务, 比如进程管理和资源监控。这样设计是为了用户的便利性。
- 解偶软件之间的依赖。每个容器都可能重新构建和发布, Kubernetes 必须支持热发布和热更新(将来)。
- 方便使用。用户不必运行独立的程序管理, 也不用担心每个运用程序的退出状态。
- 高效。考虑到基础设施有更多的职责, 容器必须要轻量化。
Pod 的生命周期
包括若干状态值:pending、running、succeeded、failed。
pending
- Pod 已经被 Node 接受, 但有一个或多个容器还没有运行起来。
- 这将包含某些 Node 正在下载镜像的时间, 这种情形会依赖于网络情况。
running
- Pod 已经被调度到 Node , 并且所有的容器都已经启动。
- 至少有一个容器处于运行状态(或者处于重启状态)。
succeeded
- 所有的容器都正常退出。
failed
- Pod 中所有容器都意外中断了。
通常来说, 如果 Pod 被创建了就不会自动销毁
- 除非被某种行为触发, 而触发此种情况可能是人为, 或者复制控制器所为。
- 唯一例外的是 Pod 由 succeeded 状态成功退出, 或者在一定时间内重试多次依然失败。
- 如果某个 Node 死掉或者不能连接, 那么 Node 控制器将会标记其上的 Pod 的状态为
failed。
举例如下。
Pod 状态
running, 有 1 容器, 容器正常退出- 记录完成事件
- 如果重启策略为:
- 始终:重启容器, Pod 保持
running - 失败时:Pod 变为
succeeded - 从不:Pod 变为
succeeded
- 始终:重启容器, Pod 保持
Pod 状态
running, 有 1 容器, 容器异常退出- 记录失败事件
- 如果重启策略为:
- 始终:重启容器, Pod 保持
running - 失败时:重启容器, Pod 保持
running - 从不:Pod 变为
failed
- 始终:重启容器, Pod 保持
Pod 状态
running, 有 2 容器, 有 1 容器异常退出- 记录失败事件
- 如果重启策略为:
- 始终:重启容器, Pod 保持
running - 失败时:重启容器, Pod 保持
running - 从不:Pod 保持
running- 当有 2 容器退出
- 记录失败事件
- 如果重启策略为:
- 始终:重启容器, Pod 保持
running - 失败时:重启容器, Pod 保持
running - 从不:Pod 变为
failed
- 始终:重启容器, Pod 保持
- 始终:重启容器, Pod 保持
Pod 状态
running, 容器内存不足- 标记容器错误中断
- 记录内存不足事件
- 如果重启策略为:
- 始终:重启容器, Pod 保持
running - 失败时:重启容器, Pod 保持
running - 从不:记录错误事件, Pod 变为
failed
- 始终:重启容器, Pod 保持
Pod 状态
running, 一块磁盘死掉- 杀死所有容器
- 记录事件
- Pod 变为
failed - 如果 Pod 运行在一个控制器下, Pod 将会在其他地方重新创建
Pod 状态
running, 对应的 Node 段溢出- Node 控制器等到超时
- Node 控制器标记 Pod
failed - 如果 Pod 运行在一个控制器下, Pod 将会在其他地方重新创建
services

- permanent IP attach to each pod
lifecycle of Pof and service not connected
- App should be accessible through browser
- external service:
- https://a.b.c.d:port
- https://myapp.com <- Ingree
- internal service:
- http:myDB
- external service:
ConfigMap + secret
- external configuration to application
- URL_DB = mongo-db-service1
- URL_DB = mongo-db-service2

secret
- to store credential
- base64 encoded
Data storgae - volume
data storage for Pod
volumes attach to Pod (local/remote)
keep storage permanent
- k8s cluster do not manage data persistence
架构设计考虑
- 分布式架构, 保证扩展性;
- 逻辑集中式的控制平面 + 物理分布式的运行平面;
- 一套资源调度系统, 管理哪个容器该分配到哪个节点上;
- 一套对容器内服务进行抽象和 HA 的系统。
运行原理
Kubernetes 是一套分布式系统
- 由多个节点组成, 节点分为两类:
- 一类是属于管理平面的
主节点/控制节点(Master Node): 复杂的工作 - 一类是属于运行平面的
工作节点(Worker Node): 负责提供稳定的操作接口和能力抽象即可。
- 一类是属于管理平面的
从这张图上, 我们没有能发现 Kubernetes 中对于控制平面的分布式实现, 但是由于数据后端自身就是一套分布式的数据库 Etcd, 因此可以很容易扩展到分布式实现。
这些服务大概分为三类:主Node 服务、工作Node 服务和其它服务

主 Node 服务
apiserver是整个系统的对外接口, 提供 RESTful 方式供客户端和其它组件调用;scheduler负责对资源进行调度, 分配某个 pod 到某个 Node 上;controller-manager- 负责管理控制器,
- 包括 endpoint-controller(刷新服务和 pod 的关联信息)
- 和 replication-controller(维护某个 pod 的复制为配置的数值)。
工作 Node 服务
- kubelet 是工作 Node 执行操作的 agent
- 负责具体的容器生命周期管理, 根据从数据库中获取的信息来管理容器, 并上报 pod 运行状态等;
- proxy 为 pod 上的服务提供访问的代理。
- kube-proxy 是一个简单的网络访问代理, 同时也是一个 Load Balancer。
- 它负责将访问到某个服务的请求具体分配给工作节点上的 Pod(同一类标签)。
其它服务
- Etcd 是所有状态的存储数据库;
gcr.io/google_containers/pause:0.8.0是 Kubernetes 启动后自动 pull 下来的测试镜像。
kubernetes architecture

节点 Node
Node
在
Kubernetes中, Node 是实际工作的点- Worker Nodes do the work
Node > Pod + Pod + Pod
Node 可以是虚拟机或者物理机器, 依赖于一个集群环境。
每个 Node 都有一些必要的服务以运行 Pod , 并且它们都可以通过主 Node 来管理。
必要服务包括 Docker, kubelet 和代理服务。
3 processes mush be installed on every Node
- 必要服务包括 Docker, kubelet 和代理服务。
- Container runtime
- Container runtime: container …
- Container runtime need to be installed on each pod
- Kubelet
- get request from scheduler
- schedule those container
- interface with both the container and node
- kubelet starts the pod with a container inside
- Kube proxy
- forward request from service to pod
- 必要服务包括 Docker, kubelet 和代理服务。

Master
- to interact with cluster
need less resource than worker node
- 4 processes mush be installed on every Node
- Api Server
- cluster gateway
- get request and query
- gatekeepper for Authentication :
- validate the request
- health request
- scheduler
- decide
- to schedule a new pod
- decide the resource need
- decide which worker node (check the etcd: A 30% used, B 60% used)
- Controller manager
- detect cluster state change
- pod dead -> recover cluster state
- request to scheduler -> kubelet
- detect cluster state change
- etcd
- cluster brain
- store actual application data
- cluster state information
- key value store
- changes get stored in the key value store
- Api Server

容器状态
容器状态用来描述 Node 的当前状态。现在, 其中包含三个信息:
主机 IP
主机 IP 需要云平台来查询, Kubernetes 把它作为状态的一部分来保存。
- 如果
Kubernetes没有运行在云平台上, Node ID 就是必需的。 - IP 地址可以变化, 并且可以包含多种类型的 IP 地址, 如公共 IP, 私有 IP, 动态 IP, ipv6 等等。
Node 周期
通常来说 Node 有 Pending, Running, Terminated 三个周期
- 如果 Kubernetes 发现了一个 Node 并且其可用, 那么 Kubernetes 就把它标记为
Pending。 - 然后在某个时刻, Kubernetes 将会标记其为
Running。 - Node 的结束周期称为
Terminated。 - 一个已经
Terminated的 Node 不会接受和调度任何请求, 并且已经在其上运行的 Pod 也会删除。
Node 状态
Node 的状态主要是用来描述处于 Running 的 Node 。
- 可用的有
NodeReachable和NodeReady。以后可能会增加其他状态。 NodeReachable表示集群可达。NodeReady表示 kubelet 返回 Status Ok 并且 HTTP 状态检查健康。
Node 管理
Node 并非 Kubernetes 创建, 而是由云平台创建, 或者就是物理机器、虚拟机。
- 在 Kubernetes 中, Node 仅仅是一条记录,
- Node 创建之后, Kubernetes 会检查其是否可用。
- 在 Kubernetes 中, Node 用如下结构保存:
1
2
3
4
5
6
7
8
9
10
11
12
13
14
{
  "id": "10.1.2.3",
  "kind": "Minion",
  "apiVersion": "v1beta1",
  "resources": {
    "capacity": {
      "cpu": 1000,
      "memory": 1073741824
    }
  },
  "labels": {
    "name": "my-first-k8s-node"
  }
}
Kubernetes 校验 Node 可用依赖于 ID。
- 在当前的版本中, 有两个接口可以用来管理 Node :
Node 控制和Kube 管理。
Node 控制
在 Kubernetes 主 Node 中, Node 控制器 是用来管理 Node 的组件。主要包含:
- 集群范围内 Node 同步
- 单 Node 生命周期管理
Node 控制有一个同步轮寻, 主要监听所有云平台的虚拟实例, 会根据 Node 状态创建和删除。
- 可以通过
--node_sync_period标志来控制该轮寻。 - 如果一个实例已经创建, Node 控制将会为其创建一个结构。
- 同样的, 如果一个 Node 被删除, Node 控制也会删除该结构。
- 在 Kubernetes 启动时可用通过
--machines标记来显示指定 Node 。 - 同样可以使用
kubectl来一条一条的添加 Node , 两者是相同的。 - 通过设置
--sync_nodes=false标记来禁止集群之间的 Node 同步, 你也可以使用 api/kubectl 命令行来增删 Node 。
Productiom cluster setup
- multiple master and worker nodes(VM or local)
minikube
Virtulization / Hypervisor is needed
to Test/local cluster setup
minikube
- create VM box on laptop
- nodes runs in CM
- master and node on one node
- 1 node K8s cluster
- for testing

1
2
3
4
5
6
7
8
9
10
11
12
$ brew install minikube


$ minikube start --driver=docker --alsologtostderr

$ minikube status
# minikube
# type: Control Plane
# host: Running
# kubelet: Running
# apiserver: Running
# kubeconfig: Configured
kubectl 使用
- wat to interact to kubernet cluster
API server:
- enable interaction with cluster
- way: UI, API, CLI (kubectl)
- worker processes do the kebectl action
for both minikube and cloud cluster
- kubectl 是 Kubernetes 自带的客户端, 可以用它来直接操作 Kubernetes。
1
2
3
4
5
6
7
8
9
10
11
12
13
14
15
16
17
18
19
# 使用格式有两种:
kubectl [flags]
kubectl [command]


$ kubectl get nodes
# NAME       STATUS   ROLES                  AGE   VERSION
# minikube   Ready    control-plane,master   53s   v1.23.3
$ kubectl get pod
$ kubectl get services


$ kubectl version
# Client Version: version.Info{Major:"1", Minor:"23", GitVersion:"v1.23.5", GitCommit:"c285e781331a3785a7f436042c65c5641ce8a9e9", GitTreeState:"clean", BuildDate:"2022-03-16T15:51:05Z", GoVersion:"go1.17.8", Compiler:"gc", Platform:"darwin/arm64"}
# Server Version: version.Info{Major:"1", Minor:"23", GitVersion:"v1.23.3", GitCommit:"816c97ab8cff8a1c72eccca1026f7820e93e0d25", GitTreeState:"clean", BuildDate:"2022-01-25T21:19:12Z", GoVersion:"go1.17.6", Compiler:"gc", Platform:"linux/arm64"}
deploy
distributed system and containers
- cluster is good for Stateless app

Pod:
- not rely on one pod
- replicate every in another node
- Deployment
:
- you create deployments
- define blueprints for pod: duplicate=3
service is also load balancer
DB cannot be replicate
- read and write on same share data storage
- avoid data inconsistency
- StatefulSet
for SateFul app
- DB are oftern hosted outside of K8s cluster
- use external database
Deployment
- bluepring for creating pos
- most basic configuratiyon for deployment
rest default
- Deployment
- ReplicaSet manages Pods
- Pod is an abstraction of container
- container
1
2
3
4
5
6
7
8
9
10
11
12
13
14
15
16
17
18
19
20
21
22
23
24
25
26
27
28
29
30
31
32
33
34
35
36
37
38
39
40
41
42
43
44
45
46
47
48
49
50
51
52
53
54
55
56
57
58
59
60
61
62
63
64
65
66
67
68
69
70
71
72
73
74
75
76
77
78
79
80
81
82
83
84
85
86
87
88
89
90
91
92
93
94
95
96
97
$ kubectl create deployment NAME --image=image [-dry-run]

$ kubectl create deployment nginx-depl --image=nginx


$ kubectl get deployment
# NAME         READY   UP-TO-DATE   AVAILABLE   AGE
# nginx-depl   1/1     1            1           36s


$ kubectl get replicaset
# NAME                    DESIRED   CURRENT   READY   AGE
# nginx-depl-5ddc44dd46   1         1         1       10m


$ kubectl get pod
# NAME                          READY   STATUS    RESTARTS   AGE
# nginx-depl-5ddc44dd46-q5cmj   1/1     Running   0          44s


$ kubectl edit deployment nginx-depl
# Please edit the object below. Lines beginning with a '#' will be ignored,
# and an empty file will abort the edit. If an error occurs while saving this file will be
# reopened with the relevant failures.
#
apiVersion: apps/v1
kind: Deployment
metadata:
  annotations:
    deployment.kubernetes.io/revision: "1"
  creationTimestamp: "2022-04-05T22:01:23Z"
  generation: 1
  labels:
    app: nginx-depl
  name: nginx-depl
  namespace: default
  resourceVersion: "5536"
  uid: d1d87196-a2e4-44f8-b294-d27e112b37ee
spec:
  progressDeadlineSeconds: 600
  replicas: 1
  revisionHistoryLimit: 10
  selector:
    matchLabels:
      app: nginx-depl
  strategy:
    rollingUpdate:
      maxSurge: 25%
      maxUnavailable: 25%
    type: RollingUpdate
  template:
    metadata:
      creationTimestamp: null
      labels:
        app: nginx-depl
    spec:
      containers:
      - image: nginx:1.16
        imagePullPolicy: Always
        name: nginx
        resources: {}
        terminationMessagePath: /dev/termination-log
        terminationMessagePolicy: File
      dnsPolicy: ClusterFirst
      restartPolicy: Always
      schedulerName: default-scheduler
      securityContext: {}
      terminationGracePeriodSeconds: 30
status:
  availableReplicas: 1
  conditions:
  - lastTransitionTime: "2022-04-05T22:01:33Z"
    lastUpdateTime: "2022-04-05T22:01:33Z"
    message: Deployment has minimum availability.
    reason: MinimumReplicasAvailable
    status: "True"
    type: Available
  - lastTransitionTime: "2022-04-05T22:01:23Z"
    lastUpdateTime: "2022-04-05T22:01:33Z"
    message: ReplicaSet "nginx-depl-5ddc44dd46" has successfully progressed.
    reason: NewReplicaSetAvailable
    status: "True"
    type: Progressing
  observedGeneration: 1
  readyReplicas: 1
  replicas: 1
  updatedReplicas: 1


# HorizontalPodAutoscalers
kubectl get hpa


# view on workers in a cold state without any traffic.
kubectl get nodes -L role
StatefulSet
Kubernetes Network connection
Service、Ingress和Endpoint是 Kubernetes 中三个重要的概念,它们都与容器编排和服务暴露相关。
Service:
- 一个 Kubernetes Service 代表着一个在集群内部的逻辑应用服务,
- 可以是一组 Pod 的负载均衡,也可以是一个静态的网络地址。
- Service 可以为多个 Pod 提供负载均衡服务,并且可以根据 selector 或 label 筛选出对应的 Pod。
Endpoint:
- Endpoint 是一组网络地址,通常是一组 Pod 的 IP 地址,用于访问 Service。
- 为 Service 提供了实际的网络地址
- Endpoint 会被自动创建并更新,以匹配与 Service 相关的 Pod 的 IP 地址和端口。
Ingress:
- Ingress 是 Kubernetes 中的一个 API 对象,用于将外部流量路由到集群内部的 Service。
- 为集群外部的访问提供了路由和负载均衡的功能。
- Ingress 能够对访问流量进行负载均衡、路由和 SSL/TLS 终止等操作。
- Ingress 通常需要一个反向代理实现,比如 Nginx、Traefik 等。
Example
- 小明是一个非常喜欢吃糖果的小学生。有一天,小明发现了一家卖糖果的商店,他想去买糖果。但是商店非常大,有很多窗口卖糖果,小明不知道应该去哪个窗口买糖果。
这时候,商店的老板出来了,他告诉小明,他可以通过三个标志来找到卖糖果的窗口,这三个标志分别是 Service、Endpoint 和 Ingress。
Service 就像商店的门面一样,它为所有的窗口提供了一个标志,让小明可以很容易地找到这家商店。
在 Kubernetes 中,Service 为所有的 Pod 提供了一个稳定的 IP 和端口,这个 IP 和端口就是小明在商店门口看到的标志。Endpoint 就像商店里面的窗口一样,它是实际卖糖果的地方。
在 Kubernetes 中,Endpoint 是由一组 IP 地址和端口号组成的列表,这些 IP 地址和端口号对应着 Pod 的网络地址和端口。小明可以通过 Service 的标志找到商店,然后通过 Endpoint 的标志找到卖糖果的窗口。Ingress 就像商店的导购一样,它可以帮助小明找到自己喜欢的糖果。
在 Kubernetes 中,Ingress 是一个 API 对象,用于将外部流量路由到集群内部的 Service。通过 Ingress,小明可以将自己的请求路由到对应的 Service 上,并且支持负载均衡、SSL 终止、HTTP 重定向等功能。- 小明通过 Service 找到了商店,通过 Endpoint 找到了卖糖果的窗口,最终通过 Ingress 找到了自己喜欢的糖果。现在,小明可以在商店里面尽情地购买糖果了。
Services
an abstraction which defines a logical set of Pods and a policy by which to access them.
Kubernetes 之所以需要 Service,一方面是因为 Pod 的 IP 不是固定的,另一方面则是因为一组 Pod 实例之间总会有负载均衡的需求。
- Services enable a loose coupling between dependent Pods.
- A Service is defined using YAML (preferred) or JSON, like all Kubernetes objects.
- The set of Pods targeted by a Service is usually determined by a LabelSelector
- Services provide load-balanced access to specified Pods.
- 所谓 Service,其实就是 Kubernetes 为 Pod
分配的、固定的、基于 iptables(或者 IPVS)的访问入口。 - 这些访问入口代理的 Pod 信息来自于 Etcd,由 kube-proxy 通过控制循环来维护。
- 所谓 Service,其实就是 Kubernetes 为 Pod
1
2
3
4
5
6
7
8
9
10
11
12
13
14
15
16
17
18
19
20
21
22
23
24
25
26
27
28
29
30
31
32
33
34
35
36
37
38
39
40
41
42
43
44
45
46
47
kind: Service
apiVersion: v1
metadata:
  name: my-service
spec:
  selector:
    app: MyApp
  ports:
    - protocol: TCP
      port: 80
      targetPort: 9376

or

# 没有 selector,就不会创建相关的 Endpoints 对象。手动将 Service 映射到指定的 Endpoints
kind: Service
apiVersion: v1
metadata:
  name: my-service
spec:
  ports:
    - protocol: TCP
      port: 80
      targetPort: 9376
---
kind: Endpoints
apiVersion: v1
metadata:
  name: my-service
subsets:
  - addresses:
      - ip: 1.2.3.4
    ports:
      - port: 9376

or

# 没有 selector,也没有定义任何的端口和 Endpoint。
# 相反地,对于运行在集群外部的服务,它通过返回该外部服务的别名这种方式来提供服务。
kind: Service
apiVersion: v1
metadata:
  name: my-service
  namespace: prod
spec:
  type: ExternalName
  externalName: my.database.example.com
上述配置将创建一个
- 名称为 “my-service” 的 Service 对象
- 它会将请求代理到 9376 TCP 端口,具有标签 “app=MyApp” 的 Pod 上。
- 这个 Service 将被指派一个 IP 地址(通常称为 “Cluster IP”),它会被服务的代理使用
- Service selector的控制器将会持续扫描符合条件的Pod,扫描结果会更新到名称为my-service的Endpoints对象上。
- Service 能够将一个接收端口映射到任意的 targetPort。
- 默认情况下,targetPort 将被设置为与 port 字段相同的值。
- targetPort 可以是一个字符串,引用了 backend Pod 的端口的名称。
- 但是,实际指派给该端口名称的端口号,在每个 backend Pod 中可能并不相同。
- 对于部署和设计 Service ,这种方式会提供更大的灵活性。例如,可以在 backend 软件下一个版本中,修改 Pod 暴露的端口,并不会中断客户端的调用。
Kubernetes Service 支持 TCP 和 UDP 协议,默认为 TCP 协议。
Although each Pod has a unique IP address, those IPs are not exposed outside the cluster without a Service.
Services allow the applications to receive traffic.
Services can be exposed in different ways by specifying a type in the
ServiceSpec- ClusterIP
- NodePort
- LoadBalancer
- ExternalName
expose the Kubernetes services
ClusterIP
- the default ServiceType.
curl CLUSTER-IP:port
ClusterIP services are created by default when you create a service in Kubernetes.
exposes the service on a cluster’s internal IP address.
- Exposes the service on
an IP addressthat is only accessible from within this cluster.- cluster-internal IP address that is only accessible to other pods in the cluster .
- To access a ClusterIP service from outside the cluster, you would need to use a proxy.
- 在集群内部IP上公开服务。
- 选择使服务只能从群集中访问。
- 可以从spec.clusterIp端口访问它。
如果设置了
spec.ports [*].targetPort,它将从端口路由到targetPort。- 调用
kubectl get services时获得的CLUSTER-IP是内部在集群内分配给此服务的IP。
NodePort
Superset of ClusterIP.
Exposes the service on
each node’s IP address at a specific static port numberin the cluster,Exposes the Service on the
same port of each selected Nodein the cluster using NAT.- Makes a Service accessible from outside the cluster using
<NodeIP>:<NodePort>- pr
<ClusterIP>:<service.Port>
在每个Node的IP上公开静态端口(NodePort)服务。
将自动创建NodePort服务到ClusterIP服务的路由。
可以通过请求:来从群集外部请求NodePort服务。
如果通过nodePort的方式从节点的外部IP访问此服务,它会将请求路由到
spec.clusterIp:spec.ports[*].port,然后将其路由到spec.ports [*].targetPort,如果设置。也可以使用与ClusterIP相同的方式访问此服务。- NodeIP是节点的外部IP地址。无法从
:spec.ports [*].nodePort访问您的服务。
LoadBalancer
Superset of NodePort.
- exposes the service externally using a load balancer service provided by a cloud provider.
- 使用云提供商的负载均衡器在外部公开服务。
- LoadBalancer services are typically created by the cloud provider that you are using for your Kubernetes cluster.
- Creates an external load balancer in the current cloud (if supported) and assigns a
fixed, external IPto the Service.- public IP address that is accessible from outside the cluster.
将自动创建外部负载均衡器到NodePort和ClusterIP服务的路由。
可以从负载均衡器的IP地址访问此服务,该IP地址将您的请求路由到nodePort,而nodePort又将请求路由到clusterIP端口。可以像访问NodePort或ClusterIP服务一样访问此服务。
- LoadBalancer services are created when you specify the type field in the service definition to be “LoadBalancer”.
ExternalName:
Maps the Service to the contents of the externalName field (e.g. foo.bar.example.com), by returning a CNAME record with its value.
No proxying of any kind is set up.
This type requires v1.7 or higher of kube-dns, or CoreDNS version 0.0.8 or higher.
how to choose
The main difference between
ClusterIPandLoadBalancerservices in Kubernetes is that ClusterIP services are only accessible within the cluster, while LoadBalancer services are accessible from outside the cluster.
Examples of use a ClusterIP service:
When you are
developing and testing an application, you might want to use a ClusterIP service so that you can access the application from other pods in the cluster .When you are
running a servicethat is only intended to be used by other services in the cluster , you might want to use a ClusterIP service.
Examples of use a LoadBalancer service:
When you are
running a servicethat is intended to be used by users outside the cluster , you might want to use aLoadBalancerservice.When you are
running a servicethat needs to be accessible from multiple regions , you might want to use aLoadBalancerservice.
ClusterIP services are more secure than LoadBalancer services
- as they are not exposed to the public internet.
- This means that they are less likely to be attacked by malicious actors.
- However, ClusterIP services can only be accessed by other pods that are running in the same cluster. This can be a limitation if you need to access the service from outside the cluster.
LoadBalancer services are less secure than ClusterIP services,
- as they are exposed to the public internet.
- This means that they are more likely to be attacked by malicious actors.
- However, LoadBalancer services can be accessed from anywhere, which can be convenient for users.
Deployment example
1
2
3
4
5
6
7
8
9
10
11
12
13
14
15
16
17
18
19
20
21
22
23
24
25
26
27
28
29
30
31
32
# Create a sample application
# nginx-deployment.yaml
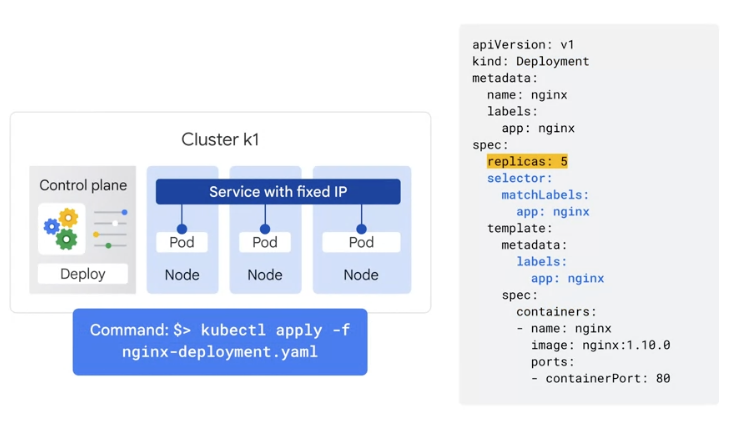
apiVersion: apps/v1
kind: Deployment
metadata:
name: nginx-deployment
labels:
app: nginx
spec:
replicas: 2
selector:
matchLabels:
app: nginx
template:
metadata:
labels:
app: nginx
spec:
containers:
- name: nginx
image: nginx:1.14.2
ports:
- containerPort: 80
# Create the deployment:
kubectl apply -f nginx-deployment.yaml
# Verify that the pods are running and have their own internal IP addresses:
kubectl get pods -l 'app=nginx' -o wide | awk {'print $1" " $3 " " $6'} | column -t
# NAME STATUS IP
# nginx-deployment-574b87c764-hcxdg Running 192.168.20.8
# nginx-deployment-574b87c764-xsn9s Running 192.168.53.240
Create the ClusterIP Service
1
2
3
4
5
6
7
8
9
10
11
12
13
14
15
16
17
18
19
20
21
22
23
24
25
26
27
28
29
30
# Create a ClusterIP service
# clusterip.yaml
apiVersion: v1
kind: Service
metadata:
  name: nginx-service-cluster-ip
spec:
  type: ClusterIP
  selector:
    app: nginx
  ports:
    - protocol: TCP
      port: 80
      targetPort: 80

# create the object and apply the clusterip.yaml file,
kubectl create -f clusterip.yaml

# or

# To expose a deployment of ClusterIP type, run the following imperative command:
# expose command creates a service without creating a YAML file.
# However, kubectl translates your imperative command into a declarative Kubernetes Deployment object.
kubectl expose deployment nginx-deployment  \
  --type=ClusterIP  \
  --name=nginx-service-cluster-ip
# Output:

# Delete the ClusterIP service:
kubectl delete service nginx-service-cluster-ip
Create a NodePort service
1
2
3
4
5
6
7
8
9
10
11
12
13
14
15
16
17
18
19
20
21
22
23
24
25
26
27
28
29
30
31
32
33
34
35
36
37
38
39
40
41
42
43
44
45
46
47
48
49
50
51
52
53
54
55
56
57
58
59
# create a NodePort service
# nodeport.yaml
apiVersion: v1
kind: Service
metadata:
  name: nginx-service-nodeport
spec:
  type: NodePort
  selector:
    app: nginx
  ports:
    - protocol: TCP
      port: 80
      targetPort: 80

# create the object and apply the nodeport.yaml file
kubectl create -f nodeport.yaml

# or

# To expose a deployment of NodePort type
kubectl expose deployment nginx-deployment  \
  --type=NodePort  \
  --name=nginx-service-nodeport
# Output:
# service/nginx-service-nodeport exposed

# Get information about nginx-service:
kubectl get service/nginx-service-nodeport
# Output:
# NAME                     TYPE       CLUSTER-IP       EXTERNAL-IP   PORT(S)        AGE
# nginx-service-nodeport   NodePort   10.100.106.151   <none>        80:30994/TCP   27s

# Important: The ServiceType is a NodePort and ClusterIP that are created automatically for the service.
# The output from the preceding command shows that the NodePort service is exposed externally on the port (30994) of the available worker node's EC2 instance.
# Before you access NodeIP:NodePort from outside the cluster, you must set the security group of the nodes to allow incoming traffic. You can allow incoming traffic through the port (30994) that's listed in the output of the preceding kubectl get service command.


# If the node is in a public subnet and is reachable from the internet, check the node’s public IP address:
kubectl get nodes -o wide |  awk {'print $1" " $2 " " $7'} | column -t
# Output:
# NAME                                      STATUS  EXTERNAL-IP
# ip-10-0-3-226.eu-west-1.compute.internal  Ready   1.1.1.1
# ip-10-1-3-107.eu-west-1.compute.internal  Ready   2.2.2.2

-or-

# If the node is in a private subnet and is reachable only inside or through a VPC, then check the node’s private IP address:
kubectl get nodes -o wide |  awk {'print $1" " $2 " " $6'} | column -t
# Output:
# NAME                                      STATUS  INTERNAL-IP
# ip-10-0-3-226.eu-west-1.compute.internal  Ready   10.0.3.226
# ip-10-1-3-107.eu-west-1.compute.internal  Ready   10.1.3.107


# Delete the NodePort service:
kubectl delete service nginx-service-nodeport
# Output:
# service "nginx-service-nodeport" deleted
Services and Labels
- A Service routes traffic across a set of Pods.
- it allows pods to die and replicate in Kubernetes without impacting the application.
- Discovery and routing among dependent Pods (such as the frontend and backend components in an application) are handled by Kubernetes Services.
- Services match a set of Pods using
labels and selectors, a grouping primitive that allows logical operation on objects in Kubernetes.- Labels are key/value pairs attached to objects and can be used in any number of ways:
- Designate objects for development, test, and production
- Embed version tags
- Classify an object using tags
- Labels are key/value pairs attached to objects and can be used in any number of ways:
- default:
- pods in a deployment is only accessible inside the cluster
- Every Pod in a cluster gets its own
unique cluster-wide IP address. do not need to explicitly create links between Pods and almost never need to deal with mapping container ports to host ports. - Pods can be treated much like VMs or physical hosts from the perspectives of port allocation, naming, service discovery, load balancing, application configuration, and migration.
- Kubernetes IP addresses exist at the Pod scope -
containers within a Pod share their network namespaces- including their IP address and MAC address. - This means that containers within a Pod can all reach each other’s ports on localhost.
- This also means that containers within a Pod must coordinate port usage, but this is no different from processes in a VM. This is called the “IP-per-pod” model.
Kubernetes networking addresses 4 concerns:
- Containers within a Pod use networking to communicate via loopback.
- Cluster networking provides communication between different Pods.
- The Service API expose an application running in Pods to be reachable from outside the cluster.
- Ingress provides extra functionality specifically for exposing HTTP applications, websites and APIs.
can also use Services to publish services only for consumption inside the cluster.
- To make the pods in the deployment publicly available
- to let people on the Internet to access the content in nginx web server
- connect a load balancer
to it
1
2
kubectl expose deployments nginx \
  --port=80 --type=LoadBalancer
Kubernetes creates a service with a fixed public IP address for the pods.
- A service
- the fundamental way Kubernetes represents load balancing.
- A service groups a set of pods together and provides a stable endpoint for them.
- Suppose the application consisted of a front end and a back end.
- the front end can access the back end using those pods' internal IP addresses
- without the need for a service
- it would be a management problem. As deployments create and destroy pods, pods get their own IP addresses,
- those addresses don’t remain stable over time.
- Services provide a stable endpoint
- A service
- Kubernetes attach an external load balancer with a public IP address to the service
- so that others outside the cluster can access it.
- Any client hits that IP address
- will be routed to a pod behind the service.
- In GKE, this kind of load balancer is network load balancer
- one of the managed load balancing services that Compute Engine makes available to virtual machines.
- replica
- This technique allows to share the load and scale the service in Kubernetes.
- Endpoints,你可以使用
- 被 selector 选中的 Pod,就称为 Service 的 Endpoints
多端口 Service
很多 Service 需要暴露多个端口。对于这种情况,Kubernetes 支持在 Service 对象中定义多个端口。
当使用多个端口时,必须给出所有的端口的名称,这样 Endpoint 就不会产生歧义
1
2
3
4
5
6
7
8
9
10
11
12
13
14
15
16
kind: Service
apiVersion: v1
metadata:
  name: my-service
spec:
    selector:
      app: MyApp
    ports:
      - name: http
        protocol: TCP
        port: 80
        targetPort: 9376
      - name: https
        protocol: TCP
        port: 443
        targetPort: 9377
Port
- Port
- exposes the Kubernetes service on the specified port within the cluster.
- Other pods within the cluster can communicate with this server on the specified port.
- the abstracted Service port, which can be any port other pods use to access the Service
- TargetPort
- the port on which the service will send requests to, that the pod will be listening on.
- the application in the container will need to be listening on this port also.
- NodePort
- exposes a service externally to the cluster by means of the target nodes IP address and the NodePort.
- NodePort is the default setting if the port field is not specified.
1
2
3
4
5
6
7
8
9
10
11
12
13
14
apiVersion: v1
kind: Service
metadata:
  name: hello-world
spec:
  type: NodePort
  selector:
  app: hello-world
  ports:
  - protocol: TCP
    port: 8080
    targetPort: 80
    nodePort: 30036
- the hello-world service will be exposed
- internally to cluster applications on port 8080
- and externally to the cluster on the node IP address on 30036.
- It will also forward requests to pods with the label “app: hello-world” on port 80.
Network policy?
Network policy is the primary tool for securing a Kubernetes network.
It restrict the network traffic in the cluster so only the traffic want to flow is allowed.
how network security was typically achieved prior to network policy.
- physical topology: Historically in enterprise networks, network security was provided by designing a physical topology of network devices (switches, routers, firewalls) and their associated configuration. The physical topology defined the security boundaries of the network.
- virtualization: In the first phase of virtualization, the same network and network device constructs were virtualized in the cloud, and the same techniques for creating specific network topologies of (virtual) network devices were used to provide network security. Adding new applications or services often required additional network design to update the network topology and network device configuration to provide the desired security.
In contrast, the Kubernetes network model defines a “flat” network in which every pod can communicate with all other pods in the cluster using pod IP addresses. This approach massively simplifies network design and allows new workloads to be scheduled dynamically anywhere in the cluster with no dependencies on the network design.
In this model, rather than network security being defined by
network topology boundaries, it is defined usingnetwork policiesthat are independent of the network topology.Network policies are further abstracted from the network by using
label selectorsas their primary mechanism for defining which workloads can talk to which workloads, rather than IP addresses or IP address ranges.
network policy security
- While you can (and should) use firewalls to restrict traffic at the perimeters of the network (commonly referred to as north-south traffic), their ability to police Kubernetes traffic is often limited to a granularity of the cluster as a whole, rather than to specific groups of pods, due to the dynamic nature of pod scheduling and pod IP addresses. In addition, the goal of most attackers once they gain a small foothold inside the perimeter is to move laterally (commonly referred to as east-west) to gain access to higher value targets, which perimeter based firewalls can’t police against.
Network policy on the other hand is designed for the dynamic nature of Kubernetes by following the standard Kubernetes paradigm of using label selectors to define groups of pods, rather than IP addresses. And because network policy is enforced within the cluster itself it can police both north-south and east-west traffic.
Network policy represents an important evolution of network security, not just because it handles the dynamic nature of modern microservices, but because it empowers dev and devops engineers to easily define network security themselves, rather than needing to learn low-level networking details or raise tickets with a separate team responsible for managing firewalls. Network policy makes it easy to define intent, such as “only this microservice gets to connect to the database”, write that intent as code (typically in YAML files), and integrate authoring of network policies into git workflows and CI/CD processes.
monitor
存活探针(Liveness)就绪探针(Readiness)和启动探针(Startup)
liveness probes
- kubelet 使用 Liveness 来确定什么时候要重启容器。
- 例如, Liveness 可以探测到应用死锁(应用在运行, 但是无法继续执行后面的步骤)情况。
- 重启这种状态下的容器有助于提高应用的可用性, 即使其中存在缺陷。
- A common pattern for liveness probes is to use the same low-cost HTTP endpoint as for readiness probes, but with a higher failureThreshold. This ensures that the pod is observed as not-ready for some period of time before it is hard killed.
- Liveness probes can be a powerful way to recover from application failures, but they should be used with caution.
- Liveness probes must be configured carefully to ensure that they truly indicate unrecoverable application failure, for example a deadlock.
- Incorrect implementation of liveness probes can lead to cascading failures. This results in restarting of container under high load; failed client requests as your application became less scalable; and increased workload on remaining pods due to some failed pods. Understand the difference between readiness and liveness probes and when to apply them for your app.
readiness probes
- 使用就绪探针可以知道容器何时准备好接受请求流量,
- A Pod is considered ready when all of its containers are ready
- One use of this signal is to control which Pods are used as backends for Services.
- When a Pod is not ready, it is removed from Service load balancers.
Startup
- kubelet 使用启动探针来了解应用容器何时启动.
- If such a probe is configured, liveness and readiness probes do not start until it succeeds, making sure those probes don’t interfere with the application startup.
- This can be used to adopt liveness checks on slow starting containers, avoiding them getting killed by the kubelet before they are up and running.
liveness
Define a liveness command
- Many applications running for long periods of time eventually transition to broken states, and cannot recover except by being restarted. Kubernetes provides liveness probes to detect and remedy such situations.
1
2
3
4
5
6
7
8
9
10
11
12
13
14
15
16
17
18
19
20
21
22
# create a Pod that runs a container based on the registry.k8s.io/busybox image.
apiVersion: v1
kind: Pod
metadata:
  labels:
    test: liveness
  name: liveness-exec
spec:
  containers:
  - name: liveness
    image: registry.k8s.io/busybox
    args:
    - /bin/sh
    - -c
    - touch /tmp/healthy; sleep 30; rm -f /tmp/healthy; sleep 600
    livenessProbe:
      exec:
        command:
        - cat
        - /tmp/healthy
      initialDelaySeconds: 5
      periodSeconds: 5
- the Pod has a single Container.
- The
periodSeconds: kubelet should perform a liveness probe every 5 seconds. - The
initialDelaySeconds: kubelet should wait 5 seconds before performing the first probe. - To perform a probe, the kubelet executes the command cat /tmp/healthy in the target container.
- If the command succeeds, it returns 0, and the kubelet considers the container to be alive and healthy.
- If the command returns a non-zero value, the kubelet kills the container and restarts it.
When the container starts
- it executes this command:
/bin/sh -c "touch /tmp/healthy; sleep 30; rm -f /tmp/healthy; sleep 600" - For the first 30 seconds of the container’s life, there is a /tmp/healthy file.
- So during the first 30 seconds, the command cat /tmp/healthy returns a success code.
- After 30 seconds, cat /tmp/healthy returns a failure code.
Create the Pod:
1
2
3
4
5
6
7
8
9
10
11
12
13
14
15
16
17
18
19
20
21
22
23
24
25
26
27
28
29
30
31
32
33
34
kubectl apply -f https://k8s.io/examples/pods/probe/exec-liveness.yaml

# Within 30 seconds, view the Pod events:
# The output indicates that no liveness probes have failed yet:
kubectl describe pod liveness-exec
# Type    Reason     Age   From               Message
# ----    ------     ----  ----               -------
# Normal  Scheduled  11s   default-scheduler  Successfully assigned default/liveness-exec to node01
# Normal  Pulling    9s    kubelet, node01    Pulling image "registry.k8s.io/busybox"
# Normal  Pulled     7s    kubelet, node01    Successfully pulled image "registry.k8s.io/busybox"
# Normal  Created    7s    kubelet, node01    Created container liveness
# Normal  Started    7s    kubelet, node01    Started container liveness


# After 35 seconds, view the Pod events again:
# there are messages indicating that the liveness probes have failed, and the failed containers have been killed and recreated.
kubectl describe pod liveness-exec
# Type     Reason     Age                From               Message
# ----     ------     ----               ----               -------
# Normal   Scheduled  57s                default-scheduler  Successfully assigned default/liveness-exec to node01
# Normal   Pulling    55s                kubelet, node01    Pulling image "registry.k8s.io/busybox"
# Normal   Pulled     53s                kubelet, node01    Successfully pulled image "registry.k8s.io/busybox"
# Normal   Created    53s                kubelet, node01    Created container liveness
# Normal   Started    53s                kubelet, node01    Started container liveness
# Warning  Unhealthy  10s (x3 over 20s)  kubelet, node01    Liveness probe failed: cat: can't open '/tmp/healthy': No such file or directory
# Normal   Killing    10s                kubelet, node01    Container liveness failed liveness probe, will be restarted


# Wait another 30 seconds, and verify that the container has been restarted:
# The output shows that RESTARTS has been incremented.
# Note that the RESTARTS counter increments as soon as a failed container comes back to the running state:
kubectl get pod liveness-exec
# NAME            READY     STATUS    RESTARTS   AGE
# liveness-exec   1/1       Running   1          1m
Define a liveness HTTP request
- Another kind of liveness probe uses an HTTP GET request.
1
2
3
4
5
6
7
8
9
10
11
12
13
14
15
16
17
18
19
20
21
22
23
# configuration file for a Pod that runs a container based on the registry.k8s.io/e2e-test-images/agnhost image.
# pods/probe/http-liveness.yaml
apiVersion: v1
kind: Pod
metadata:
  labels:
    test: liveness
  name: liveness-http
spec:
  containers:
  - name: liveness
    image: registry.k8s.io/e2e-test-images/agnhost:2.40
    args:
    - liveness
    livenessProbe:
      httpGet:
        path: /healthz
        port: 8080
        httpHeaders:
        - name: Custom-Header
          value: Awesome
      initialDelaySeconds: 3
      periodSeconds: 3
- the Pod has a single container.
- The
periodSecondsfield specifies that the kubelet should perform a liveness probe every 3 seconds. - The
initialDelaySecondsfield tells the kubelet that it should wait 3 seconds before performing the first probe.
To perform a probe
- the kubelet sends an
HTTP GETrequest to the server that is running in the container and listening on port 8080. - If the handler for the server’s /healthz path returns a success code, the kubelet considers the container to be alive and healthy.
- If the handler returns a failure code, the kubelet kills the container and restarts it.
- Any code greater than or equal to 200 and less than 400 indicates success.
- Any other code indicates failure.
source code for the server in server.go.
1
2
3
4
5
6
7
8
9
10
11
12
13
14
15
16
17
18
19
20
21
22
23
24
25
26
27
28
29
30
31
32
33
34
35
36
37
38
39
40
41
42
43
44
45
46
47
48
49
50
51
52
53
54
55
56
57
58
59
60
61
62
63
64
65
66
67
68
69
/*
Copyright 2014 The Kubernetes Authors.

Licensed under the Apache License, Version 2.0 (the "License");
you may not use this file except in compliance with the License.
You may obtain a copy of the License at

    http://www.apache.org/licenses/LICENSE-2.0

Unless required by applicable law or agreed to in writing, software
distributed under the License is distributed on an "AS IS" BASIS,
WITHOUT WARRANTIES OR CONDITIONS OF ANY KIND, either express or implied.
See the License for the specific language governing permissions and
limitations under the License.
*/

// A simple server that is alive for 10 seconds, then reports unhealthy for
// the rest of its (hopefully) short existence.

package liveness

import (
	"fmt"
	"log"
	"net/http"
	"net/url"
	"time"
	"github.com/spf13/cobra"
)

// CmdLiveness is used by agnhost Cobra.
var CmdLiveness = &cobra.Command{
	Use:   "liveness",
	Short: "Starts a server that is alive for 10 seconds",
	Long:  "A simple server that is alive for 10 seconds, then reports unhealthy for the rest of its (hopefully) short existence",
	Args:  cobra.MaximumNArgs(0),
	Run:   main,
}

func main(cmd *cobra.Command, args []string) {
	started := time.Now()
	http.HandleFunc("/started", func(w http.ResponseWriter, r *http.Request) {
		w.WriteHeader(200)
		data := (time.Since(started)).String()
		w.Write([]byte(data))
	})
	http.HandleFunc("/healthz", func(w http.ResponseWriter, r *http.Request) {
		duration := time.Since(started)
		if duration.Seconds() > 10 {
			w.WriteHeader(500)
			w.Write([]byte(fmt.Sprintf("error: %v", duration.Seconds())))
		} else {
			w.WriteHeader(200)
			w.Write([]byte("ok"))
		}
	})
  // For the first 10 seconds that the container is alive, the /healthz handler returns a status of 200.
  // After that, the handler returns a status of 500.

	http.HandleFunc("/redirect", func(w http.ResponseWriter, r *http.Request) {
		loc, err := url.QueryUnescape(r.URL.Query().Get("loc"))
		if err != nil {
			http.Error(w, fmt.Sprintf("invalid redirect: %q", r.URL.Query().Get("loc")), http.StatusBadRequest)
			return
		}
		http.Redirect(w, r, loc, http.StatusFound)
	})
	log.Fatal(http.ListenAndServe(":8080", nil))
}
- The kubelet starts performing health checks 3 seconds after the container starts.
- So the first couple of health checks will succeed.
- But after 10 seconds, the health checks will fail, and the kubelet will kill and restart the container.
To try the HTTP liveness check, create a Pod:
1
2
3
4
5
kubectl apply -f https://k8s.io/examples/pods/probe/http-liveness.yaml

# After 10 seconds, view Pod events to verify that liveness probes have failed and the container has been restarted:
# In releases after v1.13, local HTTP proxy environment variable settings do not affect the HTTP liveness probe.
kubectl describe pod liveness-http
Define a TCP liveness probe
https://kubernetes.io/docs/tasks/configure-pod-container/configure-liveness-readiness-startup-probes/#define-a-tcp-liveness-probe
Define a gRPC liveness probe
https://kubernetes.io/docs/tasks/configure-pod-container/configure-liveness-readiness-startup-probes/#define-a-grpc-liveness-probe
Use a named port
- You can use a named port for HTTP and TCP probes.
- gRPC probes do not support named ports.
1
2
3
4
5
6
7
8
ports:
- name: liveness-port
  containerPort: 8080

livenessProbe:
  httpGet:
    path: /healthz
    port: liveness-port
startup
Protect slow starting containers with startup probes
- deal with applications that require additional startup time on their first initialization.
- In such cases, it can be tricky to set up liveness probe parameters without compromising the fast response to deadlocks that motivated such a probe.
- The solution is to set up a startup probe with the same command, HTTP or TCP check, with a failureThreshold * periodSeconds long enough to cover the worst case startup time.
1
2
3
4
5
6
7
8
9
10
11
12
13
14
15
16
17
ports:
- name: liveness-port
  containerPort: 8080

livenessProbe:
  httpGet:
    path: /healthz
    port: liveness-port
  failureThreshold: 1
  periodSeconds: 10

startupProbe:
  httpGet:
    path: /healthz
    port: liveness-port
  failureThreshold: 30
  periodSeconds: 10
- with startup probe, the application will have a maximum of 5 minutes (30 * 10 = 300s) to finish its startup.
- Once the startup probe has succeeded once, the liveness probe takes over to provide a fast response to container deadlocks.
- If the startup probe never succeeds, the container is killed after 300s and subject to the pod’s restartPolicy.
readiness
Define readiness probes
- Sometimes, applications are temporarily unable to serve traffic.
- For example, an application might need to load large data or configuration files during startup, or depend on external services after startup.
- In such cases, you don’t want to kill the application, but you don’t want to send it requests either. Kubernetes provides readiness probes to detect and mitigate these situations.
- A pod with containers reporting that they are not ready does not receive traffic through Kubernetes Services.
Note:
- Readiness probes runs on the container during its whole lifecycle.
- The readiness and liveness probes do not depend on each other to succeed.
If you want to wait before executing a readiness probe, you should use initialDelaySeconds or a startupProbe.
- Readiness probes are configured similarly to liveness probes. The only difference is that you use the
readinessProbefield instead of thelivenessProbefield.
1
2
3
4
5
6
7
readinessProbe:
  exec:
    command:
    - cat
    - /tmp/healthy
  initialDelaySeconds: 5
  periodSeconds: 5
Configuration for HTTP and TCP readiness probes also remains identical to liveness probes.
- Readiness and liveness probes can be used in parallel for the same container.
- Using both can ensure that traffic does not reach a container that is not ready for it, and that containers are restarted when they fail.
Configure Probes
Incorrect implementation of readiness probes may result in an ever growing number of processes in the container, and resource starvation if this is left unchecked.
Probes have a number of fields that you can use to more precisely control the behavior of startup, liveness and readiness checks:
initialDelaySeconds:- Number of seconds after the container has started before startup, liveness or readiness probes are initiated.
- If a startup probe is defined, liveness and readiness probe delays do not begin until the startup probe has succeeded.
- If the value of periodSeconds is greater than initialDelaySeconds then the initialDelaySeconds will be ignored.
- Defaults to 0 seconds. Minimum value is 0.
periodSeconds:- How often (in seconds) to perform the probe.
- Default to 10 seconds. The minimum value is 1.
timeoutSeconds:- Number of seconds after which the probe times out.
- Defaults to 1 second. Minimum value is 1.
successThreshold:- Minimum consecutive successes for the probe to be considered successful after having failed.
- Defaults to 1. Must be 1 for liveness and startup Probes. Minimum value is 1.
failureThreshold:- After a probe fails failureThreshold times in a row, Kubernetes considers that the overall check has failed: the container is not ready/healthy/live.
- Defaults to 3. Minimum value is 1.
- For the case of a startup or liveness probe, if at least failureThreshold probes have failed, Kubernetes treats the container as unhealthy and triggers a restart for that specific container. The kubelet honors the setting of terminationGracePeriodSeconds for that container.
- For a failed readiness probe, the kubelet continues running the container that failed checks, and also continues to run more probes; because the check failed, the kubelet sets the Ready condition on the Pod to false.
terminationGracePeriodSeconds:- configure a grace period for the kubelet to wait between triggering a shut down of the failed container, and then forcing the container runtime to stop that container.
- The default is to inherit the Pod-level value for terminationGracePeriodSeconds (30 seconds if not specified), and the minimum value is 1.
HTTP probes
HTTP probes have additional fields that can be set on httpGet:
host:- Host name to connect to, defaults to the pod IP.
- You probably want to set “Host” in httpHeaders instead.
scheme:- Scheme to use for connecting to the host (HTTP or HTTPS).
- Defaults to “HTTP”.
path:- Path to access on the HTTP server.
- Defaults to “/”.
httpHeaders:- Custom headers to set in the request.
- HTTP allows repeated headers.
port:- Name or number of the port to access on the container.
- Number must be in the range 1 to 65535.
For an HTTP probe, the kubelet sends an HTTP request to the specified port and path to perform the check.
- The kubelet sends the probe to the Pod’s IP address, unless the address is overridden by the optional
hostfield in httpGet. - If scheme field is set to HTTPS, the kubelet sends an HTTPS request skipping the certificate verification.
- In most scenarios, you do not want to set the host field.
- but, suppose the container listens on 127.0.0.1 and the Pod’s hostNetwork field is true. Then host, under httpGet, should be set to 127.0.0.1.
- If your pod relies on virtual hosts, which is probably the more common case, you should not use host, but rather set the Host header in httpHeaders.
For an HTTP probe, the kubelet sends two request headers in addition to the mandatory Host header:
- User-Agent: The default value is kube-probe/1.30, where 1.30 is the version of the kubelet.
- Accept: The default value is /.
You can
1
2
3
4
5
6
7
8
9
10
11
12
13
14
15
16
17
18
19
20
21
22
23
24
25
# override the default headers by defining httpHeaders for the probe.
livenessProbe:
  httpGet:
    httpHeaders:
      - name: Accept
        value: application/json

startupProbe:
  httpGet:
    httpHeaders:
      - name: User-Agent
        value: MyUserAgent

# remove these two headers by defining them with an empty value.
livenessProbe:
  httpGet:
    httpHeaders:
      - name: Accept
        value: ""

startupProbe:
  httpGet:
    httpHeaders:
      - name: User-Agent
        value: ""
Note:
- When the kubelet probes a Pod using HTTP, it only follows redirects if the redirect is to the same host.
- If the kubelet receives 11 or more redirects during probing, the probe is considered successful and a related Event is created:
- If the kubelet receives a redirect where the hostname is different from the request, the outcome of the probe is treated as successful and kubelet creates an event to report the redirect failure.
1
2
3
4
5
6
7
8
9
Events:
  Type     Reason        Age                     From               Message
  ----     ------        ----                    ----               -------
  Normal   Scheduled     29m                     default-scheduler  Successfully assigned default/httpbin-7b8bc9cb85-bjzwn to daocloud
  Normal   Pulling       29m                     kubelet            Pulling image "docker.io/kennethreitz/httpbin"
  Normal   Pulled        24m                     kubelet            Successfully pulled image "docker.io/kennethreitz/httpbin" in 5m12.402735213s
  Normal   Created       24m                     kubelet            Created container httpbin
  Normal   Started       24m                     kubelet            Started container httpbin
 Warning  ProbeWarning  4m11s (x1197 over 24m)  kubelet            Readiness probe warning: Probe terminated redirects
TCP probes
https://kubernetes.io/docs/tasks/configure-pod-container/configure-liveness-readiness-startup-probes/#tcp-probes
- For a TCP probe, the kubelet makes the probe connection at the node, not in the Pod,
- which means that you can not use a service name in the host parameter since the kubelet is unable to resolve it.
liveness 与 readiness 的探针工作方式源码解析
ref:
- https://xuxinkun.github.io/2019/10/28/liveness-readiness/
liveness 和 readiness 作为 k8s 的探针, 可以对应用进行健康探测。
- 二者支持的探测方式相同。主要的探测方式支持 http 探测, 执行命令探测, 以及 tcp 探测. 探测均是由 kubelet 执行。
执行命令探测
1
2
3
4
5
6
7
8
9
10
11
12
13
14
15
16
17
func (pb *prober) runProbe(p *v1.Probe, pod *v1.Pod, status v1.PodStatus, container v1.Container, containerID kubecontainer.ContainerID) (probe.Result, string, error) {
.....
        command := kubecontainer.ExpandContainerCommandOnlyStatic(p.Exec.Command, container.Env)
		return pb.exec.Probe(pb.newExecInContainer(container, containerID, command, timeout))
......

func (pb *prober) newExecInContainer(container v1.Container, containerID kubecontainer.ContainerID, cmd []string, timeout time.Duration) exec.Cmd {
	return execInContainer{func() ([]byte, error) {
		return pb.runner.RunInContainer(containerID, cmd, timeout)
	}}
}

......
func (m *kubeGenericRuntimeManager) RunInContainer(id kubecontainer.ContainerID, cmd []string, timeout time.Duration) ([]byte, error) {
	stdout, stderr, err := m.runtimeService.ExecSync(id.ID, cmd, 0)
	return append(stdout, stderr...), err
}
由 kubelet, 通过 CRI 接口的 ExecSync 接口, 在对应容器内执行拼装好的 cmd 命令。获取返回值。
1
2
3
4
5
6
7
8
9
10
11
12
13
14
15
16
func (pr execProber) Probe(e exec.Cmd) (probe.Result, string, error) {
	data, err := e.CombinedOutput()
	glog.V(4).Infof("Exec probe response: %q", string(data))
	if err != nil {
		exit, ok := err.(exec.ExitError)
		if ok {
			if exit.ExitStatus() == 0 {
				return probe.Success, string(data), nil
			} else {
				return probe.Failure, string(data), nil
			}
		}
		return probe.Unknown, "", err
	}
	return probe.Success, string(data), nil
}
kubelet 是根据执行命令的退出码来决定是否探测成功。
- 执行命令的退出码为 0 时, 认为执行成功, 否则为执行失败。
- 如果执行超时, 则状态为 Unknown。
http 探测
- http 探测是通过 kubelet 请求容器的指定 url, 并根据 response 来进行判断。
- 当返回的状态码在 200 到 400(不含 400)之间时, 也就是状态码为 2xx 和 3xx, 认为探测成功。否则认为失败。
1
2
3
4
5
6
7
8
func DoHTTPProbe(url *url.URL, headers http.Header, client HTTPGetInterface) (probe.Result, string, error) {
	req, err := http.NewRequest("GET", url.String(), nil)
	......
    if res.StatusCode >= http.StatusOK && res.StatusCode < http.StatusBadRequest {
		glog.V(4).Infof("Probe succeeded for %s, Response: %v", url.String(), *res)
		return probe.Success, body, nil
	}
	......
tcp 探测
- tcp 探测是通过探测指定的端口。如果可以连接, 则认为探测成功, 否则认为失败。
1
2
3
4
5
6
7
8
9
10
11
12
func DoTCPProbe(addr string, timeout time.Duration) (probe.Result, string, error) {
	conn, err := net.DialTimeout("tcp", addr, timeout)
	if err != nil {
		// Convert errors to failures to handle timeouts.
		return probe.Failure, err.Error(), nil
	}
	err = conn.Close()
	if err != nil {
		glog.Errorf("Unexpected error closing TCP probe socket: %v (%#v)", err, err)
	}
	return probe.Success, "", nil
}
探测失败的可能原因
执行命令探测失败的原因主要可能是容器未成功启动, 或者执行命令失败。当然也可能 docker 或者 docker-shim 存在故障。
由于 http 和 tcp 都是从 kubelet 自 node 节点上发起的, 向容器的 ip 进行探测. 所以探测失败的原因除了应用容器的问题外, 还可能是从 node 到容器 ip 的网络不通。
liveness 与 readiness 的原理区别
- 二者能够起到的作用不同。
1
2
3
4
5
6
7
8
func (m *kubeGenericRuntimeManager) computePodContainerChanges(pod *v1.Pod, podStatus *kubecontainer.PodStatus) podContainerSpecChanges {
        ......
        liveness, found := m.livenessManager.Get(containerStatus.ID)
		if !found || liveness == proberesults.Success {
			changes.ContainersToKeep[containerStatus.ID] = index
			continue
		}
        ......
liveness 主要用来确定何时重启容器。l
- iveness 探测的结果会存储在 livenessManager 中。
- kubelet 在 syncPod 时, 发现该容器的 liveness 探针检测失败时, 会将其加入待启动的容器列表中, 在之后的操作中会重新创建该容器。
readiness 主要来确定容器是否已经就绪。
- 只有当 Pod 中的容器都处于就绪状态, 也就是 pod 的 condition 里的 Ready 为 true 时, kubelet 才会认定该 Pod 处于就绪状态。
- 而 pod 是否处于就绪状态的作用是控制哪些 Pod 应该作为 service 的后端。如果 Pod 处于非就绪状态, 那么它们将会被从 service 的 endpoint 中移除。
1
2
3
4
5
6
7
8
func (m *manager) SetContainerReadiness(podUID types.UID, containerID kubecontainer.ContainerID, ready bool) {
	    ......
    	containerStatus.Ready = ready
        ......
    	readyCondition := GeneratePodReadyCondition(&pod.Spec, status.ContainerStatuses, status.Phase)
    	......
    	m.updateStatusInternal(pod, status, false)
}
readiness 检查结果会通过 SetContainerReadiness 函数, 设置到 pod 的 status 中, 从而更新 pod 的 ready condition。
- liveness 和 readiness 除了最终的作用不同, 另外一个很大的区别是它们的初始值不同。
1
2
3
4
5
6
7
8
9
10
switch probeType {
	case readiness:
		w.spec = container.ReadinessProbe
		w.resultsManager = m.readinessManager
		w.initialValue = results.Failure
	case liveness:
		w.spec = container.LivenessProbe
		w.resultsManager = m.livenessManager
		w.initialValue = results.Success
}
liveness 的初始值为成功。
- 这样防止在应用还没有成功启动前, 就被误杀。
- 如果在规定时间内还未成功启动, 才将其设置为失败, 从而触发容器重建。
readiness 的初始值为失败。
- 这样防止应用还没有成功启动前就向应用进行流量的导入。
- 如果在规定时间内启动成功, 才将其设置为成功, 从而将流量向应用导入。
- 二者作用不能相互替代。
- 例如只配置了 liveness, 那么在容器启动, 应用还没有成功就绪之前, 这个时候 pod 是 ready 的(因为容器成功启动了)。那么流量就会被引入到容器的应用中, 可能会导致请求失败。虽然在 liveness 检查失败后, 重启容器, 此时 pod 的 ready 的 condition 会变为 false。但是前面会有一些流量因为错误状态导入。
- 当然只配置了 readiness 是无法触发容器重启的。
因为二者的作用不同, 在实际使用中, 可以根据实际的需求将二者进行配合使用。
.
Comments powered by Disqus.