GitHub
- Git
- Git hooks
Git
useful link:
- https://learngitbranching.js.org
- https://nulab.com/zh-cn/learn/software-development/git-tutorial
- https://www.jianshu.com/p/d220c88bb516
- https://www.yiibai.com/git/git_basic_concepts.html
- https://www.softwhy.com/article-8699-1.html
- https://www.yiibai.com/git/git_commit.html
basic


Workspace:工作区- 通过
git init创建的代码库的所有文件, 但是不包括.git文件(版本库)
- 通过
Index/Stage:暂存区/索引- 通过
git add ./*/*Xxx/Xxxx*添加的修改,都是进入到暂存区了,肉眼不可见 通过git status可以看到修改的状态。
- 通过
Repository:仓库区(或本地仓库)/存储库Remote:远程仓库
Git 常用命令速查
1
2
3
4
5
6
7
8
9
10
11
12
13
14
15
16
17
18
19
20
21
22
23
24
25
26
27
28
29
30
31
32
33
34
35
36
37
38
39
40
41
42
43
44
45
46
# 查看本地所有分支
$ git branch

# 查看当前状态
$ git status

# 提交
$ git commit

# 查看所有的分支
$ git branch -a

# 查看远程所有分支
$ git branch -r

# 提交并且加注释
$ git commit -am "init"
git remote add origin git@192.168.1.119:ndshow

# 将文件给推到服务器上
$ git push origin master

# 显示远程库origin里的资源
$ git remote show origin
$ git push origin master:develop

# 将本地库与服务器上的库进行关联
$ git push origin master:hb-dev

# 切换到远程dev分支
$ git checkout --track origin/dev

# 删除本地库develop
$ git branch -D master develop

# 建立一个新的本地分支dev
$ git checkout -b dev

# 将分支dev与当前分支进行合并
$ git merge origin/dev

# 切换到本地dev分支
$ git checkout dev

# 查看远程库
$ git remote show
版本控制
版本控制是一种记录一个或若干文件内容变化,以便将来查阅特定版本修订情况的系统。在本书所展示的例子中,我们对保存着软件源代码的文件作版本控制,但实际上,可以对任何类型的文件进行版本控制。
- 本地版本控制系统
- 人们很久以前就开发了许多种本地版本控制系统,大多都是采用某种简单的数据库来记录文件的历次更新差异。
- 其中最流行的一种叫做
RCS,现今许多计算机系统上都还看得到它的踪影。 甚至在流行的 Mac OS X 系统上安装了开发者工具包之后,也可以使用 rcs 命令。 - 它的工作原理是在硬盘上保存补丁集(补丁是指文件修订前后的变化);通过应用所有的补丁,可以重新计算出各个版本的文件内容。

- 集中化的版本控制系统
- 如何让在不同系统上的开发者协同工作?
- 于是,集中化的版本控制系统
CVCS (Centralized Version Control Systems)应运而生。 这类系统,诸如 CVS、Subversion(SVN) 以及 Perforce 等,都有一个单一的集中管理的服务器,保存所有文件的修订版本,而协同工作的人们都通过客户端连到这台服务器,取出最新的文件或者提交更新。多年以来,这已成为版本控制系统的标准做法。

- 这种做法带来了许多好处,特别是相较于老式的本地 VCS 来说。 现在,每个人都可以在一定程度上看到项目中的其他人正在做些什么。 而管理员也可以轻松掌控每个开发者的权限,并且管理一个 CVCS 要远比在各个客户端上维护本地数据库来得轻松容易。
事分两面,有好有坏。 最显而易见的缺点是中央服务器的单点故障。 如果宕机一小时,那么在这一小时内,谁都无法提交更新,也就无法协同工作。 如果中心数据库所在的磁盘发生损坏,又没有做恰当备份,毫无疑问您将丢失所有数据——包括项目的整个变更历史,只剩下人们在各自机器上保留的单独快照。本地版本控制系统也存在类似问题,只要整个项目的历史记录被保存在单一位置,就有丢失所有历史更新记录的风险。
- 分布式版本控制系统
- 分布式版本控制系统
DVCS(Distributed Version Control System)面世了。 - 在这类系统中,像 Git、Mercurial、Bazaar 以及 Darcs 等,客户端并不只提取最新版本的文件快照,而是把代码仓库完整地镜像下来。 这么一来,任何一处协同工作用的服务器发生故障,事后都可以用任何一个镜像出来的本地仓库恢复。 因为每一次的克隆操作,实际上都是一次对代码仓库的完整备份。
- 分布式版本控制系统

- 更进一步,许多这类系统都可以指定和若干不同的远端代码仓库进行交互。藉此,你就可以在同一个项目中,分别和不同工作小组的人相互协作。可以根据需要设定不同的协作流程,比如层次模型式的工作流,而这在以前的集中式系统中是无法实现的。
使用Git进行版本管理
- Git是一个分布式版本管理系统,是为了更好地管理Linux内核开发而创立的。
- Git可以在任何时间点,把文档的状态作为更新记录保存起来。
- 因此可以把编辑过的文档复原到以前的状态,也可以显示编辑前后的内容差异。
- 而且,编辑旧文件后,试图覆盖较新的文件的时候(即上传文件到服务器时),系统会发出警告,因此可以避免在无意中覆盖了他人的编辑内容。
1
2
3
4
5
6
7
8
9
10
11
12
13

cd my_app
git init

git checkout -b new_func main       # create + switch branch
git add file.txt
git commit -m "add file"
git push

git checkout main                   # switch branch
git merge new_func

git branch -d new_func
Git基础和原理
- Git 在保存和对待各种信息的时候与其它版本控制系统有很大差异,尽管操作起来的命令形式非常相近
- 直接记录快照,非差异比较
- 和其它版本控制系统(包括 Subversion 和近似工具)的主要差别在于 Git 对待数据的方法。
- 概念: 其它大部分系统以
文件变更列表的方式存储信息。 这类系统(CVS、Subversion、Perforce、Bazaar 等等)将它们保存的信息看作是一组基本文件和每个文件随时间逐步累积的差异。存储每个文件与初始版本的差异.
- 概念: 其它大部分系统以

- Git 不按照以上方式对待或保存数据。 Git 更像是把数据看作是对小型文件系统的一组快照。
- 每次提交更新,或在 Git 中保存项目状态时,它主要对当时的全部文件制作一个快照并保存这个快照的索引。
- 为了高效,如果文件没有修改,Git 不再重新存储该文件,而是只保留一个链接指向之前存储的文件。
- Git 对待数据更像是一个 快照流。
- 这是 Git 与几乎所有其它版本控制系统的重要区别。 因此 Git 重新考虑了以前每一代版本控制系统延续下来的诸多方面。 Git 更像是一个小型的文件系统,提供了许多以此为基础构建的超强工具,而不只是一个简单的 VCS。在 Git 分支讨论 Git 分支管理时,将探究这种方式对待数据所能获得的益处。
- Git 不按照以上方式对待或保存数据。 Git 更像是把数据看作是对小型文件系统的一组快照。

- 和其它版本控制系统(包括 Subversion 和近似工具)的主要差别在于 Git 对待数据的方法。
- 近乎所有操作都是本地执行
- 在 Git 中的绝大多数操作都只需要访问本地文件和资源,一般不需要来自网络上其它计算机的信息。因为你在本地磁盘上就有项目的完整历史,所以大部分操作看起来瞬间完成。
- 例子
- 浏览项目历史,Git 不需外连到服务器去获取历史,然后再显示出来, 它只需直接从本地数据库中读取, 能立即看到项目历史。
- 查看当前版本与一个月前的版本之间引入的修改,Git 会查找到一个月前的文件做一次本地的差异计算,而不是由远程服务器处理或从远程服务器拉回旧版本文件再来本地处理。
- 意味着你离线时,几乎可以进行任何操作。使用其它系统,做到如此是不可能或很费力的。比如 Perforce,你没有连接服务器时几乎不能做什么事;Subversion 和 CVS,你能修改文件,但不能向数据库提交修改(因为你的本地数据库离线了)。
- 在 Git 中的绝大多数操作都只需要访问本地文件和资源,一般不需要来自网络上其它计算机的信息。因为你在本地磁盘上就有项目的完整历史,所以大部分操作看起来瞬间完成。
- Git 保证完整性
- Git 中所有数据在存储前都计算校验和,然后以校验和来引用。
- 这意味着不可能在 Git 不知情时更改任何文件内容或目录内容。 这个功能建构在 Git 底层,是构成 Git 哲学不可或缺的部分。 若你在传送过程中丢失信息或损坏文件,Git 就能发现。
- Git 用以计算校验和的机制叫做 SHA-1 hash。由 40 个十六进制字符(0-9,a-f)组成,基于 Git 中文件的内容或目录结构计算出来。
- SHA-1 哈希看起来是这样:24b9da6552252987aa493b52f8696cd6d3b0037 Shell
- 实际上,Git 数据库中保存的信息都是以文件内容的哈希值来索引,而不是文件名。
Git 一般只添加数据
- 执行的 Git 操作,几乎只往 Git 数据库中增加数据。
- 很难让 Git 执行任何不可逆操作,或者让它以任何方式清除数据。
- 同别的 VCS 一样,未提交更新时有可能丢失或弄乱修改的内容;但是一旦你提交快照到 Git 中,就难以再丢失数据,特别是如果你定期的推送数据库到其它仓库的话。
Git 三种状态
Git 有三种状态:
- 已提交(committed) : 表示数据已经安全的保存在本地数据库中
- 已修改(modified) : 表示修改了文件,但还没保存到数据库中。
- 已暂存(staged) : 表示对一个已修改文件的当前版本做了标记,使之包含在下次提交的快照中
Git 项目的三个工作区域:
working directory 工作目录: 对项目的某个版本独立提取出来的内容。- 这些从 Git 仓库的压缩数据库中提取出来的文件,放在磁盘上供你使用或修改。
staging area 暂存区域: 暂存区域是一个文件,保存了下次将提交的文件列表信息,一般在 Git 仓库目录中。- 有时候也被称作‘索引’
.git directory(repository) 仓库目录: 用来保存项目的元数据和对象数据库的地方。- Git 中最重要的部分,从其它计算机克隆仓库时拷贝的就是这里的数据。

基本的 Git 工作流程如下:
- 在工作目录中修改文件。
- 暂存文件,将文件的快照放入暂存区域。
- 提交更新,找到暂存区域的文件,将快照永久性存储到 Git 仓库目录。
如果 Git 目录中保存着的特定版本文件,就属于已提交状态。 如果作了修改并已放入暂存区域,就属于已暂存状态。 如果自上次取出后,作了修改但还没有放到暂存区域,就是已修改状态。
Git安装设置
Linux 上安装
- 用二进制安装程序来安装 Git,可以使用发行版包含的基础软件包管理工具来安装。
- Fedora 上,用 yum:
$ sudo yum install git - 在 Debian 的发行版上,用 apt-get:
$ sudo apt-get install git - 安装完成后,查看当前安装的 Git 的版本:
$ git version
在 Mac 上安装
- 最简单的方法是安装 Xcode Command Line Tools。 Mavericks (10.9) 或更高版本的系统中,在 Terminal 里尝试首次运行 git 命令即可。 如果没有安装过命令行开发者工具,将会提示你安装。
- 可以使用二进制安装程序。OSX Git 安装程序可以在 Git 官方网站下载,网址为 https://git-scm.com/download/mac。
- Git OS X 安装程序.你也可以将它作为 GitHub for Mac 的一部分来安装。 它们的图形化 Git 工具有一个安装命令行工具的选项。 你可以从 GitHub for Mac 网站下载该工具,网址为 https://mac.github.com。
在 Windows 上安装
- 官方版本可以在 Git 官方网站下载。 打开 https://git-scm.com/download/win ,下载会自动开始。 要注意这是一个名为 Git for Windows的项目(也叫做 msysGit),和 Git 是分别独立的项目;
- 另一个简单的方法是安装 GitHub for Windows。 该安装程序包含图形化和命令行版本的 Git。 它也能支持 Powershell,提供了稳定的凭证缓存和健全的 CRLF 设置
从源代码安装
- 从源码安装 Git 更实用,因为你能得到最新的版本。 二进制安装程序倾向于有一些滞后,当然近几年 Git 已经成熟,这个差异不再显著。 注意:从源码安装 Git 依懒包会比较,可能比较费时。
- 从源码安装 Git,需要安装 Git 依赖的库:curl、zlib、openssl、expat,还有libiconv。
- 如果你的系统上有 yum (如 Fedora)或者 apt-get(如基于 Debian 的系统),可以使用以下命令之一来安装最小化的依赖包来编译和安装 Git 的二进制版:
1
2
3
4
$ sudo yum install curl-devel expat-devel gettext-devel
  openssl-devel zlib-devel
$ sudo apt-get install libcurl4-gnutls-dev libexpat1-dev gettext
  libz-dev libssl-dev
为了能够添加更多格式的文档(如 doc, html, info),你需要安装以下的依赖包:
1
2
$ sudo yum install asciidoc xmlto docbook2x
$ sudo apt-get install asciidoc xmlto docbook2x
当你安装好所有的必要依赖,你可以继续从几个地方来取得最新发布版本的 tar 包。
- 从 Kernel.org 网站获取,网址为 https://www.kernel.org/pub/software/scm/git,
- 从 GitHub 网站上的镜像来获得,网址为 https://github.com/git/git/releases。 通常在 GitHub 上的是最新版本,但 kernel.org 上包含有文件下载签名,如果你想验证下载正确性的话会用到。
- 接着,编译并安装:
1
2
3
4
5
6
$ tar -zxf git-2.0.0.tar.gz
$ cd git-2.0.0
$ make configure
$ ./configure --prefix=/usr
$ make all doc info
$ sudo make install install-doc install-html install-info
完成后,使用 Git 来获取 Git 的升级:
$ git clone git://git.kernel.org/pub/scm/git/git.git
repository


创建数据库
从Git 版本库的初始化

通常两种方式:
git init和git remote:- 当你本地创建了一个工作目录,你可以进入这个目录,使用’git init’命令进行初始化;Git以后就会对该目录下的文件进行版本控制,这时候如果你需要将它放到远程服务器上,可以在远程服务器上创建一个目录,并把可访问的URL记录下来,此时你就可以利用’git remote add’命令来增加一个远程服务器端,
git remoteaddorigin git://github.com/someone/another_project.git- 增加URL地址为’git://github.com/someone/another_project.git’,名称为origin的远程服务器
- 以后提交代码的时候只需要使用 origin别名即可
git clone: 当已有一个远程的Git版本库,只需要在本地克隆一份git clonegit://github.com/someone/some_project.git some_project- 将’git://github.com/someone/some_project.git’这个URL地址的远程版本库,完全克隆到本地some_project目录下
远程仓库相关命令
1
2
3
4
5
6
7
8
9
10
11
12
13
14
15
16
17
18
# - 检出仓库:
$ git clone git://github.com/jquery/jquery.git
# - 查看远程仓库:
$ git remote -v
# - 添加远程仓库:
$ git remote add [name] [url]
# - 删除远程仓库:
$ git remote rm [name]
# - 修改远程仓库:
$ git remote set-url --push [name] [newUrl]
# - 拉取远程仓库:
$ git pull [remoteName] [localBranchName]
# - 推送远程仓库:
$ git push [remoteName] [localBranchName]

# 如果想把本地某分支test提交到远程仓库,并作为远程仓库的master分支,或者作为另外一个名叫test的分支
$ git push origin test:master // 提交本地test分支作为远程的master分支
$ git push origin test:test   // 提交本地test分支作为远程的test分支
Fork
origin 与 upstream
- Git 是去中心化的版本管理工具:
- 一个 Git 仓库,既可以没有远程仓库,也可以有多个远程仓库,
- 其中默认的远程仓库我们称之为 origin。
- 在 Github 上,我们可以 fork 任意开源项目到个人 ID 下,当我们把个人 ID 下的仓库 clone 到本地时,除了默认的 origin 仓库外,我们还需要配置一个 upstream 仓库,指向原始的开源项目地址,保证可以定期同步源仓库的更新。
注:upstream 只是一个命名约定,你可以换成任意的命名。
1
2
3
4
5
6
7
8
9
10
11
# 查看远程仓库列表
git remote -v           # grv

# 查看具体仓库细节
git remote show origin  # gr show origin

# 添加 upstream 仓库信息
git remote add upstream <git_repository_url> # gra upstream

# 删除 upstream 仓库信息
git remote remove upstream # grrm upstream
origin
- 源仓库,一般为git clone的仓库,克隆后默认提交和拉取的地址
upstream
- 为上游仓库,一般为origin fork 的仓库
1
2
git pull = git pull origin main  - 从 user/fastjson 的 main 分支拉代码
git pull upstream main           - 从 company/fastjson 的 main 分支拉代码
修改记录
若要把文件或目录的添加和变更保存到数据库,就需要进行提交。
执行提交后,数据库中会生成上次提交的状态与当前状态的差异记录(也被称为revision)。

collusion


工作树和索引
在Git管理下,大家实际操作的目录被称为工作树。
在数据库和工作树之间有索引,索引是为了向数据库提交作准备的区域。

Git在执行提交的时候,不是直接将工作树的状态保存到数据库
- 而是将设置在中间索引区域的状态保存到数据库。
- 因此,要提交文件,首先需要把文件加入到索引区域中。
- 所以,凭借中间的索引,可以避免工作树中不必要的文件提交,还可以将文件修改内容的一部分加入索引区域并提交。
- fetch
- push
- pull -


command
Branch 分支
在开发软件时
- 可能有多人同时为同一个软件开发功能或修复BUG,
- 可能存在多个Release版本,并且需要对各个版本进行维护。
- Git的 branch 功能可以支持同时进行多个功能的开发和版本管理。
branch
- branch 是为了将修改记录的整体流程分叉保存。
- 分叉后的 branch 不受其他 branch 的影响,
- 所以在同一个数据库里可以同时进行多个修改。
- 为了不受其他开发人员的影响,在主 branch 上建立自己专用的 branch 。
- 完成工作后,将自己 branch 上的修改合并到主 branch 。
- 因为每一次提交的历史记录都会被保存, 当发生问题时,定位和修改造成问题的提交就容易多了。


1
2
3
4
5
6
7
8
9
10
11
12
13
14
15
16
17
18
19
20
21
22
23
24
25
26
27
28
29
30
31
32
33
34
35
36
37
38
39
40
41
42
43
44
45
# 显示分支列表
$ git branch

# 查看远程分支:
$ git branch -r

# 创建分支
$ git branch <branchname>

# 重命名分支
$ git branch -m <oldbranch> <newbranch>

# 删除分支
$ git branch -d <branchname>

# 切换分支
# 添加-b选项将创建一个新分支,并切换到它。
$ git checkout <branch>

# 创建新分支并立即切换到新分支:
$ git checkout -b [name]

# 删除分支:
# -d选项只能删除已经参与了合并的分支,对于未有合并的分支是无法删除的。如果想强制删除一个分支,可以使用-D选项
$ git branch -d [name]

# 合并分支:
$ git merge [name] ----将名称为[name]的分支与当前分支合并
$ git merge upstrem/[name]

# 创建远程分支(本地分支push到远程):
$ git push origin [name]

# 删除远程分支:
$ git push origin :heads/[name] 或 $ git push origin :[name]

# 创建空的分支:(执行命令之前记得先提交你当前分支的修改,否则会被强制删干净没得后悔)
$git symbolic-ref HEAD refs/heads/[name]
$rm .git/index
$git clean -fdx

# 合并分支
# 添加--no-ff选项将导致 git merge 命令都会是创建合并提交,而不是快进。这很有用,因为它允许保留合并前分支的历史记录信息。
# 当添加--squash选项时,Git 会创建一个代表合并更改的单个提交,而不是创建合并提交。 此提交包含来自合并分支的更改,但不包含任何与合并分支或合并过程本身相关的信息。
$ git merge <branch>
main branch
- 在数据库进行最初的提交后, Git会创建一个名为 main branch
- 因此之后的提交,在切换 branch 之前都会添加到 main branch 里。

Checkout branch
- 若要切换作业的 branch ,就要进行checkout操作。进行checkout时,git会从工作树还原向目标 branch 提交的修改内容。
- checkout之后的提交记录将被追加到目标 branch 。

Merge branch
Merge branch
- 是为了 可以随时发布release而创建的 branch
- 还能作为Topic branch 的源 branch 使用。
- 保持 branch 稳定
的状态很重要
- 如果要进行更改,通常先创建Topic branch ,
- 针对该 branch ,可以使用Jenkins之类的CI工具进行自动化编译以及测试。
通常,大家会将 main branch 当作 Merge branch 使用。
Topic branch
Topic branch
- 为了开发新功能或修复Bug等任务而建立的 branch 。
- 若要同时进行多个的任务,请创建多个的Topic branch 。
- Topic branch 是从稳定的 Merge branch 创建的。
- 完成作业后,要把Topic branch 合并回 Merge branch 。

Branch action
1. Create branch 创建分支
1
2
3
4
5
$ git branch issue1

$ git branch
# issue1
# * main

2. Switch branch 跳转分支
1
2
$ git checkout issue1
# Switched to branch 'issue1'

1
2
3
$ git add myfile.txt
$ git commit -m "append description of the add command"
# [issue1 b2b23c4] append description of the add command 1 files changed, 1 insertions(+), 0 deletions(-)
3. Merge to main
1
2
3
4
5
6
7
8
$ git checkout main
# Switched to branch 'main'

$ git merge issue1
# Updating 1257027..b2b23c4
# Fast-forward
# myfile.txt |    1 +
# 1 files changed, 1 insertions(+), 0 deletions(-)

4. Delete branch
1
2
$ git branch -d issue1
# Deleted branch issue1 (was b2b23c4).

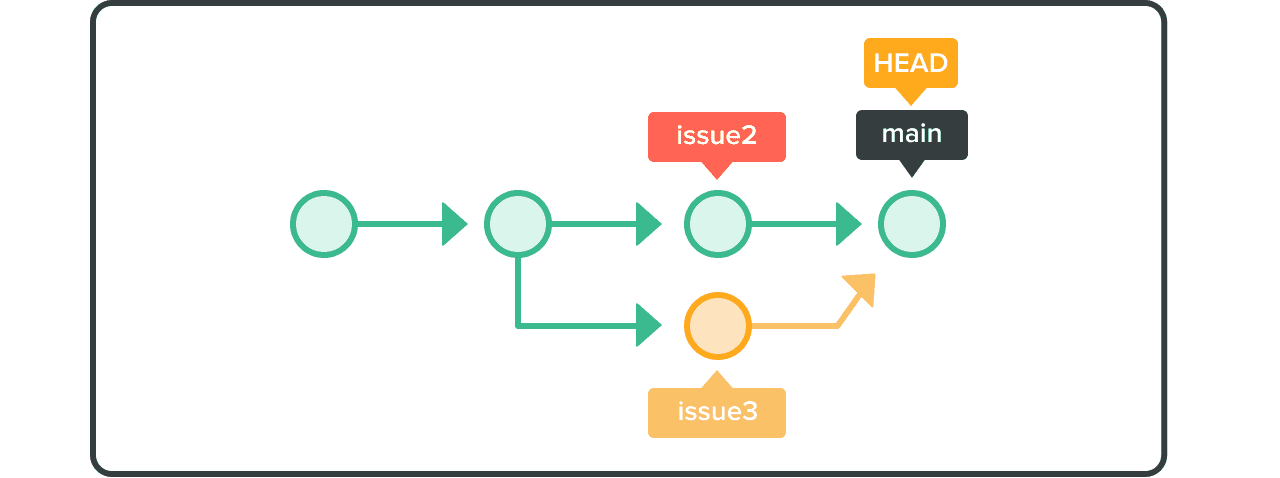
5. Working in parallel
1
2
3
4
5
6
7
8
9
10
$ git branch issue2
$ git branch issue3

$ git checkout issue2
$ git add myfile.txt
$ git commit -m "append description of the commit command"

$ git checkout issue3
$ git add myfile.txt
$ git commit -m "append description of the pull command"
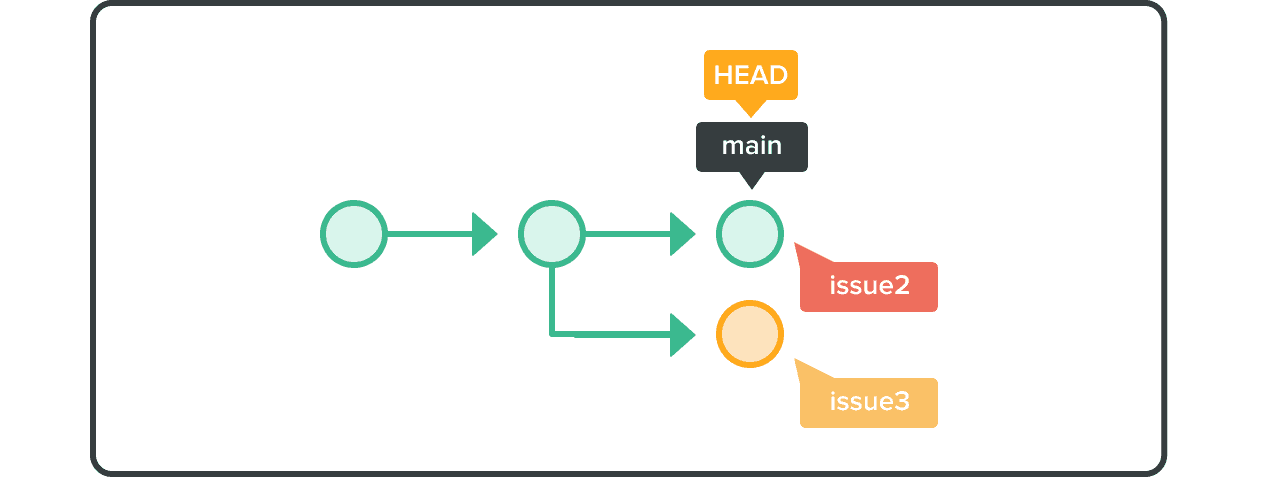
6. Resolve merge conflict
1
2
3
4
5
6
7
8
9
10
11
12
13
14
15
$ git checkout main
$ git merge issue2
# Updating b2b23c4..8f7aa27
# Fast-forward
# myfile.txt |    2 ++
#   1 files changed, 2 insertions(+), 0 deletions(-)

$ git merge issue3
# Auto-merging myfile.txt
# CONFLICT (content): Merge conflict in myfile.txt
# Automatic merge failed; fix conflicts and then commit the result.

# manually fix the conflict
$ git add myfile.txt
$ git commit -m "merge issue3 branch"
7. Reset branch
undoing the previous merge.
1
$ git reset --hard HEAD~
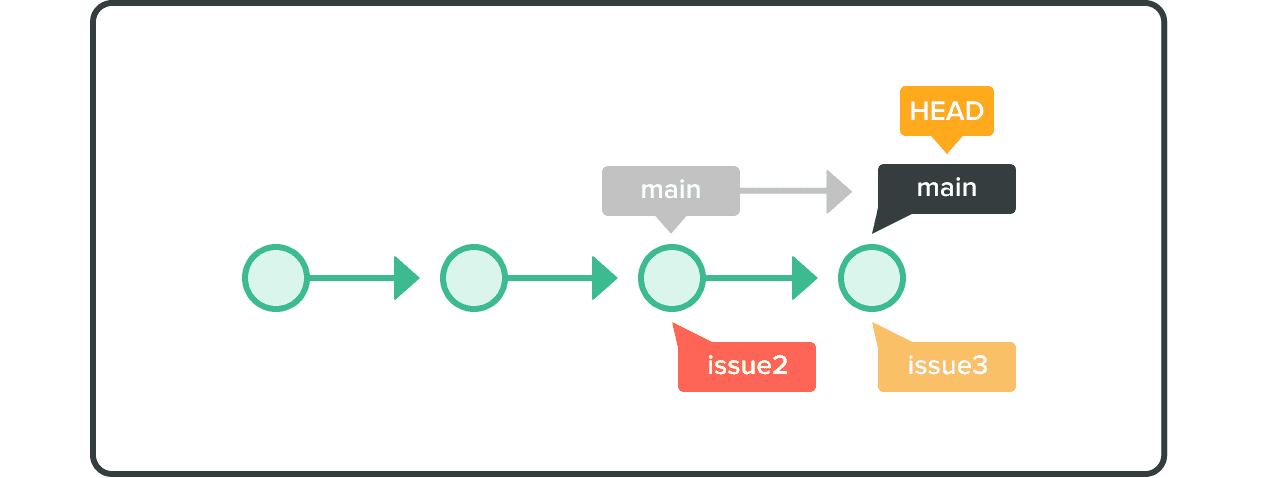
8. Rebase a branch
Modify & move past commit and messages
1
2
3
4
# Exit rebase
$ git rebase --abort
# run rebase.
$ git rebase --continue
1
2
3
4
5
6
7
8
9
10
11
12
13
14
15
16
$ git checkout issue3

$ git rebase main
# Auto-merging sample.txt
# CONFLICT (content): Merge conflict in sample.txt
# error: could not apply 470d684... My Commit
# hint: Resolve all conflicts manually, mark them as resolved with
# hint: "git add/rm <conflicted_files>", then run "git rebase --continue".
# hint: You can instead skip this commit: run "git rebase --skip".
# hint: To abort and get back to the state before "git rebase", run "git rebase --abort".
# Could not apply 470d684... My Commit

# manually fix the conflict
$ git add myfile.txt
$ git rebase --continue
# Applying: append description of the pull command

With the issue3 branch rebased onto main, we can now issue a fast-forward merge.
Switch over to the main branch and merge issue3 with main
1
2
3
4
5
6
$ git checkout main
$ git merge issue3
# Updating 8f7aa27..96a0ff0
# Fast-forward
# myfile.txt |    1 +
#   1 files changed, 1 insertions(+), 0 deletions(-)
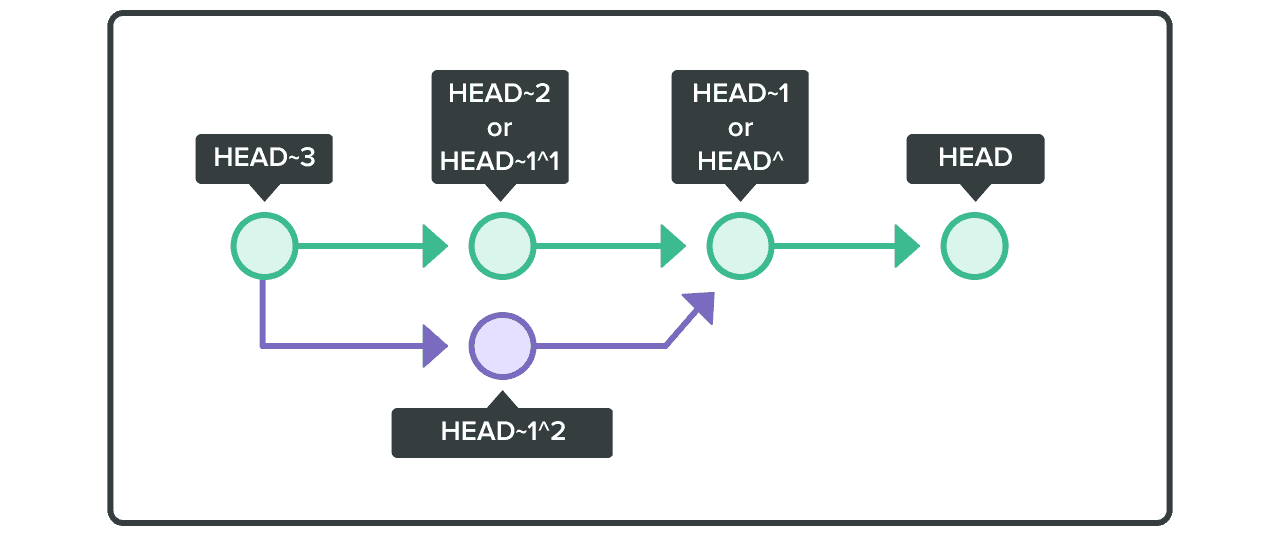
HEAD(指向分支)
HEAD
- 指向的是现在使用中的 branch 的最后一次更新。
- 通常默认指向 main branch 的最后一次更新。
- 通过移动HEAD,就可以变更使用的 branch 。
HEAD 用于表示分支的当前快照。对于一个新的存储库,在默认情况下,Git 会将 HEAD 指向主分支。更改 HEAD 指向的位置将更新活动分支。
- ~(代字号) 和 ^(插入符号) 指向相对于特定提交的位置。这些符号与提交引用一起使用,通常是 HEAD 或提交哈希(hash)。
- ~ 指的是祖先(多少代取决于数量)。
- HEAD~1 指的是提交的第一个父级。
- HEAD~2 指的是提交的第一个祖父级。
- ^ 指的是合并提交的父级。
- HEAD^1 指的是 HEAD 的第一个父级,其中 head 是合并提交。
- HEAD^2 指的是 HEAD 的第一个祖父级,其中 head 是合并提交。
- 合并提交中的提交可以有两个父项。
TAG

1
2
3
4
5
6
7
8
9
10
11
$ git init
$ git add myfile.txt
$ git commit -m "first commit"

$ git tag tag1

$ git tag
  # tag1

$ git tag -n
  # tag1           first commit
1
2
3
4
5
$ git tag -am "Simple Git tutorial for beginners" tag2

$ git tag -n
  # tag1           first commit
  # tag2          Simple Git tutorial for beginners
1
2
# Delete the tag
$ git tag -d tag2
1
2
3
4
5
6
7
8
9
10
11
12
13
14
15
16
17
18
19
20
21
22
23
24
25
26
27

# 查看版本:
$ git tag

# 创建版本:
$ git tag [name]

# 删除版本:
$ git tag -d [name]

# 查看远程版本:
$ git tag -r`

# 创建远程版本(本地版本push到远程):
$ git push origin [name]

# 删除远程版本:
$ git push origin :refs/tags/[name]

# 合并远程仓库的tag到本地:
$ git pull origin --tags

# 上传本地tag到远程仓库:
$ git push origin --tags

# 创建带注释的tag:
$ git tag -a [name] -m 'yourMessage'
stash (暂存分支)
- 还未提交的修改内容以及新添加的文件,留在索引区域或工作树的情况下切换到其他的 branch 时,修改内容会从原来的 branch 移动到目标 branch 。
但是如果在checkout的目标 branch 中相同的文件也有修改,checkout会失败的。这时要么先提交修改内容,要么用stash暂时保存修改内容后再checkout。
stash
- 是临时保存文件修改内容的区域。
- stash 可以暂时保存工作树和索引里还没提交的修改内容,
- 可以事后再取出暂存的修改,应用到原先的 branch 或其他的 branch 上。

branch 的合并
完成作业后的topic branch ,最后要合并回 merge branch 。
合并 branch 有2种方法:
- merge
- 保持修改内容的历史记录,但是历史记录会很复杂。
- rebase
- 历史记录简单,是在原有提交的基础上将差异内容反映进去。
- 因此,可能导致原本的提交内容无法正常运行。
- 历史记录会有很大的差别。
- 根据开发团队的需要分别使用merge和rebase。
- 例如,想简化历史记录,
- 向 topicbranch 更新 merge branch 的最新代码 > rebase。
- 向 merge branch 导入topic branch, 先用rebase,再用merge。
pull 与 fetch 的关系是:
1
2
git pull          = git fetch + merge
git pull --rebase = git fetch + rebase
主要的差异是:
- rebase 改变了时间线,而 merge 没有;
- rebase 扁平化时间线后,历史记录变得更加简单和直观。
merge
使用merge可以合并多个历史记录的流程。
bugfix branch 是从 main branch 分叉 出来的。

合并 bugfix branch 到 main branch 时:
如果 main branch 的状态没有被更改过, bugfix branch 的历史记录包含 main branch 所有的历史记录
- fast-forward(快进)合并。
- 把 main branch 的位置移动到 bugfix的最新 branch 上,Git 就会合并。

- non fast-forward
- branch 会维持原状。那么要查明在这个 branch 里的操作就很容易了。

- fast-forward(快进)合并。
main branch 在 bugfix branch 分叉出去后有新的更新。
- 要把 main branch 的修改内容和 bugfix branch 的修改内容汇合起来。


rebase
使用rebase方法进行 branch 合并


- rebase bugfix branch 到 main branch,
- bugfix branch 的历史记录会添加在 main branch 的后面。
- 历史记录成一条线,相当整洁。
- 移动提交X和Y有可能会发生冲突,所以需要修改各自的提交时发生冲突的部分。
- rebase之后,main的HEAD位置不变。
- 因此,要合并 main branch 和 bugfix branch ,
- 将 main的HEAD 移动到 bugfix的HEAD 这里。


忽略一些文件、文件夹不提交
在仓库根目录下创建名称为“.gitignore”的文件,写入不需要的文件夹名或文件,每个元素占一行即可,如
1
2
3
target
bin
*.db
Submodule - 子模块相关操作命令
1
2
3
4
5
6
7
8
9
10
11
12
13
14
15
16
17
18
19
20
21
# 添加子模块:
$ git submodule add [url] [path]
$ git submodule add git://github.com/soberh/ui-libs.git src/main/webapp/ui-libs

# 初始化子模块:
$ git submodule init ----只在首次检出仓库时运行一次就行

# 更新子模块:
$ git submodule update ----每次更新或切换分支后都需要运行一下

# 删除子模块:(分4步)
$ git rm --cached [path]
# 编辑“.gitmodules”文件,将子模块的相关配置节点删除掉
# 编辑“ .git/config”文件,将子模块的相关配置节点删除掉
# 手动删除子模块残留的目录

# remove submodule
export SubMod="xx/xxx"
git submodule deinit -f ./$SubMod
rm -rf .git/modules/$SubMod
git config --remove-section submodule.$SubMod
Patch
git am 操作
- 在做git操作的时候,为了保留git log的记录,我们在做patch的时候会使用git format patch的命令来生成一个patch,在应用patch的时候会选择git am来打上patch。
- 我们打上的patch一般会包含N个文件的补丁,假设这N个文件中有一个文件发生了conflict,那么am的过程就会停止,这时候需要我们手动去解决conflict,然后才能继续。
create patch
1
2
3
4
5
6
7
8
9
10
11
12
13
14
15
16
17
18
19
$ git format-patch -<n> <rev>
# git format-patch -1 HEAD
# -<n> Prepare patches from the topmost <n> commits.

$ git show HEAD > some-patch0001.patch

$ git format-patch HEAD~1 --stdout > some-patch0001.patch  #生成最近的1次commit的patch

# 生成patch文件
$ git format-patch HEAD^		#生成最近的1次commit的patch
$ git format-patch HEAD^^		#生成最近的2次commit的patch
$ git format-patch HEAD^^^	# 生成最近的3次commit的patch
$ git format-patch HEAD^^^^	# 生成最近的4次commit的patch

$ git format-patch <r1>..<r2>	  # 生成两个commit间的修改的patch(包含两个commit。<r1>和<r2>都是具体的commit号)
$ git format-patch <r1>			    # 生成某commit以来的修改patch(不包含该commit)
$ git format-patch --root <r1>	# 生成从根到r1提交的所有patch
# 由实例可以看出生成Patch的相应操作。
git format-patch <id> -1
apply patch
git am patch 文件
- 需要将patch文件合并到相应的分支中
- git apply 是另外一种打patch的命令,其与git am的区别是,
- git apply 并不会将commit message等打上去,打完patch之后需要重新git add 和 git commit,
- git am会直接将patch的所有信息打上去,而且不用重新git add和git commit,author也是patch的author而不是打patch的人
1
2
3
4
git apply
--stat # show stats.
--check # check for error before applying.
--verbose  # -v or --verbose will show what failed, if any. Giving you a clue on how to fix.
1
2
3
4
5
6
7
8
9
10
11
12
13
14
15
16
17
18
19
# 查看patch的情况
$ git apply --stat 0001-fix-bug-error-of-export-billing.patch

# 检查patch是否能够打上,如果没有任何输出,则说明无冲突,可以打上。
$ git show --stat 0001-fix-bug-error-of-export-billing.patch

# 将名0001-fix-bug-error-of-export-billing.patch字为0001-fix-bug-error-of-export-billing.patch的patch打上
$ git am 0001-fix-bug-error-of-export-billing.patch

# 添加-s或者--signoff,还可以把自己的名字添加为signed off by信息,作用是注明打patch的人是谁,因为有时打patch的人并不是patch的作者。
$ git am --signoff 0001-fix-bug-error-of-export-billing.patch

# 将路径~/patch-set/*.patch 按照先后顺序打上
$ git am ~/patch-set/*.patch

# 当git am失败时,用以将已经在am过程中打上的patch废弃掉(比如有三个patch,打到第三个patch时有冲突,那么这条命令会把打上的前两个patch丢弃掉,返回没有打patch的状态)
$ git am --abort

$ git am --resolved
git am patch文件冲突
1
2
3
4
5
6
7
8
9
$ git am /home/jackdan/Documents/work/nanwang/fp10-15/0023-Configuration-for-on-and-off-creat-instance-from-ima.patch
    # Applying: Configuration for on and off creat instance from image
    # error: patch failed: easystack_dashboard/settings.py:149
    # error: easystack_dashboard/settings.py: patch does not apply
    # Patch failed at 0001 Configuration for on and off creat instance from image
    # The copy of the patch that failed is found in: .git/rebase-apply/patch
    # When you have resolved this problem, run "git am --continue".
    # If you prefer to skip this patch, run "git am --skip" instead.
    # To restore the original branch and stop patching, run "git am --abort".
解决冲突的方案:
- 方案二和方案三主要区别是解决冲突的方法不一样。
- 方案二是通过编辑patch文件的方式解决冲突;
- 方案三是通过编辑冲突code文件的方式解决冲突。
- 这两种方案区别比较大:经过实验,核心区别在于,方案三无法验证冲突有没有切实的解决。即使你在方案三的第二步乱改一通,也能“打完”发生冲突的patch(并没有检测修改后的code文件跟patch期望的是否相同)。因此,如果采用方案三,那么再解决code文件冲突后,需要人工去确认修改的正确性。
- 推荐方案二作为解决合并patch冲突的方案。
不打这一系列patch了
git am --abort- fix
- 根据git am失败的信息,找到发生冲突的具体patch文件,
- 然后用命令
git apply --reject <patch_name>,强行打这个patch- 发生冲突的部分会保存为.rej文件(例如发生冲突的文件是a.txt,那么运行完这个命令后,发生conflict的部分会保存为a.txt.rej)
- 未发生冲突的部分会成功打上patch
- 根据.rej文件,通过编辑该patch文件的方式解决冲突。
- 废弃上一条am命令已经打了的patch:
git am --abort - 重新打patch:
git am ~/patch-set/*.patchpatch
- fix
- 根据git am失败的信息,找到发生冲突的具体patch文件
- 然后用命令
git apply --reject <patch_name>,强行打这个patch,- 发生冲突的部分会保存为.rej文件(例如发生冲突的文件是a.txt,那么运行完这个命令后,发生conflict的部分会保存为a.txt.rej)
- 未发生冲突的部分会成功打上patch
- 根据.rej文件,通过编辑发生冲突的code文件的方式解决冲突。
- 将该patch涉及到的所有文件(不仅仅是发生冲突的文件)通过命令
git add <file_name>添加到工作区中 - 告诉git冲突已经解决,继续打patch:
git am --resolved (git am --resolved)和git am --continue是一样的
A successful Git branching model


Commit
合并多个 Commit
执行以下命令获得四个 Commit:
1
2
3
4
5
6
7
8
9
10
11
12
13
14
15
16
17
18
19
mkdir test
cd test
git init

echo "0" >> a
git add a
git commit -m "Commit-0"

echo "1" >> a
git add a
git commit -m "Commit-1"

echo "2" >> a
git add a
git commit -m "Commit-2"

echo "3" >> a
git add a
git commit -m "Commit-3"
Git 的历史长成这样:
1
2
3
4
5
6
7
8
9
10
11
$ git log

$ git log --oneline
# * b1b8189 - (HEAD -> main) Commit-3
# * 5756e15 - Commit-2
# * e7ba81d - Commit-1
# * 5d39ff2 - Commit-0

$ git log --graph

$ git log --author=Linus --oneline -5
Goadl:
- 把 e7ba81d(Commit-1)、5756e15(Commit-2)、b1b8189(Commit-3) 合并到一起
- 并且只保留 e7ba81d(Commit-1) 的 Git message Commit-1
1
2
3
git rebase -i
  # -i: --interactive 的简写
  # 在使用 git rebase -i 时,我们要在后面再添加一个参数,这个参数应该是 最新的一个想保留的 Commit。
「最新的一个想保留的 Commit」是 5d39ff2(Commit-0),于是我们的命令看起来就长这样:
1
2
3
git rebase -i 5d39ff2
# or 通过 HEAD~3 来指定该 Commit
git rebase -i HEAD~3
按下回车后,进入界面:
1
2
3
4
5
6
7
8
9
10
11
12
13
14
15
16
17
18
19
20
21
pick e7ba81d Commit-1
pick 5756e15 Commit-2
pick b1b8189 Commit-3

# Rebase 5d39ff2..b1b8189 onto 5d39ff2 (3 command(s))
#
# Commands:
# p, pick = use commit
# r, reword = use commit, but edit the commit message
# e, edit = use commit, but stop for amending
# s, squash = use commit, but meld into previous commit
# f, fixup = like "squash", but discard this commit's log message
# x, exec = run command (the rest of the line) using shell
#
# These lines can be re-ordered; they are executed from top to bottom.
#
# If you remove a line here THAT COMMIT WILL BE LOST.
#
# However, if you remove everything, the rebase will be aborted.
#
# Note that empty commits are commented out
前面三行是我们需要操作的三个 Commit
- 每行最前面的是对该 Commit 操作的 Command。
- 关于每个 Command 具体做什么,下面的注释写得非常清楚。
- 为了完成我们的需求,我们可以关注到这两个命令:
- s, squash
- = use commit, but meld into previous commit
- 使用该 Commit,但会被合并到前一个 Commit 当中
- f, fixup =
- like “squash”, but discard this commit’s log message
- 就像 squash 那样,但会抛弃这个 Commit 的 Commit message
- s, squash
试一下 squash
1
2
3
4
5
6
7
8
9
# 想把三个 Commit 都合并在一起,并且使 Commit Message 写成 Commit-1,
# 所以我们需要把 5756e15(Commit-2) 和 b1b8189(Commit-3) 前面的 pick 都改为squash
pick e7ba81d Commit-1
squash 5756e15 Commit-2
squash b1b8189 Commit-3
# or
pick e7ba81d Commit-1
s 5756e15 Commit-2
s b1b8189 Commit-3
完成后,使用 :wq 保存并退出。这个时候进入下一个界面:
- 这里其实就是一个编写 Commit Message 的界面,
- 带
#的行会被忽略掉, - 其余的行就会作为我们的新 Commit Message。
1
2
3
4
5
6
7
8
9
10
11
12
13
14
15
16
17
18
19
20
21
22
# This is a combination of 3 commits.
# The first commit's message is:
Commit-1

# This is the 2nd commit message:

Commit-2

# This is the 3rd commit message:

Commit-3

# Please enter the commit message for your changes. Lines starting
# with '#' will be ignored, and an empty message aborts the commit.
#
# Date:      Tue Jan 5 23:27:22 2016 +0800
#
# rebase in progress; onto 5d39ff2
# You are currently editing a commit while rebasing branch 'main' on '5d39ff2'.
#
# Changes to be committed:
#   modified:   a
为了完成我们的需求,我们修改成这样:
1
2
3
4
5
6
7
8
9
10
11
12
Commit-1

# Please enter the commit message for your changes. Lines starting
# with '#' will be ignored, and an empty message aborts the commit.
#
# Date:      Tue Jan 5 23:27:22 2016 +0800
#
# rebase in progress; onto 5d39ff2
# You are currently editing a commit while rebasing branch 'main' on '5d39ff2'.
#
# Changes to be committed:
#   modified:   a
使用 :wq 后,再看一下我们的 log:
1
2
* 2d7b687 - (HEAD -> main) Commit-1
* 5d39ff2 - Commit-0
The crucial last step is missing.
1
2
# git push -f
$ git push -f origin feat-xxx
Full git story
1.Setup


1
2
3
4
5
6
7
8
9
10
11
12
13
14
15
16
17
18
19
20
# 首先建立一个新目录,并在里面建立一个空数据库。创建一个名为tutorial的目录。
$ mkdir tutorial
$ cd tutorial

# Initialized empty Git repository in /Users/eguchi/Desktop/tutorial/.git/
$ git init

# 在HEAD指向的提交里添加名为banana的标签,
$ git tag banana
# 显示标签列表。
$ git tag
# banana

# 删除标签
$ git tag -d banana

# 在tutorial目录创建一个名为myfile.txt的档案
# 提交。
$ git add myfile.txt
$ git commit -m "first commit"
- 建立 + 切换 branch


1
2
3
4
5
6
7
8
9
10
11
12
13
14
15
16
17
18
# ----------------------- git branch <branchname>
# 创建名为issue1的 branch 。
$ git branch issue1

# 显示 branch 列表。
# 不指定参数直接执行branch命令的话,前面有*的就是现在的 branch 。
$ git branch
  issue1
* main

# 切换到issue1 branch 。
# Switched to branch 'issue1'
$ git checkout issue1

# ----------------------- git checkout -b <branch>
# -b选项执行,可以创建 branch 并进行切换。
$ git checkout -b issue1
- 提交 + 合并 branch


1
2
3
4
5
6
7
8
9
10
11
12
13
14
# ---------------------- 提交
# 在切换到issue1 branch 的状态下提交,历史记录会被记录到issue1 branch 。
# 在myfile.txt添加add命令的说明后再提交。
# add 把变更录入到索引中
$ git add myfile.txt
$ git commit -m "添加add的说明"


# ---------------------- 执行merge命令以合并 branch 。$ git merge <commit>
# 该命令将指定 branch 导入到HEAD指定的 branch 。
# 先切换main branch ,然后把issue1 branch 导入到main branch 。
$ git checkout main
$ git merge issue1
# main branch 指向的提交移动到和issue1同样的位置。这个是fast-forward(快进)合并。
- 删除 branch

1
2
3
4
5
6
7
# 执行以下的命令以删除issue1 branch 。
$ git branch -d issue1
Deleted branch issue1(was b2b23c4).

# 用branch命令来确认 branch 是否已被删除。
$ git branch
* main
Git hooks
一些 sample hooks 脚本如下:
- pre-commit: 检查提交消息是否有拼写错误
- pre-receive: Enforce project coding standards.
- post-commit: Email/SMS team members of a new commit.
- post-receive: Push the code to production.
Git hooks:
- Git hooks 是Git在事件之前或之后执行的脚本,例如:commit,push和receive。
- Git hooks 是一个内置功能 - 无需下载任何东西。
- Git hooks 在本地运行。
- 每个Git存储库都有一个
.git/hooks文件夹,其中包含可以绑定到的每个钩子的脚本。可以根据需要随意更改或更新这些脚本,Git将在这些事件发生时执行它们。
pre-commit
- git hooks 的一个子集,实现在提交代码审查之前,Git钩子脚本可用于处理简单问题。
- 在每次提交时运行我们的钩子,以自动指出代码中的问题,例如缺少分号,尾随空格和调试语句。
安装
1
2
3
4
5
6
7
8
# 安装
pip install pre-commit
brew install pre-commit

# 依赖
# 在 requirements.txt(或 requirements-dev.txt) 填加依赖:
pre-commit
pip install -r requirements.txt
配置
1
2
3
4
5
6
7
8
9
10
11
12
13
14
15
16
17
18
19
20
21
22
23
24
25
26
27
28
29
30
31
32
33
34
35
36
37
38
39
40
41
42
43
44
45
46
47
48
49
50
# 在项目根目录填加 .pre-commit-config.yaml 文件
default_language_version:
    python: python2.7
fail_fast: true
repos:
-   repo: https://github.com/pre-commit/pre-commit-hooks
    rev: v2.2.3
    hooks:
    -   id: check-added-large-files
    -   id: check-docstring-first
    -   id: check-json
    -   id: check-merge-conflict
    -   id: check-yaml
    -   id: debug-statements
    -   id: double-quote-string-fixer
    -   id: end-of-file-fixer
    -   id: flake8
    -   id: name-tests-test
    -   id: requirements-txt-fixer
    -   id: trailing-whitespace
-   repo: https://gitlab.com/pycqa/flake8
    rev: 3.7.1
    hooks:
    -   id: flake8
-   repo: https://github.com/pre-commit/mirrors-autopep8
    rev: v1.4.4
    hooks:
    -   id: autopep8
-   repo: https://github.com/pre-commit/pre-commit
    rev: v1.16.1
    hooks:
    -   id: validate_manifest
-   repo: https://github.com/asottile/reorder_python_imports
    rev: v1.3.5
    hooks:
    -   id: reorder-python-imports
        language_version: python3
-   repo: https://github.com/asottile/pyupgrade
    rev: v1.17.1
    hooks:
    -   id: pyupgrade
-   repo: https://github.com/asottile/add-trailing-comma
    rev: v0.7.1
    hooks:
    -   id: add-trailing-comma
-   repo: https://github.com/pre-commit/mirrors-mypy
    rev: v0.660
    hooks:
    -   id: mypy
        language_version: python3
启用
1
2
3
4
5
6
7
8
9
10
11
12
13
14
15
# pre-commit 将会在每次提交前执行,每次 clone 代码后,都需要执行 pre-commit install
pre-commit install
# pre-commit installed at .git/hooks/pre-commit

# 手动触发
# 第一次,需要触发全部:
# 第一次 pre-commit 运行时,将会自动下载、安装并且运行 hook
pre-commit run --all-files

# 触发指定hook:
pre-commit run <hook_id>
# 自动合并配置
pre-commit migrate-config
# 自动更新 hooks
pre-commit autoupdate
Github LICENSE
协议
- license译为许可证,也可作为开源协议
- 它可以将自己创作的东西,授权给他人使用,并约定了使用者可以有的权利和必须遵从的义务。
现在很多优秀的开源项目都有设置license,不同的license所约束的条件也不同。
- 因此开源不等于免费,开源也不等于没有约束。
- 对于大型的软件可能都有专门的律师团队去撰写软件协议。
- 作为一名开发人员,有时候想开源自己的项目,但又不想源代码被随意借鉴或者分享到别处, 就可以设置license去约束一些行为。
但是协议往往需要具备专业的知识,它涉及到了法律规则. 可以选择一些流行的开源协议去满足项目的需求。
流行的license
- 在创建项目的时候可以选择一个license,可以看到有很多流行的开源协议可以选择。
MIT可以说是很宽松的一个协议了,也是目前很常用的一个开源协议,它允许对代码做任何形式的修改和宣传GPL鼓励免费,著名的Linux使用的就是这个协议,这使得它成为时下热门的一个协议BSD不允许不经书面许可借原作者进行推广,如果介意其他人的项目推广自己的话可以选择这个协议
各协议介绍
| 协议 | 简述 |
|---|---|
| Apache | 允许他人修改源代码后再闭源,但是必须对每个修改过的文件做版权说明 |
| MIT | 允许他人修改源代码后再闭源,不用对修改过的文件做说明,且二次开发的软件可以使用原作者的名字做营销 |
| BSD2/BSD3 | 和上面一条类似,但未经事先书面许可,不得使用版权所有者的姓名或其贡献者的姓名来推广 |
| BSL | 和GPL类似,但不需要复制版权信息 |
| CCZ | 放弃创作的作品版权权益,并将其奉献给大众,不对代码做任何担保 |
| GPL2 | 和GPL3相比,如果使用代码作为服务提供,而不分发软件,则不需要开源 |
| GPL3 | 无论以何种方式修改或者使用代码,都需要开源 |
| EPL | 与GPL类似,有权使用、修改、复制与发布软件原始版本和修改后版本,但在某些情况下则必须将修改内容一并释出 |
| AGPL | GPL拓展,使用在线网络服务的也需要开源 |
| LGPL | 和GPL相比,LGPL允许商业软件通过类库引用(link)方式使用LGPL类库而不需要开源商业软件的代码 |
| Mozilla | 与LGPL类似,但是需要对修改过的源码内容做说明 |
| Unlicense | 与CCZ相似,且开放商标和所用的专利授权 |
不选择协议
- 并不是一定要在项目中添加协议的。
- 如果你想把代码分享出来,又想约束一些行为,最好还是选择一个适合的开源协议。
- 不选择协议可以让发布者保留作品的解释权,不允许他人分发,复制或二次开发。
- 但是部分网站会有特有的协议,例如当你将代码发布到GitHub上,会默认公开的项目可以自由的查看和fork。
Insights
ref:
- https://docs.github.com/en/issues/planning-and-tracking-with-projects/viewing-insights-from-your-project/about-insights-for-projects
Insights
- current charts: create current charts to visualize your project items.
- historical charts: You can create historical charts to visualize your project items over time
.
Comments powered by Disqus.