GCP - GCP AI
GCP - Vertex AI access online prediction endpoints privately using PSC
- GCP - Vertex AI access online prediction endpoints privately using PSC
- Introduction
- 1. Update the project
- 2. Enable Services
- 3. Setup
aiml-vpc - 4. Setup
on-prem-vpc - 5. Create the Private Service Connect endpoint
- 6. Hybrid connectivity
- 7. Establish BGP neighbors interface and peering for both VPC
- 8. Create custom route advertisements
aiml-vpc - 9. Create custom route advertisements
on-prem-vpc - 10. Create a user managed service account (GCE Instances)
- 11. Create a user managed service account (Notebook)
- 12. Created the test instances
- 13. Create a user managed notebook
- 14. Deploy the Model and Online Prediction
- 15. Validate access to the Vertex API over the Internet
- 16. Validation - Internet Access to Vertex API
- 17. Enable Private Access to Vertex APIs
- 18. Validation - Private Access to Vertex API
- 19. Clean up
- 20. End
ref:
- https://codelabs.developers.google.com/codelabs/vertex-psc-googleapis#17
Introduction
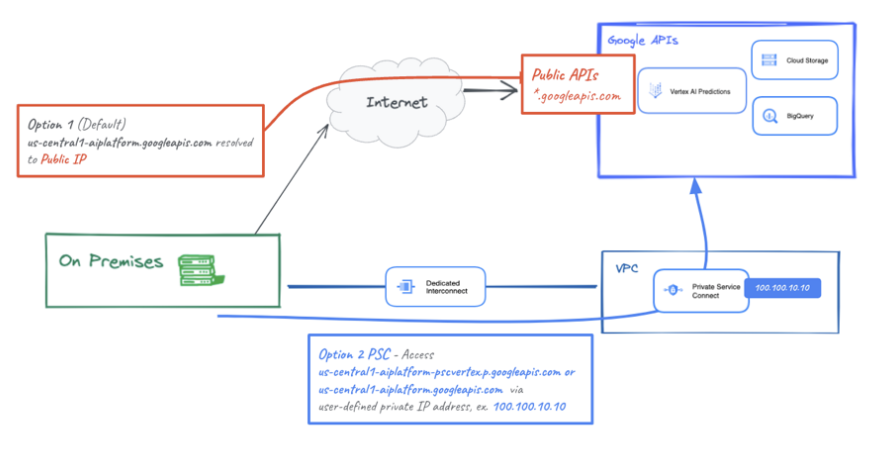
- On-premises hosts can reach an Online Prediction from the on-premises network
- natively through the public internet (option 1)
- using Cloud VPN or Cloud Interconnect with Private Service Connect (PSC) (option 2)
both offering SSL/TLS encryption.
- Hybrid connectivity to online prediction over interconnect is more performant than Internet therefore recommended for critical applications as illustrated in Figure 1.
In this tutorial we will demonstrate how to use High-Availability VPN (HA VPN) to access Online Prediction privately between two VPC networks that can serve as a basis for multi-cloud and on-premises private connectivity.
Vertex Online Prediction is a public endpoint, therefore you want to restrict access utilizing VPC Service Controls (VPC-SC) to create secure perimeters to allow/deny access to Vertex and other Googleapis.
What you’ll build
Note: The lab makes use of an existing model and online prediction endpoint codelab required to validate prediction connectivity, when creating the notebook ensure to use the
aiml-vpcnetwork and workbench-subnet subnetwork part of the tutorial. You will be asked to deploy the codelab in the step Deploy the Model and Online Prediction.
- set up a VPC network called
on-prem-vpcto represent an on-premises environment.- For the deployment, the
on-prem-vpcwould not exist, instead hybrid networking to the on-premise data center or cloud provider would be used.
- For the deployment, the
- build a comprehensive Private Service Connect architecture that illustrates accessing Online Prediction
- Publicly through Cloud NAT
- Privately using PSC over HA VPN.
Once the online prediction is deployed in the GCP project the following uses cases will be explored:
Public access to online prediction, consists of the following:
- Create a GCE instance (
nat-client) that leverages NAT for egress internet access - Use CURL to inference against the model
- Use TCPDUMP to validate that online prediction is
accessed via a public VIP
- Create a GCE instance (
Private access to online prediction, consists of the following:
- Deploy a model to a Vertex online prediction endpoint in the project
- Create a Private Service Connect Endpoint (Googleapis) in the
aiml-vpc - Export the PSC IP address over the cloud router as a custom advertisement to the on-prem VPC
- Create a GCE instance (
private-client) and update etc/hosts file with the PSC endpoint IP - Use CURL to inference against the model
- Use TCPDUMP to validate that online prediction is
accessed via the PSC endpoint IP Address
Note:
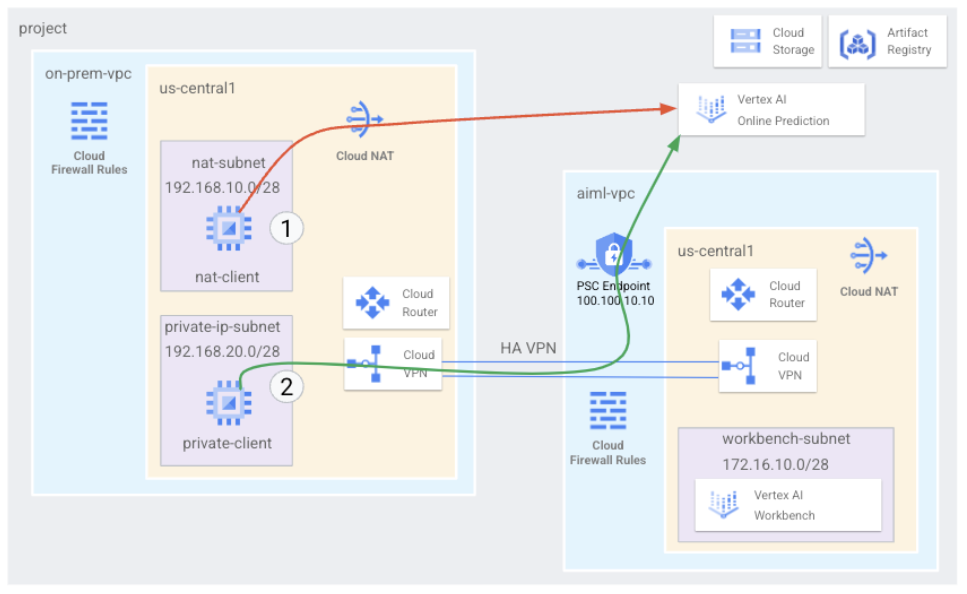
- Tutorial offers configuration and validation steps based on the illustrated topology in Figure 2, modify the procedure as needed to meet the organization’s requirements.
- Access: Determines how the online prediction endpoint can be accessed. By default, endpoints are available for prediction serving through a REST API. Endpoint access can’t be changed after the endpoint is created.
What you’ll learn
How to establish a Private Service Connect Endpoint
How to advertise the PSC Endpoint IP over the Cloud Router
How to use TCPDUMP to validate Online Prediction access, both Public and Private
What you’ll need
GCP project
IAM Permissions
- Compute Network Admin
- Service Directory Editor
- DNS Administrator
- Network Admin
- Quota Administrator
- Notebooks Admin
- Service Account User
- Storage Administrator
- Vertex AI User
- Service Account Admin
1. Update the project
1
2
3
4
gcloud config list project
gcloud config set project [YOUR-PROJECT-NAME]
projectid=YOUR-PROJECT-NAME
echo $projectid
2. Enable Services
1
2
3
4
5
gcloud services enable dns.googleapis.com
gcloud services enable aiplatform.googleapis.com
gcloud services enable iam.googleapis.com
gcloud services enable compute.googleapis.com
gcloud services enable notebooks.googleapis.com
3. Setup aiml-vpc
1
2
3
4
5
6
7
8
9
10
11
12
13
14
15
16
17
18
19
20
21
22
23
24
25
26
27
# Create the `aiml-vpc`
gcloud compute networks create aiml-vpc \
    --project=$projectid \
    --subnet-mode=custom

# Create the user-managed notebook subnet
gcloud compute networks subnets create workbench-subnet \
    --project=$projectid \
    --range=172.16.10.0/28 \
    --network=aiml-vpc \
    --region=us-central1 \
    --enable-private-ip-google-access

# **Cloud Router** and NAT configuration
# Cloud NAT is used in the tutorial for notebook software package downloads because the user-managed notebook instance does not have an external IP address. Cloud NAT also offers egress NAT capabilities, which means that internet hosts are not allowed to initiate communication with a user-managed notebook, making it more secure.

# create the regional cloud router.
gcloud compute routers create cloud-router-us-central1-aiml-nat \
    --network aiml-vpc \
    --region us-central1

# create the regional cloud nat gateway.
gcloud compute routers nats create cloud-nat-us-central1 \
    --router=cloud-router-us-central1-aiml-nat \
    --auto-allocate-nat-external-ips \
    --nat-all-subnet-ip-ranges \
    --region us-central1
4. Setup on-prem-vpc
1
2
3
4
5
6
7
8
9
10
11
12
13
14
15
16
17
18
19
20
21
22
23
24
25
26
27
28
29
30
31
32
33
34
# Create the `on-prem-vpc`
gcloud compute networks create on-prem-vpc \
    --project=$projectid \
    --subnet-mode=custom

# Create the nat-subnet
gcloud compute networks subnets create nat-subnet \
    --project=$projectid \
    --range=192.168.10.0/28 \
    --network=on-prem-vpc \
    --region=us-central1

# Create the private-ip-subnet
gcloud compute networks subnets create private-ip-subnet \
    --project=$projectid \
    --range=192.168.20.0/28 \
    --network=on-prem-vpc \
    --region=us-central1

# **Cloud Router** and NAT configuration
# Cloud NAT is used in the tutorial for software package downloads.
# Cloud NAT also offers egress NAT capabilities, which means that internet hosts are not allowed to initiate communication with compute, making it more secure.

# create the regional cloud router.
gcloud compute routers create cloud-router-us-central1-on-prem-nat \
    --network on-prem-vpc \
    --region us-central1

# create the regional cloud nat gateway.
gcloud compute routers nats create cloud-nat-us-central1 \
    --router=cloud-router-us-central1-on-prem-nat \
    --auto-allocate-nat-external-ips \
    --nat-all-subnet-ip-ranges \
    --region us-central1
5. Create the Private Service Connect endpoint
create a Private Service Connect endpoint to access the Vertex API from the on-prem-vpc.
- The PSC IP address
100.100.10.10will be advertised from theaiml-vpc-cloud-router-vpnas a custom router advertisement to the on-premises network in an upcoming step.
1
2
3
4
5
6
7
8
9
10
11
12
13
14
15
16
17
18
19
20
gcloud compute addresses create psc-ip \
    --global \
    --purpose=PRIVATE_SERVICE_CONNECT \
    --addresses=100.100.10.10 \
    --network=aiml-vpc

# Create the PSC Endpoint
gcloud compute forwarding-rules create pscvertex \
    --global \
    --network=aiml-vpc \
    --address=psc-ip \
    --target-google-apis-bundle=all-apis

# List the configured **Private Service Connect endpoints**
gcloud compute forwarding-rules list  \
    --filter target="(all-apis OR vpc-sc)" \
    --global

# Describe the configured **Private Service Connect endpoints**
gcloud compute forwarding-rules describe pscvertex --global
6. Hybrid connectivity
create a Cloud Router to dynamically exchange routes between the Virtual Private Cloud (VPC) and peer network by using Border Gateway Protocol (BGP).
Cloud Router can set up a BGP session over a Cloud VPN tunnel to connect the networks. It automatically learns new subnet IP address ranges and announces them to the peer network.
Deploy HA VPN between the aiml-vpc and on-prem-vpc.
Create the HA VPN gateway for both vpc
- When each gateway is created, two external IPv4 addresses are automatically allocated, one for each gateway interface.
- Note down these IP addresses to use later on in the configuration steps.
1
2
3
4
5
6
7
8
9
# create the HA VPN gateway for aiml-vpc
gcloud compute vpn-gateways create aiml-vpn-gw \
   --network=aiml-vpc\
   --region=us-central1

# create the HA VPN gateway for on-prem-vpc
gcloud compute vpn-gateways create on-prem-vpn-gw \
   --network=on-prem-vpc\
   --region=us-central1
Validate HA VPN gateway creation
Using the console, navigate to HYBRID CONNECTIVITY → VPN → CLOUD VPN GATEWAYS and validate that the gateway IPs are generated.

Create the Cloud Router for both vpc
1
2
3
4
5
6
7
8
9
10
11
# create the Cloud Router located in us-central1 for the `aiml-vpc`
gcloud compute routers create aiml-cr-us-central1 \
   --region=us-central1 \
   --network=aiml-vpc\
   --asn=65001

# create the Cloud Router located in us-central1 for the `on-prem-vpc`
gcloud compute routers create on-prem-cr-us-central1 \
   --region=us-central1 \
   --network=on-prem-vpc \
   --asn=65002
Create the VPN tunnels on each HA VPN gateway.
- Create VPN tunnels for
aiml-vpc
1
2
3
4
5
6
7
8
9
10
11
12
13
14
15
16
17
18
19
# create tunnel0
gcloud compute vpn-tunnels create aiml-vpc-tunnel0 \
    --peer-gcp-gateway on-prem-vpn-gw \
    --region us-central1 \
    --ike-version 2 \
    --shared-secret [ZzTLxKL8fmRykwNDfCvEFIjmlYLhMucH] \
    --router aiml-cr-us-central1 \
    --vpn-gateway aiml-vpn-gw \
    --interface 0

# create tunnel1
gcloud compute vpn-tunnels create aiml-vpc-tunnel1 \
    --peer-gcp-gateway on-prem-vpn-gw \
    --region us-central1 \
    --ike-version 2 \
    --shared-secret [bcyPaboPl8fSkXRmvONGJzWTrc6tRqY5] \
    --router aiml-cr-us-central1 \
    --vpn-gateway aiml-vpn-gw \
    --interface 1
- Create the VPN tunnels for
on-prem-vpc
1
2
3
4
5
6
7
8
9
10
11
12
13
14
15
16
17
18
19
# create tunnel0
gcloud compute vpn-tunnels create on-prem-tunnel0 \
    --peer-gcp-gateway aiml-vpn-gw \
    --region us-central1 \
    --ike-version 2 \
    --shared-secret [ZzTLxKL8fmRykwNDfCvEFIjmlYLhMucH] \
    --router on-prem-cr-us-central1 \
    --vpn-gateway on-prem-vpn-gw \
    --interface 0

# create tunnel1
gcloud compute vpn-tunnels create on-prem-tunnel1 \
    --peer-gcp-gateway aiml-vpn-gw \
    --region us-central1 \
    --ike-version 2 \
    --shared-secret [bcyPaboPl8fSkXRmvONGJzWTrc6tRqY5] \
    --router on-prem-cr-us-central1 \
    --vpn-gateway on-prem-vpn-gw \
    --interface 1
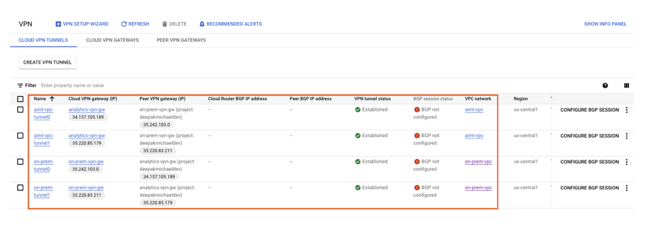
Validate vpn tunnel creation
Using the console, navigate to HYBRID CONNECTIVITY → VPN → CLOUD VPN TUNNELS.
7. Establish BGP neighbors interface and peering for both VPC
Create BGP sessions
configure Cloud Router interfaces and BGP peers.
- Create a BGP interface and peering for
aiml-vpc
1
2
3
4
5
6
7
8
9
10
11
12
13
14
15
16
17
18
19
20
21
22
23
24
25
26
27
28
29
30
31
32
33
34
# create the BGP interface:
gcloud compute routers add-interface aiml-cr-us-central1 \
    --interface-name if-tunnel0-to-onprem \
    --ip-address 169.254.1.1 \
    --mask-length 30 \
    --vpn-tunnel aiml-vpc-tunnel0 \
    --region us-central1


# create the BGP peer:
gcloud compute routers add-bgp-peer aiml-cr-us-central1 \
    --peer-name bgp-on-premises-tunnel0 \
    --interface if-tunnel1-to-onprem \
    --peer-ip-address 169.254.1.2 \
    --peer-asn 65002 \
    --region us-central1


# create the BGP interface:
gcloud compute routers add-interface aiml-cr-us-central1 \
    --interface-name if-tunnel1-to-onprem \
    --ip-address 169.254.2.1 \
    --mask-length 30 \
    --vpn-tunnel aiml-vpc-tunnel1 \
    --region us-central1


# create the BGP peer:
gcloud compute routers add-bgp-peer aiml-cr-us-central1 \
    --peer-name bgp-on-premises-tunnel1 \
    --interface if-tunnel2-to-onprem \
    --peer-ip-address 169.254.2.2 \
    --peer-asn 65002 \
    --region us-central1
- Create a BGP interface and peering for
on-prem-vpc
1
2
3
4
5
6
7
8
9
10
11
12
13
14
15
16
17
18
19
20
21
22
23
24
25
26
27
28
29
30
31
32
# create the BGP interface:
gcloud compute routers add-interface on-prem-cr-us-central1 \
    --interface-name if-tunnel0-to-aiml-vpc\
    --ip-address 169.254.1.2 \
    --mask-length 30 \
    --vpn-tunnel on-prem-tunnel0 \
    --region us-central1

# create the BGP peer:
gcloud compute routers add-bgp-peer on-prem-cr-us-central1 \
    --peer-name bgp-aiml-vpc-tunnel0 \
    --interface if-tunnel1-to-aiml-vpc\
    --peer-ip-address 169.254.1.1 \
    --peer-asn 65001 \
    --region us-central1

# create the BGP interface:
gcloud compute routers add-interface on-prem-cr-us-central1 \
    --interface-name if-tunnel1-to-aiml-vpc\
    --ip-address 169.254.2.2 \
    --mask-length 30 \
    --vpn-tunnel on-prem-tunnel1 \
    --region us-central1


# create the BGP peer:
gcloud compute routers add-bgp-peer on-prem-cr-us-central1 \
    --peer-name bgp-aiml-vpc-tunnel1\
    --interface if-tunnel2-to-aiml-vpc\
    --peer-ip-address 169.254.2.1 \
    --peer-asn 65001 \
    --region us-central1
Note:
- the cloud router’s default behavior will advertise subnet routes between the VPCs over HA VPN. Later in the tutorial, we will modify the advertised routes to only advertise the PSC endpoint IP address from the
aiml-vpcand the private-ip-subnet from theon-prem-vpc.
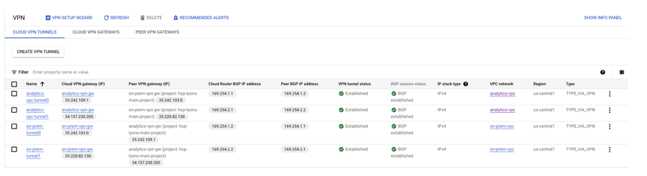
Navigate to Hybrid CONNECTIVITY → VPN to view the VPN tunnel details.
Validate
Validate aiml-vpc learned routes over HA VPN
Using the console, navigate to VPC network → VPC networks → aiml-vpc→ ROUTES → REGION → US-CENTRAL1 → VIEW
Observe the aiml-vpc has learned routes from the on-prem-vpc nat-subnet and private-ip-subnet
Validate that on-prem-vpc has learned the workbench-subnet over HA-VPN
Using the console, navigate to VPC network → VPC networks → on-prem-vpc → ROUTES → REGION → US-CENTRAL1 → VIEW
8. Create custom route advertisements aiml-vpc
The Private Service Connect Endpoint IP is not automatically advertised by the aiml-cr-us-central1 cloud router because the subnet is not configured in the VPC.
Instead, you will need to create a custom route advertisement from the aiml-cr-us-central cloud router for the endpoint IP Address 100.100.10.10 that will be advertised to the on-premises environment over BGP to the on-prem-vpc.
From the console navigate to HYBRID CONNECTIVITY → CLOUD ROUTERS → aiml-cr-us-central1, then select EDIT.
In the section Advertised routes, select the option Create custom routes, update the fields based on the example below, select DONE, and then click SAVE.
Validation
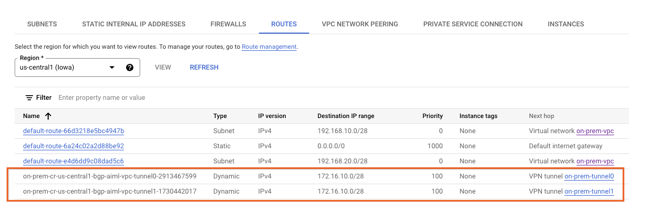
Validate that on-prem-vpc has learned the PSC Endpoint IP Address over HA-VPN
Using the console, navigate to VPC network → VPC networks → on-prem-vpc → ROUTES → REGION → US-CENTRAL1 → VIEW
9. Create custom route advertisements on-prem-vpc
The on-prem-vpc cloud router advertises all subnets by default, but only the private-ip-subnet is needed.
In the following section, update the route advertisements from the on-prem-cr-us-central1 cloud router.
From the console navigate to HYBRID CONNECTIVITY → CLOUD ROUTERS → on-prem-cr-us-central1, then select EDIT.
In the section Advertised routes, select the option Create custom routes, update the fields based on the example below, select DONE, and then click SAVE.
Validation
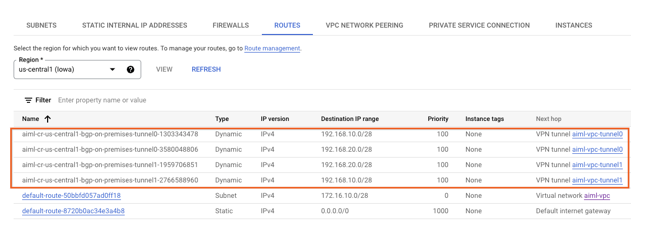
Validate that aiml-vpc has learned the private-ip-subnet route from the on-prem-vpc.
Using the console, navigate to VPC network → VPC networks → aiml-vpc → ROUTES → REGION → US-CENTRAL1 → VIEW
2b1a7a5f918e9f50.png
10. Create a user managed service account (GCE Instances)
To provide a fine level of control to the Vertex API a user managed service account is required that will be applied to the nat and private client instances.
Once generated, the service account permissions can be modified based on business requirements. the user managed service account, vertex-sa, will have the following roles applied:
- Vertex AI User
- Compute Instance Admin
enable the Service Account API before proceeding.
1
2
3
4
5
6
7
8
9
10
11
12
13
14
# create the service account.
gcloud iam service-accounts create gce-vertex-sa \
    --description="service account for vertex" \
    --display-name="gce-vertex-sa"

# update the service account with the role compute instance admin
gcloud projects add-iam-policy-binding $projectid \
  --member="serviceAccount:gce-vertex-sa@$projectid.iam.gserviceaccount.com" \
  --role="roles/compute.instanceAdmin.v1"

# update the service account with the role Vertex AI User
gcloud projects add-iam-policy-binding $projectid \
  --member="serviceAccount:gce-vertex-sa@$projectid.iam.gserviceaccount.com" \
  --role="roles/aiplatform.user"
11. Create a user managed service account (Notebook)
create a user managed service account that will be associated with the Vertex Workbench (Notebook) used in the tutorial.
the service account will have the following roles applied:
- Storage Admin
- Vertex AI User
- Artifact Registry Administrator
1
2
3
4
5
6
7
8
9
10
11
12
13
14
15
16
17
18
19
20
21
# create the service account.
gcloud iam service-accounts create user-managed-notebook-sa \
    --display-name="user-managed-notebook-sa"

# update the service account with the role Storage Admin.
gcloud projects add-iam-policy-binding $projectid \
  --member="serviceAccount:user-managed-notebook-sa@$projectid.iam.gserviceaccount.com" \
  --role="roles/storage.admin"

# update the service account with the role Vertex AI User.
gcloud projects add-iam-policy-binding $projectid \
  --member="serviceAccount:user-managed-notebook-sa@$projectid.iam.gserviceaccount.com" \
  --role="roles/aiplatform.user"

# update the service account with the role Artifact Registry Admin.
gcloud projects add-iam-policy-binding $projectid \
  --member="serviceAccount:user-managed-notebook-sa@$projectid.iam.gserviceaccount.com" \
  --role="roles/artifactregistry.admin"

# list the service account and note the email address that will be used when creating the user-managed notebook.
gcloud iam service-accounts list
12. Created the test instances
create test instances to validate different methods to reach Vertex APIs, specifically:
- The instance,
nat-client, will use Cloud NAT to resolve Vertex AI hence access the Online Prediction endpoint over the Internet - The instance,
private-client, will use the Private Service Connect IP 100.100.10.10 to access Online Prediction endpoint over HA-VPN.
1
2
3
4
5
6
7
8
9
10
11
12
13
14
15
16
17
18
19
20
21
22
23
24
25
26
27
28
29
30
31
32
33
34
35
# Inside Cloud Shell create the `nat-client` instance.
gcloud compute instances create nat-client \
    --zone=us-central1-a \
    --image-family=debian-11 \
    --image-project=debian-cloud \
    --subnet=nat-subnet \
    --service-account=vertex-sa@$projectid.iam.gserviceaccount.com \
    --scopes=https://www.googleapis.com/auth/cloud-platform \
    --no-address \
    --metadata startup-script="#! /bin/bash
      sudo apt-get update
      sudo apt-get install tcpdump dnsutils -y"

# Inside Cloud Shell create the `private-client` instance.
gcloud compute instances create private-client \
    --zone=us-central1-a \
    --image-family=debian-11 \
    --image-project=debian-cloud \
    --subnet=private-ip-subnet \
    --service-account=vertex-sa@$projectid.iam.gserviceaccount.com \
    --scopes=https://www.googleapis.com/auth/cloud-platform \
    --no-address \
    --metadata startup-script="#! /bin/bash
      sudo apt-get update
      sudo apt-get install tcpdump dnsutils -y"

# To allow Identity-Aware Proxy (IAP) to connect to the VM instances, create a firewall rule that:
# Applies to all VM instances that you want to be accessible by using IAP.
# Allows ingress traffic from the IP range 35.235.240.0/20. This range contains all IP addresses that IAP uses for TCP forwarding.

# create the IAP firewall rule.
gcloud compute firewall-rules create ssh-iap-on-prem-vpc \
    --network on-prem-vpc \
    --allow tcp:22 \
    --source-ranges=35.235.240.0/20
13. Create a user managed notebook
Enable the notebook API
- create a user-managed notebook that incorporates the previously created service account, user-managed-notebook-sa.
Inside Cloud Shell create the private-client instance.
1
2
3
4
5
6
7
8
9
gcloud notebooks instances create workbench-tutorial \
      --vm-image-project=deeplearning-platform-release \
      --vm-image-family=common-cpu-notebooks \
      --machine-type=n1-standard-4 \
      --location=us-central1-a \
      --subnet-region=us-central1 \
      --subnet=workbench-subnet \
      --no-public-ip \
      --service-account=user-managed-notebook-sa@$projectid.iam.gserviceaccount.com
14. Deploy the Model and Online Prediction
In the following section, use the provided codelab,Vertex AI:Use custom prediction routines with Sklearn to preprocess and post process data for predictions start with Section 7 since you already created a notebook in the previous step.
Once the model is deployed, return back to the tutorial to start the next section.
15. Validate access to the Vertex API over the Internet
log into instance, nat-client, and validate connectivity to Vertex AI through the use of dig and tcpdump against the domain us-central1-aiplatform.googleapis.com used to resolve Vertex APIs.
Log into nat-client using IAP in Cloud Shell to validate connectivity to the Vertex API by performing a dig against the vertex domain us-central1-aiplatform.googleapis.com
1
2
3
4
5
6
7
8
9
10
11
12
13
14
15
16
17
18
19
20
21
22
23
24
25
26
27
28
29
30
31
32
33
34
35
36
37
38
39
40
41
42
43
44
45
46
47
48
49
50
51
52
53
54
55
56
57
58
59
60
61
62
63
64
65
66
67
68
69
70
71
72
73
74
75
76
77
78
79
80
81
82
83
84
85
86
87
88
89
90
91
92
93
94
95
96
97
98
99
100
101
102
gcloud compute ssh nat-client \
  --project=$projectid --zone=us-central1-a --tunnel-through-iap

# Execute the dig.
user@nat-client:~$ dig us-central1-aiplatform.googleapis.com

# Example, note the Public IPs in the DNS response.
# ; <<>> DiG 9.16.42-Debian <<>> us-central1-aiplatform.googleapis.com
# ;; global options: +cmd
# ;; Got answer:
# ;; ->>HEADER<<- opcode: QUERY, status: NOERROR, id: 56761
# ;; flags: qr rd ra; QUERY: 1, ANSWER: 16, AUTHORITY: 0, ADDITIONAL: 1
# ;; OPT PSEUDOSECTION:
# ; EDNS: version: 0, flags:; udp: 512
# ;; QUESTION SECTION:
# ;us-central1-aiplatform.googleapis.com. IN A
# ;; ANSWER SECTION:
# us-central1-aiplatform.googleapis.com. 300 IN A 108.177.111.95
# us-central1-aiplatform.googleapis.com. 300 IN A 142.250.1.95
# us-central1-aiplatform.googleapis.com. 300 IN A 108.177.121.95
# us-central1-aiplatform.googleapis.com. 300 IN A 142.250.103.95
# us-central1-aiplatform.googleapis.com. 300 IN A 108.177.120.95
# us-central1-aiplatform.googleapis.com. 300 IN A 142.251.171.95
# us-central1-aiplatform.googleapis.com. 300 IN A 142.250.159.95
# us-central1-aiplatform.googleapis.com. 300 IN A 142.251.120.95
# us-central1-aiplatform.googleapis.com. 300 IN A 142.251.161.95
# us-central1-aiplatform.googleapis.com. 300 IN A 142.251.172.95
# us-central1-aiplatform.googleapis.com. 300 IN A 74.125.126.95
# us-central1-aiplatform.googleapis.com. 300 IN A 74.125.70.95
# us-central1-aiplatform.googleapis.com. 300 IN A 74.125.132.95
# us-central1-aiplatform.googleapis.com. 300 IN A 74.125.201.95
# us-central1-aiplatform.googleapis.com. 300 IN A 74.125.202.95
# us-central1-aiplatform.googleapis.com. 300 IN A 74.125.69.95

# ;; Query time: 4 msec
# ;; SERVER: 169.254.169.254#53(169.254.169.254)
# ;; WHEN: Thu Jun 29 01:35:57 UTC 2023
# ;; MSG SIZE  rcvd: 322


# From the nat-client OS, execute tcpdump to validate DNS resolution when performing a curl against the Online Prediction.
user@nat-client:~$ sudo tcpdump -i any port 53 -n
# Example:
# tcpdump: data link type LINUX_SLL2
# tcpdump: verbose output suppressed, use -v[v]... for full protocol decode
# listening on any, link-type LINUX_SLL2 (Linux cooked v2), snapshot length 262144 bytes


# Open a new Cloud Shell terminal by selecting the "+". Once the new tab is opened, update the project name variable.

# update the project name variable.
gcloud config list project
gcloud config set project [YOUR-PROJECT-NAME]
projectid=YOUR-PROJECT-NAME
echo $projectid

# Inside Cloud Shell two, perform a ssh to `nat-client` instance.
gcloud compute ssh --zone "us-central1-a" "nat-client" --project "$projectid"

# In the following section, you will create an instances.json file using sudo VI editor or nano and insert the data string used to obtain a prediction from the deployed model.

# From the `nat-client` OS, create a instances.json file with the data string below:
user@nat-client:$ more instances.json
{
  "instances": [
    [0.23, 'Ideal', 'E', 'VS2', 61.5, 55.0, 3.95, 3.98, 2.43],
    [0.29, 'Premium', 'J', 'Internally Flawless', 52.5, 49.0, 4.00, 2.13, 3.11]
  ]
}


# Obtain the Online Prediction Endpoint ID from Cloud Console that will be used in the subsequent steps.

# Navigate to VERTEX AI → ONLINE PREDICTION


# From the `nat-client` OS, create the following variables:
gcloud config list project
gcloud config set project [YOUR-PROJECT-NAME]
projectid=YOUR-PROJECT-NAME
echo $projectid
# ENDPOINT_ID="insert-the-endpoint-id-here"
ENDPOINT_ID="3328226095324463104"


# From the `nat-client` os, perform a curl to obtain a response from the model.
curl https://us-central1-aiplatform.googleapis.com/v1/projects/${projectid}/locations/us-central1/endpoints/${ENDPOINT_ID}:predict \
 -X POST -H "Authorization: Bearer $(gcloud auth print-access-token)" \
 -H "Content-Type: application/json"  \
 -d @instances.json

# Example, note the successful prediction.
# {
#   "predictions": [
#     "$479.0",
#     "$586.0"
#   ],
#   "deployedModelId": "1949163636186415104",
#   "model": "projects/234086459238/locations/us-central1/models/947543727654567936",
#   "modelDisplayName": "diamonds-cpr",
#   "modelVersionId": "1"
# }
16. Validation - Internet Access to Vertex API
Now that you executed the prediction, let’s take a look at the TCPDUMP results (terminal 1) that indicate the nat-client instance (192.168.10.2) performing a DNS query to the local dns server 169.254.169.254 for the Vertex AI domain us-central1-aiplatform.googleapis.com. The result of the DNS query are public Virtual IP Addresses (VIPS) for Vertex APIs as noted below:
1
2
3
4
5
6
7
8
9
10
11
12
user@nat-client:~$ sudo tcpdump -i any port 53 -n
tcpdump: data link type LINUX_SLL2
tcpdump: verbose output suppressed, use -v[v]... for full protocol decode
listening on any, link-type LINUX_SLL2 (Linux cooked v2), snapshot length 262144 bytes
20:05:09.260937 ens4  Out IP 192.168.10.2.40782 > 169.254.169.254.53: 47190+ A? oauth2.googleapis.com. (39)
20:05:09.260946 ens4  Out IP 192.168.10.2.40782 > 169.254.169.254.53: 28075+ AAAA? oauth2.googleapis.com. (39)
20:05:09.263556 ens4  In  IP 169.254.169.254.53 > 192.168.10.2.40782: 28075 4/0/0 AAAA 2607:f8b0:4001:c34::5f, AAAA 2607:f8b0:4001:c54::5f, AAAA 2607:f8b0:4001:c16::5f, AAAA 2607:f8b0:4001:c17::5f (151)
20:05:09.265018 ens4  In  IP 169.254.169.254.53 > 192.168.10.2.40782: 47190 16/0/0 A 74.125.201.95, A 74.125.202.95, A 74.125.69.95, A 64.233.183.95, A 173.194.193.95, A 173.194.194.95, A 173.194.195.95, A 173.194.196.95, A 173.194.197.95, A 64.233.191.95, A 173.194.74.95, A 173.194.192.95, A 209.85.145.95, A 209.85.146.95, A 209.85.147.95, A 142.250.125.95 (295)
20:05:09.474478 ens4  Out IP 192.168.10.2.57356 > 169.254.169.254.53: 36008+ A? us-central1-aiplatform.googleapis.com. (55)
20:05:09.474488 ens4  Out IP 192.168.10.2.57356 > 169.254.169.254.53: 47020+ AAAA? us-central1-aiplatform.googleapis.com. (55)
20:05:09.477190 ens4  In  IP 169.254.169.254.53 > 192.168.10.2.57356: 36008 16/0/0 A 173.194.194.95, A 173.194.195.95, A 173.194.196.95, A 173.194.197.95, A 173.194.74.95, A 173.194.192.95, A 209.85.145.95, A 209.85.146.95, A 209.85.147.95, A 142.250.125.95, A 142.250.136.95, A 142.250.148.95, A 209.85.200.95, A 209.85.234.95, A 142.250.152.95, A 142.250.128.95 (311)
20:05:09.478607 ens4  In  IP 169.254.169.254.53 > 192.168.10.2.57356: 47020 4/0/0 AAAA 2607:f8b0:4001:c1b::5f, AAAA 2607:f8b0:4001:c0c::5f, AAAA 2607:f8b0:4001:c0e::5f, AAAA 2607:f8b0:4001:c1e::5f (167)
17. Enable Private Access to Vertex APIs
In the following section, you will access Vertex APIs using Private Service Connect over hybrid networking (HA VPN) to privately reach the online prediction. In the example used in the tutorial, you will update the /etc/hosts file in the private-client instance.
In the on-premises environment updating a single or a handful of machines /etc/hosts file for testing is appropriate however for large scale and production environments creating a new forwarding zone using the PSC endpoint FQDN is more desirable.
As an example, the psc endpoint created in the tutorial is called pscvertex that translates to pscvertex.p.googleapis.com, when using the endpoint for vertex append the FQDN with the service e.g us-central1-aiplatform-pscvertex.p.googleapis.com.
Updating the on-premises DNS with the PSC endpoint also requires refactoring of local applications to call the FDQN e.g us-central1-aiplatform-pscvertex.p.googleapis.com instead of the native public endpoint us-central1-aiplatform.googleapis.com.
Clients that can be configured to use a custom endpoint can use the p.googleapis.com DNS names to send requests to an endpoint.
See the documentation for the client or client library for information about configuring it to use custom endpoints. For example:
- Python: You can configure api_endpoint in the Client options class in the google-api-core package.
- Go: You can configure WithEndpoint in the Client options package in the api package.
- gcloud: You can configure api_endpoint_overrides
Open a new Cloud Shell terminal by selecting the “+”. Once the new tab is opened, update the project name variable.
1
2
3
4
5
6
7
8
9
10
11
12
13
14
15
16
17
18
19
20
21
22
23
24
25
26
27
28
29
30
31
32
33
34
35
36
37
38
39
40
41
42
43
44
45
46
47
48
49
50
51
52
53
54
55
56
57
58
59
60
61
62
63
64
65
66
67
68
69
70
71
72
73
74
75
76
77
78
79
80
81
82
83
84
85
86
87
88
89
90
91
92
93
94
95
96
97
98
99
100
# From Cloud Shell.
gcloud config list project
gcloud config set project [YOUR-PROJECT-NAME]
projectid=YOUR-PROJECT-NAME
echo $projectid


# Log into `private-client` using IAP in a new Cloud Shell to validate connectivity to the Vertex API by performing a dig against the vertex domain us-central1-aiplatform.googleapis.com

From Cloud Shell, log into the `private-client` OS instance.
gcloud compute ssh private-client --project=$projectid --zone=us-central1-a --tunnel-through-iap


# Execute the dig.
user@private-client:~$ dig us-central1-aiplatform.googleapis.com
# ; <<>> DiG 9.16.42-Debian <<>> us-central1-aiplatform.googleapis.com
# ;; global options: +cmd
# ;; Got answer:
# ;; ->>HEADER<<- opcode: QUERY, status: NOERROR, id: 33311
# ;; flags: qr rd ra; QUERY: 1, ANSWER: 16, AUTHORITY: 0, ADDITIONAL: 1
# ;; OPT PSEUDOSECTION:
# ; EDNS: version: 0, flags:; udp: 512
# ;; QUESTION SECTION:
# ;us-central1-aiplatform.googleapis.com. IN A
# ;; ANSWER SECTION:
# us-central1-aiplatform.googleapis.com. 300 IN A 74.125.132.95
# us-central1-aiplatform.googleapis.com. 300 IN A 74.125.201.95
# us-central1-aiplatform.googleapis.com. 300 IN A 74.125.202.95
# us-central1-aiplatform.googleapis.com. 300 IN A 74.125.69.95
# us-central1-aiplatform.googleapis.com. 300 IN A 64.233.182.95
# us-central1-aiplatform.googleapis.com. 300 IN A 64.233.183.95
# us-central1-aiplatform.googleapis.com. 300 IN A 173.194.193.95
# us-central1-aiplatform.googleapis.com. 300 IN A 173.194.194.95
# us-central1-aiplatform.googleapis.com. 300 IN A 173.194.195.95
# us-central1-aiplatform.googleapis.com. 300 IN A 173.194.196.95
# us-central1-aiplatform.googleapis.com. 300 IN A 173.194.197.95
# us-central1-aiplatform.googleapis.com. 300 IN A 64.233.191.95
# us-central1-aiplatform.googleapis.com. 300 IN A 173.194.74.95
# us-central1-aiplatform.googleapis.com. 300 IN A 173.194.192.95
# us-central1-aiplatform.googleapis.com. 300 IN A 209.85.145.95
# us-central1-aiplatform.googleapis.com. 300 IN A 209.85.146.95
# ;; Query time: 4 msec
# ;; SERVER: 169.254.169.254#53(169.254.169.254)
# ;; WHEN: Sun Jul 02 20:5


# Update the `private-client` instance /etc/hosts using sudo VI editor or nano to create a record of the Vertext AI FQDN us-central1-aiplatform.googleapis.com pointing to the PSC endpoint 100.100.10.10, no further changes required.
user@private-client:~$ more /etc/hosts
# 127.0.0.1       localhost
# ::1             localhost ip6-localhost ip6-loopback
# ff02::1         ip6-allnodes
# ff02::2         ip6-allrouters
# 100.100.10.10   us-central1-aiplatform.googleapis.com
# 192.168.20.2    private-client.c.$projectid.internal private-client  # Added by Google
# 169.254.169.254 metadata.google.internal  # Added by Google


# From the `private-client` OS, perform a PING to the Vertex API endpoint.
# Example, PING returns the PSC endpoint IP yet no reply is expected.
user@private-client:~$ ping us-central1-aiplatform.googleapis.com
# PING us-central1-aiplatform.googleapis.com (100.100.10.10) 56(84) bytes of data.
# From the `private-client` OS, execute tcpdump to validate DNS resolution and IP datapath to the PSC endpoint when performing a curl against the Online Prediction.
sudo tcpdump -i any port 53 -n or host 100.100.10.10


# Open a fourth Cloud Shell terminal by selecting the "+". Once the new tab is opened, update the project name variable.


# update the project name variable.
gcloud config list project
gcloud config set project [YOUR-PROJECT-NAME]
projectid=YOUR-PROJECT-NAME
echo $projectid

# Inside Cloud Shell four, perform a ssh to `private-client` instance.
gcloud compute ssh --zone "us-central1-a" "private-client" --project "$projectid"


# In the following section, you will create an instances.json file using sudo VI editor or nano and insert the data string used to obtain a prediction from the deployed model.
# From the `private-client` OS, create a instances.json file with the data string below:
user@private-client:$ more instances.json
# {
#   "instances": [
#   [0.23, 'Ideal', 'E', 'VS2', 61.5, 55.0, 3.95, 3.98, 2.43],
#   [0.29, 'Premium', 'J', 'Internally Flawless', 52.5, 49.0, 4.00, 2.13, 3.11]
#   ]
# }

# From the `private-client` OS, create the following variables:
gcloud config list project
projectid=YOUR-PROJECT-NAME
echo $projectid
# ENDPOINT_ID="insert-the-endpoint-id-here"
ENDPOINT_ID="3328226095324463104"


# From the `private-client` OS in Cloud Shell four, perform a curl to obtain a response from the model.


curl -v -X POST -H "Authorization: Bearer $(gcloud auth print-access-token)" -H "Content-Type: application/json" https://us-central1-aiplatform.googleapis.com/v1/projects/${projectid}/locations/us-central1/endpoints/${ENDPOINT_ID}:predict -d @instances.json
18. Validation - Private Access to Vertex API
From the private-client OS in Cloud Shell four, note the PSC endpoint IP (100.100.10.10) was used to access Vertex API.
1
2
3
4
5
6
7
8
9
10
11
12
13
14
15
16
17
18
19
20
21
22
23
24
25
26
27
28
29
30
31
32
33
34
35
36
37
38
39
40
41
42
43
44
45
46
47
48
49
50
51
52
53
54
55
56
57
58
59
60
61
62
63
64
65
66
67
68
69
70
71
72
73
74
75
76
77
78
79
80
81
82
83
84
85
86
87
88
89
90
91
user@private-client$ curl -v -X POST -H "Authorization: Bearer $(gcloud auth print-access-token)" -H "Content-Type: application/json" https://us-central1-aiplatform.googleapis.com/v1/projects/${projectid}/locations/us-central1/endpoints/${ENDPOINT_ID}:predict -d @instances.json
# Note: Unnecessary use of -X or --request, POST is already inferred.
# *   Trying 100.100.10.10:443...
# * Connected to us-central1-aiplatform.googleapis.com (100.100.10.10) port 443 (#0)
# * ALPN, offering h2
# * ALPN, offering http/1.1
# * successfully set certificate verify locations:
# *  CAfile: /etc/ssl/certs/ca-certificates.crt
# *  CApath: /etc/ssl/certs
# * TLSv1.3 (OUT), TLS handshake, Client hello (1):
# * TLSv1.3 (IN), TLS handshake, Server hello (2):
# * TLSv1.3 (IN), TLS handshake, Encrypted Extensions (8):
# * TLSv1.3 (IN), TLS handshake, Certificate (11):
# * TLSv1.3 (IN), TLS handshake, CERT verify (15):
# * TLSv1.3 (IN), TLS handshake, Finished (20):
# * TLSv1.3 (OUT), TLS change cipher, Change cipher spec (1):
# * TLSv1.3 (OUT), TLS handshake, Finished (20):
# * SSL connection using TLSv1.3 / TLS_AES_256_GCM_SHA384
# * ALPN, server accepted to use h2
# * Server certificate:
# *  subject: CN=upload.video.google.com
# *  start date: May 29 08:21:36 2023 GMT
# *  expire date: Aug 21 08:21:35 2023 GMT
# *  subjectAltName: host "us-central1-aiplatform.googleapis.com" matched cert's "*.googleapis.com"
# *  issuer: C=US; O=Google Trust Services LLC; CN=GTS CA 1C3
# *  SSL certificate verify ok.
# * Using HTTP2, server supports multi-use
# * Connection state changed (HTTP/2 confirmed)
# * Copying HTTP/2 data in stream buffer to connection buffer after upgrade: len=0
# * Using Stream ID: 1 (easy handle 0x55f2ab65c2c0)
# > POST /v1/projects/$projectid/locations/us-central1/endpoints/3328226095324463104:predict HTTP/2
# > Host: us-central1-aiplatform.googleapis.com
# > user-agent: curl/7.74.0
# > accept: */*
# > authorization: Bearer ya29.a0AbVbY6NdCbIJYj0mQROeq-xYgQCw534TTtjRc1kBAEOimKCFxb3gqgD5AvhfefJatSNr33eW1YJirfQVMptFoqfjRoB-i8zEJJ_GGCVqhsVnpSOjK0hzJQSuo2YGjIiSe1o1zdo7lWmh1Px-vLe8FImieGkrQ1hqVaa6aCgYKAXgSARESFQFWKvPlUQ_FuKB2hrDJRyFDjupL1g0171
# > content-type: application/json
# > content-length: 154
# >
# * Connection state changed (MAX_CONCURRENT_STREAMS == 100)!
# * We are completely uploaded and fine
# < HTTP/2 200
# < content-type: application/json; charset=UTF-8
# < x-vertex-ai-internal-prediction-backend: harpoon
# < date: Mon, 03 Jul 2023 22:13:35 GMT
# < vary: X-Origin
# < vary: Referer
# < vary: Origin,Accept-Encoding
# < server: scaffolding on HTTPServer2
# < cache-control: private
# < x-xss-protection: 0
# < x-frame-options: SAMEORIGIN
# < x-content-type-options: nosniff
# < accept-ranges: none
# <
# {
#   "predictions": [
#     "$479.0",
#     "$586.0"
#   ],
#   "deployedModelId": "1949163636186415104",
#   "model": "projects/234086459238/locations/us-central1/models/947543727654567936",
#   "modelDisplayName": "diamonds-cpr",
#   "modelVersionId": "1"
# }
# * Connection #0 to host us-central1-aiplatform.googleapis.com left intact
# From the TCPDUMP terminal in Cloud Shell three, we can validate that a DNS lookup to us-central1-aiplatform.googleapis.com was not observed since the /etc/host file took precedence yet the PSC IP Address 100.100.10.10 was used in the data path.


# user@private-client:~$ sudo tcpdump -i any port 53 -n or host 100.100.10.10
# tcpdump: data link type LINUX_SLL2
# tcpdump: verbose output suppressed, use -v[v]... for full protocol decode
# listening on any, link-type LINUX_SLL2 (Linux cooked v2), snapshot length 262144 bytes
# 22:13:35.507625 ens4  Out IP 192.168.20.2.37004 > 169.254.169.254.53: 58585+ A? oauth2.googleapis.com. (39)
# 22:13:35.507631 ens4  Out IP 192.168.20.2.37004 > 169.254.169.254.53: 15580+ AAAA? oauth2.googleapis.com. (39)
# 22:13:35.511796 ens4  In  IP 169.254.169.254.53 > 192.168.20.2.37004: 58585 16/0/0 A 142.251.6.95, A 108.177.112.95, A 74.125.124.95, A 172.217.212.95, A 172.217.214.95, A 172.253.114.95, A 172.253.119.95, A 108.177.111.95, A 142.250.1.95, A 108.177.121.95, A 142.250.103.95, A 108.177.120.95, A 142.251.171.95, A 142.250.159.95, A 142.251.120.95, A 142.251.161.95 (295)
# 22:13:35.512002 ens4  In  IP 169.254.169.254.53 > 192.168.20.2.37004: 15580 4/0/0 AAAA 2607:f8b0:4001:c2b::5f, AAAA 2607:f8b0:4001:c18::5f, AAAA 2607:f8b0:4001:c5f::5f, AAAA 2607:f8b0:4001:c58::5f (151)
# 22:13:35.722145 ens4  Out IP 192.168.20.2.47304 > 100.100.10.10.443: Flags [S], seq 1951267724, win 65320, options [mss 1420,sackOK,TS val 1371205990 ecr 0,nop,wscale 7], length 0
# 22:13:35.730727 ens4  In  IP 100.100.10.10.443 > 192.168.20.2.47304: Flags [S.], seq 3198878726, ack 1951267725, win 65535, options [mss 1366,sackOK,TS val 67847676 ecr 1371205990,nop,wscale 8], length 0
# 22:13:35.730760 ens4  Out IP 192.168.20.2.47304 > 100.100.10.10.443: Flags [.], ack 1, win 511, options [nop,nop,TS val 1371205999 ecr 67847676], length 0
# 22:13:35.738339 ens4  Out IP 192.168.20.2.47304 > 100.100.10.10.443: Flags [P.], seq 1:518, ack 1, win 511, options [nop,nop,TS val 1371206006 ecr 67847676], length 517
# 22:13:35.739922 ens4  In  IP 100.100.10.10.443 > 192.168.20.2.47304: Flags [.], ack 518, win 261, options [nop,nop,TS val 67847688 ecr 1371206006], length 0
# 22:13:35.740860 ens4  In  IP 100.100.10.10.443 > 192.168.20.2.47304: Flags [.], seq 1:2709, ack 518, win 261, options [nop,nop,TS val 67847689 ecr 1371206006], length 2708
# 22:13:35.740863 ens4  In  IP 100.100.10.10.443 > 192.168.20.2.47304: Flags [P.], seq 2709:4699, ack 518, win 261, options [nop,nop,TS val 67847689 ecr 1371206006], length 1990
# 22:13:35.740874 ens4  Out IP 192.168.20.2.47304 > 100.100.10.10.443: Flags [.], ack 2709, win 497, options [nop,nop,TS val 1371206009 ecr 67847689], length 0
# 22:13:35.740886 ens4  Out IP 192.168.20.2.47304 > 100.100.10.10.443: Flags [.], ack 4699, win 485, options [nop,nop,TS val 1371206009 ecr 67847689], length 0
# 22:13:35.742709 ens4  Out IP 192.168.20.2.47304 > 100.100.10.10.443: Flags [P.], seq 518:598, ack 4699, win 501, options [nop,nop,TS val 1371206011 ecr 67847689], length 80
# 22:13:35.743996 ens4  Out IP 192.168.20.2.47304 > 100.100.10.10.443: Flags [P.], seq 598:644, ack 4699, win 501, options [nop,nop,TS val 1371206012 ecr 67847689], length 46
# 22:13:35.744011 ens4  Out IP 192.168.20.2.47304 > 100.100.10.10.443: Flags [P.], seq 644:693, ack 4699, win 501, options [nop,nop,TS val 1371206012 ecr 67847689], length 49
# 22:13:35.744082 ens4  Out IP 192.168.20.2.47304 > 100.100.10.10.443: Flags [P.], seq 693:728, ack 4699, win 501, options [nop,nop,TS val 1371206012 ecr 67847689], length 35
# 22:13:35.744165 ens4  Out IP 192.168.20.2.47304 > 100.100.10.10.443: Flags [P.], seq 728:1069, ack 4699, win 501, options [nop,nop,TS val 1371206012 ecr 67847689], length 341
# You have successfully validated connecting to online prediction through a public endpoint via the Internet and privately with the use of hybrid networking and **Private Service Connect** (googleapis). Exit from the OS returning to the Cloud Shell prompt.
19. Clean up
From Cloud Shell, delete tutorial components.
1
2
3
4
5
6
7
8
9
10
11
12
13
14
15
16
17
18
19
20
21
22
23
24
25
26
27
28
29
30
31
32
33
34
35
36
gcloud compute forwarding-rules delete pscvertex --global --quiet

gcloud compute instances delete workbench-tutorial --zone=us-central1-a --quiet

gcloud compute addresses delete psc-ip --global --quiet

gcloud compute networks subnets delete workbench-subnet --region=us-central1 --quiet

gcloud compute vpn-tunnels delete aiml-vpc-tunnel0 aiml-vpc-tunnel1 on-prem-tunnel0 on-prem-tunnel1 --region=us-central1 --quiet

gcloud compute vpn-gateways delete aiml-vpn-gw on-prem-vpn-gw --region=us-central1 --quiet

gcloud compute routers delete aiml-cr-us-central1 cloud-router-us-central1-aiml-nat --region=us-central1 --quiet

gcloud compute routers delete cloud-router-us-central1-on-prem-nat on-prem-cr-us-central1 --region=us-central1 --quiet

gcloud compute instances delete `nat-client` `private-client` --zone=us-central1-a --quiet

gcloud compute firewall-rules delete ssh-iap-`on-prem-vpc` --quiet

gcloud compute networks subnets delete nat-subnet  private-ip-subnet --region=us-central1 --quiet

gcloud compute networks delete `on-prem-vpc` --quiet

gcloud compute networks delete `aiml-vpc` --quiet
Delete Vertex Components

To delete the container image, navigate to Artifact Registry, select the repository you created, and select Delete

To delete the Storage Bucket, using the Navigation menu in the Cloud Console, browse to Storage, select the bucket, and click Delete:

Undeploy the model from the endpoint. Navigate to Vertex AI → Online prediction → Select diamonds-cpr_endpoint → Undeploy Model from endpoint → Undeploy

Delete the Model. Navigate to Vertex AI → Model Registry → Delete Model

Delete the Online prediction endpoint. Navigate to VertexAI → Online prediction → Select diamonds-cpr_endpoint → Delete endpoint
20. End
configured and validated connecting to Online Prediction natively using the Internet and privately with Private Service Connect and hybrid networking.
created a nat-client and private-client and used TCPDUMP to validate IP Addresses used to reach the Vertex APIs. In addition, you learned about Private Service Connect (googleapis) and how it can be used to isolate on-premises and multi-cloud applications by leveraging a customer PSC endpoint.
Comments powered by Disqus.