GCP - Compute migrate
Migration
Application Migration
- creating a VM, then using the container option, and then the advanced options to set the starting commands and environment variables.
- For something like Grafana I have setup a template, and use a group with a minimum instance of 1, then use the load balancer to provide certificate offloading.
在 Google 云平台上部署 ML 模型
本节中使用的代码可以在 /kurtispykes/gcp-deployment-example GitHub repo 中找到。
- 在 Google App Engine 上部署 ML 模型
predict.py
- 本模块中的步骤包括:
- 将持久化模型加载到内存中。
- 创建一个将一些输入作为参数的函数。
- 在函数中,将输入转换为 pandas DataFrame并进行预测。
1
2
3
4
5
6
7
8
9
10
11
12
13
14
15
16
import joblib
import pandas as pd

model = joblib.load("logistic_regression_v1.pkl")

def make_prediction(inputs):
    """
    Make a prediction using the trained model
    """
    inputs_df = pd.DataFrame(
        inputs,
        columns=["sepal_length_cm", "sepal_width_cm", "petal_length_cm", "petal_width_cm"]
    )
    predictions = model.predict(inputs_df)

    return predictions
main.py
- 推理逻辑必须封装在 web 服务中。用 Flask 包装模型。
- 在代码示例中创建了两个端点
- index:主页
- /predict:用于与部署的模型交互。
1
2
3
4
5
6
7
8
9
10
11
12
13
14
15
16
17
18
19
20
21
22
23
24
25
26
27
28
29
30
31
32
33
34
35
36
37
import numpy as np
from flask import Flask, request
from predict import make_prediction

app = Flask(__name__)

@app.route("/", methods=["GET"])
def index():
    """Basic HTML response."""
    body = (
        "<html>"
        "<body style='padding: 10px;'>"
        "<h1>Welcome to my Flask API</h1>"
        "</body>"
        "</html>"
    )
    return body

@app.route("/predict", methods=["POST"])
def predict():
    data_json = request.get_json()

    sepal_length_cm = data_json["sepal_length_cm"]
    sepal_width_cm = data_json["sepal_width_cm"]
    petal_length_cm = data_json["petal_length_cm"]
    petal_width_cm = data_json["petal_width_cm"]

    data = np.array(
      [
        [sepal_length_cm, sepal_width_cm, petal_length_cm, petal_width_cm]
      ]
    )
    predictions = make_prediction(data)
    return str(predictions)

if __name__ == "__main__":
    app.run()
app.yaml
- 其中包含用于运行应用程序的运行时。
1
runtime: python38
- 在 Google Cloud 控制台:
- 选择 App Engine
- 从 App Engine 页面,选择 Create Application
- App Engine
- 选择要在其中创建应用程序的区域。
- 将应用程序语言设置为 Python 并使用 Standard 环境。
- 在右上角,选择终端图标。这将激活cloud shell,这意味着您不必下载云 SDK 。
- 在部署应用程序之前,必须上载所有代码。从cloud shell中克隆此存储库。
- 将代码 URL 复制到剪贴板并导航回 GCP 上的cloud shell。向 shell 输入以下命令:
- git clone https://github.com/kurtispykes/gcp-deployment-example.git
- 输入以下命令导航到代码存储库:
- cd gcp-deployment-example/app_engine
- 接下来, initialize the application 。确保您选择了最近创建的项目。
- 部署应用程序。
- 从云 shell 运行以下命令。如果系统提示您继续,请输入Y。
- gcloud app deploy
- 部署完成后,您将获得服务部署位置的 URL 。
- 打开提供的 URL 以验证应用程序是否正常运行。您应该看到 欢迎使用我的 Flask API 消息。
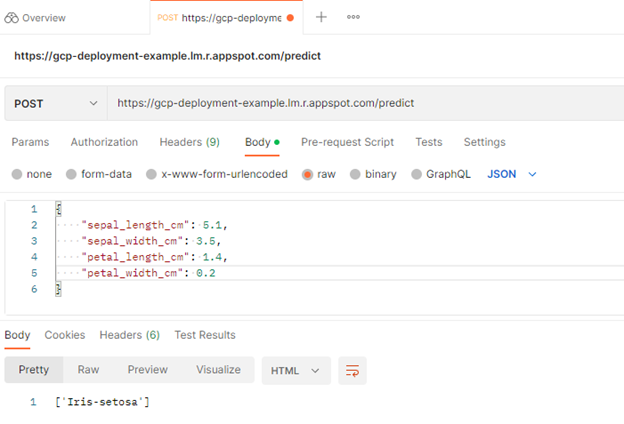
- 测试/predict端点。
- 使用 Postman 向/predict端点发送 POST 请求。
- 从那里,选择 Workspaces 、 My Workspace 、 New ,然后选择 HTTP Request 。
- 接下来,将 HTTP 请求从GET更改为POST,并在请求 URL 中插入到已部署服务的链接。
- 之后,导航到Body标头并选择raw,以便插入示例实例。选择send。
- 您向/predict端点发送了 POST 请求,其中包含一些定义模型输入的原始数据。在响应中,模型返回[‘Iris-setosa’],这是模型成功部署的积极指示。
在 Google Cloud Function 上部署 ML 模型
最明显的区别是不再从本地存储库导入序列化模型。相反,您正在调用 Google 云存储中的模型。
- 将模型上传到 Google 云存储
- 导航到 Cloud Storage 并选择 Buckets 、 Create Bucket 。命名为model-data-iris。
- 上传持久化模型。选择 Upload Files ,导航到存储模型的位置,然后选择它。
- 现在,您可以使用 Google Cloud 中的各种服务来访问此文件。要访问云存储,必须从google.cloud导入storage对象。
从 Google 云存储中访问模型
1
2
3
4
5
6
7
8
9
10
11
12
13
14
15
16
17
18
19
20
21
22
23
 import joblib
 import numpy as np
 from flask import request
 from google.cloud import storage

 storage_client = storage.Client()
 bucket = storage_client.get_bucket("model-iris-data")
 blob = bucket.blob("logistic_regression_v1.pkl")
 blob.download_to_filename("/tmp/logistic_regression_v1.pkl")
 model = joblib.load("/tmp/logistic_regression_v1.pkl")

 def predict(request):
     data_json = request.get_json()

     sepal_length_cm = data_json["sepal_length_cm"]
     sepal_width_cm = data_json["sepal_width_cm"]
     petal_length_cm = data_json["petal_length_cm"]
     petal_width_cm = data_json["petal_width_cm"]

     data = np.array([[sepal_length_cm, sepal_width_cm, petal_length_cm, petal_width_cm]])
     predictions = model.predict(data)

     return str(predictions)
- Cloud Functions
- Create Function 。
- 要求您启用 API 。选择 Enable 继续。
- 函数名称= Predict 。
- Trigger type = HTTP 。
- Allow unauthenticated invocations =已启用。
- 默认值是可以的,因此选择 Next 。
- 设置运行时并定义源代码的来源。
- 在 Runtime 部分,选择您正在使用的 Python 版本。
- 确保在源代码头中选择了 Inline Editor 。
- 复制并粘贴云函数用作 main.py 文件入口点的以下代码示例。
1
2
3
4
5
6
  {
 "sepal_length_cm" : 5.1,
 "sepal_width_cm" : 3.5,
 "petal_length_cm" : 1.4,
 "petal_width_cm" : 0.2
  }
- 使用内联编辑器更新 requirements.txt :
1
2
3
4
  flask >= 2.2.2, <2.3.0
  numpy >= 1.23.3, <1.24.0
  scitkit-learn >=1.1.2, <1.2.0
  google-cloud-storage >=2.5.0, <2.6.0
- 将 Entry point 值更改为端点的名称。
- 在这种情况下,它是predict。
- 完成所有更改后,选择 Deploy 。
- 部署可能需要几分钟的时间来安装依赖项并启动应用程序。
- 完成后,您会看到成功部署的模型的函数名称旁边有一个绿色的勾号图标。
- Create Function 。
- 现在,您可以在 Testing 选项卡上测试应用程序是否正常工作。
- 使用以下示例代码进行测试:
1
2
3
4
5
6
{
  "sepal_length_cm" : 5.1,
  "sepal_width_cm" : 3.5,
  "petal_length_cm" : 1.4,
  "petal_width_cm" : 0.2
}
- 使用以下示例代码进行测试:
- 使用此部署,您不必担心服务器管理。您的Cloud Function 仅在收到请求时执行,并且 Google 管理服务器。
在 Google AI 云上部署 ML 模型
之前的两个部署要求您编写不同程度的代码。在谷歌人工智能云上,你可以提供经过训练的模型,他们为你管理一切。
- 导航到 AI Platform 。
- 在 Models 选项卡上,选择 Create Model 。
- 选择一个区域。选择区域后,选择 Create Model 。为模型命名,相应地调整区域,然后选择 Create 。
- 转到创建模型的区域,您应该可以看到模型。选择型号并选择 Create a Version 。
接下来,将模型链接到云存储中存储的模型。本节有几个重要事项需要注意:
- AI 平台上scikit-learn的最新模型框架版本是 1.0.1 版,因此您必须使用此版本来构建模型。
- 模型必须存储为model.pkl或model.joblib。
为了遵守 GCP AI 平台的要求,我使用所需的模型版本创建了一个新的脚本,将模型序列化为model.pkl,并将其上传到谷歌云存储。有关更多信息,请参阅 /kurtispykes/gcp-deployment-example GitHub repo 中的更新代码。
- Model name: logistic_regression_model
- 选中 Use regional endpoint 复选框。
- Region: 欧洲西部 2
- 在 models 部分,确保仅选择 europe-west2 区域。
为要创建的模型版本选择 Save 。创建模型版本可能需要几分钟的时间。
- 通过选择模型版本并导航到 Test & Use 标题来测试模型。
- 输入输入数据并选择 Test 。
Google Cloud Run
- 应用打包成 Docker 之后,剩下的任务包括:
- 把镜像推送到 Google 镜像库。
- 运行 gcloud beta run deploy
- 只要几分钟,Cloud Run 就会使用一个可定制、可开放的域名启动新应用了。
示例:使用 Semaphore 进行持续部署, 为一个微服务配置 Serverless CI/CD Pipeline
- 运行自动测试;
- 构建 Docker 容器;
- 将容器镜像推入 Google 镜像库;
- 提供到 Cloud Run 预备环境的一键部署;
- 在对 Master 分支的构建成功之后;自动部署到 Cloud Run 生产环境。
semaphore
可以在 Github 上找到相关的全部代码。
- 启用 Cloud Run
- 中启用 Cloud Run API;
- 安装 Google Cloud SDK;
- 使用 gcloud components install beta 安装 Beta 组件。
- 应用容器化
- Dockerfile 将一个简单的 Sinatra 应用打包
注意如果使用你自己的 Dockerfile,必须开放 8080 端口,否则可能会看到错误:
1
2
3
4
5
6
7
8
9
10
11
12
13
14
15
FROM ruby:2.5

RUN apt-get update -qq && apt-get install -y build-essential
ENV APP_HOME /app

RUN mkdir $APP_HOME
WORKDIR $APP_HOME

ADD Gemfile* $APP_HOME/
RUN bundle install --without development test
ADD . $APP_HOME

EXPOSE 8080

CMD ["bundle", "exec", "rackup", "--host", "0.0.0.0", "-p", "8080"]
- 登录 Google Cloud 和 GCR
- 要在 CI/CD Pipeline 中自动地将镜像推送到 GCR,需要在 Semaphore 中登录到 Google Cloud。
- 为了安全起见,需要在 Semaphore 中根据 Google Cloud Service account 的认证密钥创建一个 Secret。
- 获取认证密钥之后,在 Semaphore 中用 Secret 的形式上传到 Semaphore。假设文件名是 .secrets.gcp.json:
- sem create secret google-cloud-stg –file ~/Downloads/account-name-27f3a5bcea2d.json:.secrets.gcp.json
定义分发管线
编写一个 Pipeline 来构建、标记并推送镜像到 GCR 了:
1
2
3
4
5
6
7
8
9
10
11
12
13
14
15
16
17
18
19
20
21
22
23
24
25
26
27
28
29
30
31
32
33
34
35
36
37
38
39
40
41
42
43
44
# .semaphore/docker-build.yml
# This pipeline runs after semaphore.yml
version: v1.0
name: Docker build
agent:
  machine:
    # Use a machine type with more RAM and CPU power for faster container
    # builds:
    type: e1-standard-4
    os_image: ubuntu1804
blocks:
  - name: Build
    task:
      # Mount a secret which defines an authentication key file.
      # For info on creating secrets, see:
      # - https://docs.semaphoreci.com/article/66-environment-variables-and-secrets
      # - https://docs.semaphoreci.com/article/72-google-container-registry-gcr
      secrets:
        - name: google-cloud-stg
      jobs:
      - name: Docker build
        commands:
          # Authenticate using the file injected from the secret
          - gcloud auth activate-service-account --key-file=.secrets.gcp.json
          # Configure access to container registry, silence confirmation prompts with -q
          - gcloud auth configure-docker -q
          - checkout
          # Tag the images with gcr.io/ACCOUNT_PROJECT_NAME/SERVICE_NAME pattern
          # Use Git SHA to produce unique artifacts
          - docker build -t "gcr.io/semaphore2-stg/semaphore-demo-cloud-run:${SEMAPHORE_GIT_SHA:0:7}" .
          - docker push "gcr.io/semaphore2-stg/semaphore-demo-cloud-run:${SEMAPHORE_GIT_SHA:0:7}"

promotions:
  # Deployment to staging can be trigger manually:
  - name: Deploy to staging
    pipeline_file: deploy-staging.yml

  # Automatically deploy to production on successful builds on master branch:
  - name: Deploy to production
    pipeline_file: deploy-production.yml
    auto_promote_on:
      - result: passed
        branch:
          - master
在 deploy-staging.yml 和 deploy-production.yml 中包含了同样的步骤,区别只是服务的名称。
1
2
3
4
5
6
7
8
9
10
11
12
13
14
15
16
17
18
19
20
21
22
# .semaphore/deploy-production.yml
# This pipeline runs after docker-build.yml
version: v1.0
name: Deploy to production
agent:
  machine:
    type: e1-standard-2
    os_image: ubuntu1804
blocks:
  - name: Deploy to production
    task:
      secrets:
        - name: google-cloud-stg
      jobs:
      - name: run deploy
        commands:
          - gcloud auth activate-service-account --key-file=.secrets.gcp.json
          - gcloud auth configure-docker -q

          # Deploy to Cloud Run, using flags to avoid interactive prompt
          # See https://cloud.google.com/sdk/gcloud/reference/beta/run/deploy
          - gcloud beta run deploy markoci-demo-cloud-run --project semaphore2-stg --image gcr.io/semaphore2-stg/markoci-demo-cloud-run:${SEMAPHORE_GIT_SHA:0:7} --region us-central1
- 上线运行
- 在本地终端或者 Semaphore 作业的日志中,最后一行会包含一个应用运行的网址:
- https://semaphore-demo-cloud-run-ud2bmvsmda-uc.a.run.app.
- 用浏览器打开这个网址会看到:forbidden
- 这是因为还没有完成最后一步:在 Google Cloud Run 控制台中开放服务
- 完成之后的浏览页面:hello
App migrate
Setup:
Set Up the GCP Environment:
Install Google Cloud SDK
Authenticate and set the project:
1
2
3
Copy code
gcloud auth login
gcloud config set project [The_PROJECT_ID]
- Enable Vertex AI API
- Enable the Vertex AI API in your project:
1
gcloud services enable aiplatform.googleapis.com
- Enable the Vertex AI API in your project:
Set Up Authentication and Permissions
Ensure that the service account used by your Cloud Run service has the necessary permissions. Assign the required roles to the service account.
Create a Service Account:
1
2
3
gcloud iam service-accounts create vertex-ai-sa \
    --description="Service account for Vertex AI access" \
    --display-name="Vertex AI Service Account"
Grant the necessary roles to the service account: For accessing the Vertex AI, you might need roles like roles/aiplatform.admin or roles/aiplatform.user.
1
2
3
gcloud projects add-iam-policy-binding [YOUR_PROJECT_ID] \
    --member="serviceAccount:vertex-ai-sa@[YOUR_PROJECT_ID].iam.gserviceaccount.com" \
    --role="roles/aiplatform.user"
<!–
Create a key for the service account:
1
2
gcloud iam service-accounts keys create key.json \
    --iam-account=vertex-ai-sa@[YOUR_PROJECT_ID].iam.gserviceaccount.com
- Store Service Account Key in Secret Manager
Enable Secret Manager API:
1
gcloud services enable secretmanager.googleapis.com- Create a new secret and store the service account key:
1
gcloud secrets create vertex-ai-sa-key --data-file=key.json
Grant the Secret Accessor role to the Cloud Run service account:
bash gcloud projects add-iam-policy-binding [YOUR_PROJECT_ID] \ --member="serviceAccount:[YOUR_CLOUD_RUN_SERVICE_ACCOUNT]" \ --role="roles/secretmanager.secretAccessor"–>
Upload the Configuration Files:
- Create a Cloud Storage bucket:
1
gsutil mb gs://[YOUR_BUCKET_NAME]/
- Upload your configuration file to the bucket:
1
gsutil cp tests/java-cwe/myconfig.yaml gs://[YOUR_BUCKET_NAME]/
- Create a Cloud Storage bucket:
On Container:
Build and Push Your Docker Image to Google Container Registry (GCR):
- Tag your Docker image:
1
docker tag [YOUR_IMAGE] gcr.io/[YOUR_PROJECT_ID]/my_app:latest - Authenticate with GCR:
1
gcloud auth configure-docker
- Push your Docker image to GCR:
1
docker push gcr.io/[YOUR_PROJECT_ID]/my_app:latest
- Tag your Docker image:
Create a Script to Run Inside the Container:
Create a script run_my_app.sh:
1
2
3
4
5
6
7
8
9
10
11
12
13
14
15
16
17
18
19
20
21
22
23
24
25
26
#!/bin/bash

# Initialize Google Cloud Logging
pip install google-cloud-logging
python -c "from google.cloud import logging; logging_client = logging.Client(); logging_client.setup_logging()"

# Download configuration file from Cloud Storage
gsutil cp gs://[YOUR_BUCKET_NAME]/my_app.yaml /app/my_app.yaml

# Log the start of the operation
echo "Starting my_app evaluation" | logger -s

# Run the command
my_app eval --config /app/my_app.yaml \
  --no-cache \
  --output /app/output-my_app-1.csv \
  --delay 100

# Log the completion of the operation
echo "Completed my_app evaluation" | logger -s

# Upload the output file to Cloud Storage
gsutil cp /app/output-my_app-1.csv gs://[YOUR_BUCKET_NAME]/

# Log the file upload completion
echo "Uploaded output file to Cloud Storage" | logger -s
1
2
3
4
5
6
7
8
9
10
11
12
13
14
15
16
17
18
19
20
21
22
23
24
25
26
27
28
29
30
31
32
33
34
35
36
37
38
39
40
41
import logging
from google.cloud import logging as cloud_logging
import subprocess
import os

# Initialize Google Cloud Logging
cloud_logging_client = cloud_logging.Client()
cloud_logging_client.setup_logging()

# Set up logging
logger = logging.getLogger()
logger.setLevel(logging.INFO)

def run_command(command):
    process = subprocess.Popen(command, shell=True, stdout=subprocess.PIPE, stderr=subprocess.PIPE)
    stdout, stderr = process.communicate()
    return process.returncode, stdout, stderr

# Download configuration file from Cloud Storage
logger.info("Downloading configuration file from Cloud Storage")
return_code, stdout, stderr = run_command("gsutil cp gs://[YOUR_BUCKET_NAME]/my_app.yaml /app/my_app.yaml")
if return_code != 0:
    logger.error(f"Failed to download configuration file: {stderr.decode()}")
    exit(1)

# Run the command
logger.info("Starting my_app evaluation")
return_code, stdout, stderr = run_command("my_app eval --config /app/my_app.yaml --no-cache --output /app/output-my_app-1.csv --delay 1000")
if return_code != 0:
    logger.error(f"Failed to run my_app: {stderr.decode()}")
    exit(1)
logger.info(f"my_app evaluation completed: {stdout.decode()}")

# Upload the output file to Cloud Storage
logger.info("Uploading output file to Cloud Storage")
return_code, stdout, stderr = run_command("gsutil cp /app/output-my_app-1.csv gs://[YOUR_BUCKET_NAME]/")
if return_code != 0:
    logger.error(f"Failed to upload output file: {stderr.decode()}")
    exit(1)
logger.info("Output file uploaded successfully")
Update Your Python Script to Handle HTTP Requests:
- Use Flask to create a simple web server that handles HTTP requests and executes the command with the provided parameters.
1
2
3
4
5
6
7
8
9
10
11
12
13
14
15
16
17
18
19
20
21
22
23
24
25
26
27
28
29
30
31
32
33
34
35
36
37
38
39
40
41
42
43
44
45
46
47
48
49
50
51
52
53
54
55
56
57
58
59
60
61
62
63
64
65
66
67
68
69
70
71
72
73
74
75
import logging
from google.cloud import logging as cloud_logging
from google.cloud import aiplatform
from flask import Flask, request, jsonify
import subprocess
import os
import json

# Initialize Google Cloud Logging
cloud_logging_client = cloud_logging.Client()
cloud_logging_client.setup_logging()

# Set up logging
logger = logging.getLogger()
logger.setLevel(logging.INFO)

# Function to get access token
def get_access_token():
    metadata_server_token_url = 'http://metadata/computeMetadata/v1/instance/service-accounts/default/token'
    token_request_headers = {'Metadata-Flavor': 'Google'}
    token_response = requests.get(metadata_server_token_url, headers=token_request_headers)
    token_response.raise_for_status()
    return token_response.json()['access_token']

def run_command(command):
    process = subprocess.Popen(command, shell=True, stdout=subprocess.PIPE, stderr=subprocess.PIPE)
    stdout, stderr = process.communicate()
    return process.returncode, stdout, stderr

app = Flask(__name__)

@app.route('/run', methods=['POST'])
def run():
    # Get parameters from the request
    config = request.json.get('config', '/app/my_app.yaml')
    no_cache = request.json.get('no_cache', True)
    output = request.json.get('output', '/app/output-my_app-1.csv')
    delay = request.json.get('delay', 1000)

    # Download configuration file from Cloud Storage
    logger.info("Downloading configuration file from Cloud Storage")
    return_code, stdout, stderr = run_command(f"gsutil cp gs://[YOUR_BUCKET_NAME]/{config} /app/my_app.yaml")
    if return_code != 0:
        logger.error(f"Failed to download configuration file: {stderr.decode()}")
        return jsonify({'status': 'error', 'message': 'Failed to download configuration file', 'details': stderr.decode()}), 500

    # Build the my_app command
    no_cache_flag = '--no-cache' if no_cache else ''
    command = f"my_app eval --config /app/my_app.yaml {no_cache_flag} --output {output} --delay {delay}"

    # Get the access token
    access_token = get_access_token()
    os.environ['VERTEX_API_KEY'] = access_token

    # Run the command
    logger.info(f"Starting my_app evaluation with command: {command}")
    return_code, stdout, stderr = run_command(command)
    if return_code != 0:
        logger.error(f"Failed to run my_app: {stderr.decode()}")
        return jsonify({'status': 'error', 'message': 'Failed to run my_app', 'details': stderr.decode()}), 500

    logger.info(f"my_app evaluation completed: {stdout.decode()}")

    # Upload the output file to Cloud Storage
    logger.info("Uploading output file to Cloud Storage")
    return_code, stdout, stderr = run_command(f"gsutil cp {output} gs://[YOUR_BUCKET_NAME]/")
    if return_code != 0:
        logger.error(f"Failed to upload output file: {stderr.decode()}")
        return jsonify({'status': 'error', 'message': 'Failed to upload output file', 'details': stderr.decode()}), 500

    logger.info("Output file uploaded successfully")
    return jsonify({'status': 'success', 'message': 'Output file uploaded successfully'})

if __name__ == '__main__':
    app.run(host='0.0.0.0', port=8080)
Create a requirements.txt File:
- List the dependencies for the Python script.
1
2
3
Flask==2.1.1
google-cloud-logging==3.0.0
google-cloud-aiplatform
- List the dependencies for the Python script.
Modify Your Dockerfile to Include the Script:
Add the script to your Docker image and set it as the entry point.
Make sure the Google Cloud Logging library is installed.
1
2
3
4
5
6
7
8
9
10
11
12
13
14
15
16
17
18
19
20
21
FROM python:3.8-slim

# Install dependencies
COPY requirements.txt /app/requirements.txt
RUN pip install --no-cache-dir -r /app/requirements.txt

# Copy the application
COPY run_my_app.sh /app/run_my_app.sh
RUN chmod +x /app/run_my_app.sh

# Set default environment variables
ENV VERTEX_API_KEY=""
ENV VERTEX_PROJECT_ID=""
ENV VERTEX_REGION="us-central1"
ENV my_app_DISABLE_TELEMETRY="true"

# Set the working directory
WORKDIR /app

# Run the application
ENTRYPOINT ["/app/run_my_app.sh"]
- Rebuild and Push Your Docker Image:
- Build your Docker image:
1
docker build -t gcr.io/[YOUR_PROJECT_ID]/my_app:latest .
- Push your Docker image to GCR:
1
docker push gcr.io/[YOUR_PROJECT_ID]/my_app:latest
- Create a Docker Repository in Artifact Registry to store your Docker images.
1
2
3
4
gcloud artifacts repositories create [REPOSITORY_NAME] \
   --repository-format=docker \
   --location=[LOCATION] \
   --description="Docker repository"
- Configure Docker to Authenticate with Artifact Registry to use your Google credentials for pushing and pulling images.
1
gcloud auth configure-docker [LOCATION]-docker.pkg.dev - Update Your Docker Commands to Use Artifact Registry, Modify your Docker build and push commands to use the Artifact Registry path.
1
2
docker build -t [LOCATION]-docker.pkg.dev/[YOUR_PROJECT_ID]/[REPOSITORY_NAME]/my_app:latest .
docker push [LOCATION]-docker.pkg.dev/[YOUR_PROJECT_ID]/[REPOSITORY_NAME]/my_app:latest
- Build your Docker image:
Deploy/Update to Google Cloud Run Service:
- Deploy your Docker image to Cloud Run:
1
2
3
4
5
6
7
gcloud run deploy my_app-service \
    --image gcr.io/[YOUR_PROJECT_ID]/my_app:latest \
    --image [LOCATION]-docker.pkg.dev/[YOUR_PROJECT_ID]/[REPOSITORY_NAME]/my_app:latest \
    --platform managed \
    --region [YOUR_PREFERRED_REGION] \
    --allow-unauthenticated
# Note the URL provided after deployment. This is your Cloud Run service URL.
1
2
3
4
5
6
7
gcloud run deploy my_app-service \
    --image gcr.io/[YOUR_PROJECT_ID]/my_app:latest \
    --platform managed \
    --region [YOUR_PREFERRED_REGION] \
    --allow-unauthenticated \
    --update-secrets "VERTEX_AI_SA_KEY=vertex-ai-sa-key:latest" \
    --port 8080
- Deploy your Docker image to Cloud Run:
Trigger the Cloud Run Service:
You can now trigger the Cloud Run service by making an HTTP request to the service URL.
- This can be done manually via curl or programmatically via any HTTP client.
1
curl -X POST [CLOUD_RUN_SERVICE_URL]
- trigger the Cloud Run service by making an HTTP POST request with JSON payload containing the parameters.
1
2
3
4
5
6
7
8
curl -X POST [CLOUD_RUN_SERVICE_URL]/run \
 -H "Content-Type: application/json" \
 -d '{
     "config": "my_app.yaml",
     "no_cache": true,
     "output": "/app/output-my_app-1.csv",
     "delay": 1000
 }'
- Access Logs in Google Cloud Console:
- Go to the Logging section:
- Select Logging from the sidebar, then select Log Viewer.
- Filter Logs:
- In the Log Viewer, you can filter logs by resource type (Cloud Run Revision) and the specific service (my_app-service).
- View Logs:
- You should see logs for each request and execution of your Cloud Run service, including any logs written by your application using logger.
On VM:
Prepare a GCP Virtual Machine (VM):
- Create a VM instance:
1
2
3
4
5
gcloud compute instances create my_app-vm \
    --machine-type=e2-medium \
    --image-project=debian-cloud \
    --image-family=debian-11 \
    --scopes=https://www.googleapis.com/auth/cloud-platform
- SSH into the VM:
1
gcloud compute ssh my_app-vm
- Create a VM instance:
Install Required Software on the VM:
- Update and install dependencies:
1
2
sudo apt-get update
sudo apt-get install -y python3-pip
- Install my_app (assuming it’s a Python package, replace if necessary):
1
pip3 install my_app - Install Google Cloud Storage client library:
1
pip3 install google-cloud-storage
- Update and install dependencies:
Download Your Configuration File from Cloud Storage:
- upload the files:
1
gcloud compute scp ./test/myconfig.yaml my_app-vm:~/
- Create a script download_files.sh:
1
2
#!/bin/bash
gsutil cp gs://[YOUR_BUCKET_NAME]/myconfig.yaml ~/
- Upload the script and make it executable:
1 2 3
gcloud compute scp download_files.sh my_app-vm:~/ gcloud compute ssh my_app-vm chmod +x ~/download_files.sh - Run the script to download the configuration file:
1
~/download_files.sh
- upload the files:
Run the Command on the VM:
- SSH into the VM
1
2
3
4
5
gcloud compute ssh my_app-vm
my_app eval --config ~/myconfig.yaml \
  --no-cache \
  --output ~/output-config-1.csv \
  --delay 1000
- SSH into the VM
Transfer Output File to Google Cloud Storage:
1
 gsutil cp ~/output-config-1.csv gs://[YOUR_BUCKET_NAME]/
Automate the Process with a Script (Optional):
- Create a script run_my_app.sh:
1
2
3
4
5
6
7
#!/bin/bash
my_app eval --config ~/config.yaml \
  --no-cache \
  --output ~/output-config-1.csv \
  --delay 1000

gsutil cp ~/output-config-1.csv gs://[YOUR_BUCKET_NAME]/
- Upload the script and make it executable:
1 2 3
gcloud compute scp run_my_app.sh my_app-vm:~/ gcloud compute ssh my_app-vm chmod +x ~/run_my_app.sh - Run the script:
1
~/run_my_app.sh
- Create a script run_my_app.sh:
Schedule the Script (Optional):
- Use cron to schedule the script:
1
2
crontab -e
0 0 * * * ~/run_my_app.sh
- Use cron to schedule the script:
.
Comments powered by Disqus.