Meow's Testing Tools - Postman
Postman
Postman basic
- 网页调试工具
- 用户在开发或者调试网络程序/网页B/S模式的程序的时候是需要一些方法来
跟踪网页请求,一些网络的监视工具比如著名的Firebug等网页调试工具。 - postman 可以
- 调试简单的css、html、脚本等简单的网页基本信息
- 可以发送几乎所有类型的HTTP请求, Chrome插件类产品中的代表产品之一。
特点:
- 创建 + 测试:创建和发送任何的HTTP请求,请求可以保存到历史中再次执行
- Organize: 使用
Collections为更有效的测试 及 集成工作流管理和组织APIs - document: 依据创建的
Clollections自动生成API文档,并将其发布成规范的格式 - collarorate: 通过同步 连接你的team和你的api,以及权限控制,API库
Postman provides a variety of views and controls for managing your API projects.

Postman的操作环境
postman适用于不同的操作系统,Postman Mac、Windows X32、Windows X64、Linux系统,还支持postman 浏览器扩展程序、postman chrome应用程序等。
官方英文文档 ‘
Postman install
下载地址:
Postman安装
postman的安装方法分好几种:
- chrome postman 插件安装
- postman谷歌浏览器的安装插件,所以说它的使用前提是你的电脑上得安装谷歌浏览器才行
- Postman电脑客户端安装
- macOS安装
- Windows安装
- Linux安装
Navigating Postman
main modes:
- Build and Browse using the control at the bottom-right of the app, or the top-left on the web.
- Build mod: the primary interface for working with API requests. 快速创建几乎所有的请求
HTTP请求的4部分: URL,request method,headers,body。
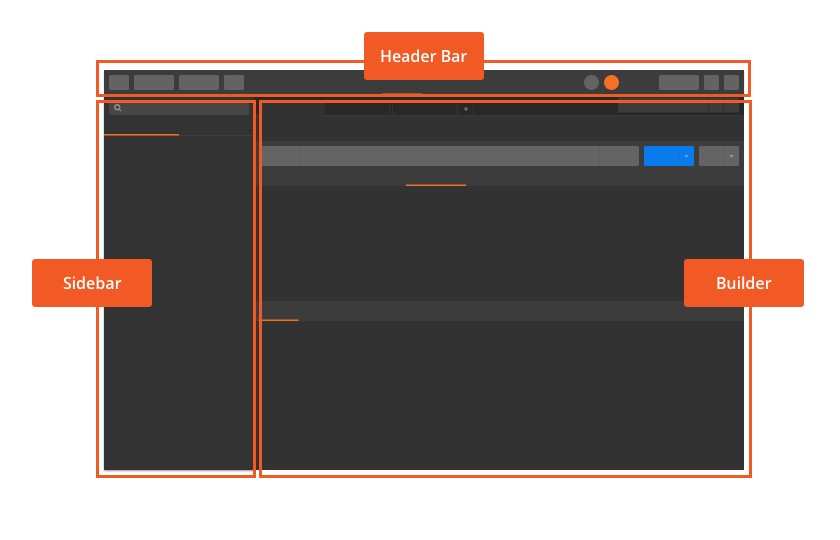
- sidebar provides access to your request history, collections, and APIs.
- header
- create and import requests and collections,
- to access the Collection Runner,
- to move and invite collaborators to workspaces,
- access the Interceptor, view sync status / notifications,
- open your Settings, account, and Postman plan.
- The status bar along the bottom allows you to show/hide the sidebar, find and replace, and open the console on the left.
- On the right you can launch the Bootcamp, toggle between Build and Browse mode, toggle pane view, open keyboard shortcuts, and access help resources.
resize the panes in the Postman UI.
- declutter your workspace by collapsing panes using the arrow button—click the collapsed section to reopen it.
- hide the sidebar and toggle between single and two pane view.

Find and replace
- search the Postman workspace by clicking Find and Replace at the bottom-left of Postman
- the keyboard shortcuts
Command + SHIFT + F/Control + SHIFT + F. - Enter your search string and optionally choose which entities to return, entering replacement text if necessary.
- Postman will search tabs, collections, and variables.
- click directly from the search results to open an entity.

History
- access a history of the requests you’ve made in Postman in History on the left of Postman.
- history will sync across devices.
- Click a request to open it again.
- Click + to save the request to a collection.
- Toggle Save Responses to save request responses so that you can view what was returned by a request when you open it from your history.
- The View more actions menu allows you to
save, monitor, document, or mock a request. - Use the delete (trash icon) or Clear all options to remove requests from your history.
- multi-select requests by pressing
CommandorControland clicking the requests.

Tabs
- send requests in Postman by opening tabs—click + in the center of the screen, or press
Command/Control + T.

If you open a request and do not edit or send it, then open another, the first tab will be replaced by the second. While the tab is in Preview mode it will display in italics.
- can have multiple tabs open at the same time as you work, and can drag tabs to rearrange them. Use the … button to manage tabs and access recent tabs.
Duplicating a tab does not mean creating a second request to the same endpoint—when you duplicate a tab any edits you make will affect the original request.
Postman will display a dot on any tabs with unsaved changes.
- A tab may indicate a conflict if you or a collaborator changes it in another tab or workspace.
- Postman will prompt you to resolve any conflicts that occur.
You can toggle whether Postman opens requests in new tabs or not in the Settings, as well as configuring whether Postman prompts you when closing tabs with unsaved changes.
Next steps
The best way to get to know Postman is by firing up the Bootcamp on the bottom-right and working through the lessons.

You can also access Bootcamp together with other resources for getting started and staying up to date by opening Launchpad—you’ll see a button when you have no open tabs.

接口请求流程
Each API request uses an HTTP method. The most common methods are GET, POST, PATCH, PUT, and DELETE.
GETmethods retrieve data from an API.POSTsends new data to an API.PATCHandPUTmethods update existing data.DELETEremoves existing data.
In Postman you can make API requests and examine the responses without using a terminal or writing any code.
- When you create a request and click Send, the API response appears inside the Postman user interface.


1
2
3
4
5
6
7
8
9
10
11
12
13
14
15
16
17
postman-echo.com/get

{
    "args": {},
    "headers": {
        "x-forwarded-proto": "http",
        "x-forwarded-port": "80",
        "host": "postman-echo.com",
        "x-amzn-trace-id": "Root=1-5fbc10c4-2b1fe7686b5d211975ddd574",
        "user-agent": "PostmanRuntime/7.26.8",
        "accept": "*/*",
        "cache-control": "no-cache",
        "postman-token": "8f289d40-e514-4b91-a923-de4b63c1860c",
        "accept-encoding": "gzip, deflate, br"
    },
    "url": "https://postman-echo.com/get"
}
GET 请求
1
2
3
GET请求:
点击Params,输入参数及value,可输入多个,即时显示在URL链接上,
GET请求的请求头与请求参数如在接口文档中无特别声明时,可以不填。
这里会有请求的响应状态码,响应时间,以及响应大小
响应体示例: 响应的格式可以有多种, 一般情况下,自定义接口是 json格式的响应体
POST请求
- POST请求一:表单提交
下图示例中设置了请求方法,请求URL,请求参数,但是没有设置请求头 在我的使用过程中,请求头是根据请求参数的形式自动生成的 请求头中的Content-Type与请求参数的格式之间是有关联关系,比如:
- POST请求二:json提交
下图中,当我们选择JSON(application/json) 是会自动帮我们设置 headers 为 application/json 在这里就不截图 举例了,朋友们可以自行去查看
- POST请求三:xml提交
- POST请求四:二进制文件提交
其它请求方式如PUT,DELETE 大致流程和GET,POST 差不多,这里就不一一举例说明了
管理用例—Collections
在POST基础功能那里有一张图片大致说了一下Collections 的作用, 这里我们再详细说明一下
Collections集合:也就是将多个接口请求可以放在一起,并管理起来。
- 接口请求可以放在同一个collection里
- 一个工程一个Collection,这样方便查找及统一处理数据。
创建Collections > + > Name:”abc” > Description:”demo” > Create Collections.
在Collections里添加请求
在右侧准备好接口请求的所有数据,并验证后,点击save按钮。
保存好之后就可以在这里看到啦,之后要再次调用时可以点击这里,方便快捷
collections 管理精细化, 这里我们针对不同的请求方式做分组
添加子文件夹
精细化划分之后的结果:
身份验证Authentication**
- Basic Auth
- 是基础的验证,所以会比较简单
- 会直接把用户名、密码的信息放在请求的 Header 中
- Digest Auth
- 要比Basic Auth复杂的多。
- 使用当前填写的值生成authorization header。
- 所以在生成header之前要确保设置的正确性。
- 如果当前的header已经存在,postman会移除之前的header。
- OAuth 1.0
- postman的OAuth helper让你签署支持OAuth
- 1.0基于身份验证的请求。OAuth不用获取access token,你需要去API提供者获取的。
- OAuth 1.0可以在header或者查询参数中设置value。
- OAuth 2.0
- postman支持获得OAuth 2.0 token并添加到requests中。
extension
1
2
3
4
5
6
7
8
9

# install jython
brew install jython

echo "export JYTHON_HOME=/usr/local/Cellar/jython/2.7.2/libexec" | tee -a ~/.bash_profile; source ~/.bash_profile

JAVA_HOME = /Library/Java/JavaVirtualMachines/jdk1.8.0_181.jdk/Contents/Home
.
Comments powered by Disqus.